EVT vs EVTX
Windows XP is no longer supported by Microsoft, but there are still XP
and 2003 systems out there, and as such, some of us are still going to
need to know the difference between Event Logs (XP, 2003), and Windows
Event Logs (Vista+).
Besides the binary differences in the records and Event Log files
themselves, on XP/2003, there were three main Event Log files; System,
Application, and Security. On my Windows 7 system, a 'dir' of the winevt\Logs folder reports 143 files. So, there is a LOT
of information being recorded by default on a Windows 7 system; while
not all of it may be useful to you, there is a great deal of information
that can be extracted from the logs when used properly.
Wevtx.bat
When I released Windows Forensic Toolkit 4/e, one of the things included in the additional materials is a batch file, wevtx.bat. What the batch file does is use LogParser to parse a directory full of .evtx files, and then parse those entries into TLN format for inclusion in a timeline. The tool evtxparse.exe,
used by the batch file, makes use of a mapping file (i.e.,
eventmap.txt) to map event source/ID pairs to an artifact category tag.
As such, when the entry in written to a timeline, records such as
"Microsoft-Windows-Security-Auditing/4624" are prepended with an
appropriate tag (i.e., "[Logon]"), based on the artifact category.
I really love this tool! What I like about it is that it's easy to
update (eventmap.txt is just a text file), I can add comments to it to
show the source of the information I used to map an event record to
something specific, and it acts as a fantastic little repository for all
of my past experiences. Not only is it a great repository, but it's
incorporated right into the tools that I use on just about every
engagement.
Records
Here are some of the event source/ID pairs that I've found to be useful
during investigations, for such things as malware detection, determining
the window of compromise, etc. I'll say up front that these
records are not 100% infallible, and may not have extremely high
fidelity (some do, others don't...), but they've worked quite well for
me at one time or another, so I'll share them here.
Microsoft-Windows-DNS-Client/1014
– DNS name resolution timeout; I've used this one more than once to
help demonstrate that malware was on a system, even in the face of
anti-forensics techniques (time stomping the malware files, deleting the
malware files, etc.). It's not a 100%, infallible indicator, but it's
worked for me more than once. What has also helped is when this
event record was seen; in a timeline, I could see that it occurred
shortly after a user logged into a laptop, and before the user connected
the system to a WAP. This helped me narrow down the persistence
mechanism for the malware.
Microsoft-Windows-Security-Auditing/4720 - user account created; because the bad guys do this from time to time.
McLogEvent/257 – McAfee malware detection - McAfee AV may detect
malware behaviors (i.e., run from a Temp folder, etc.) without actually
detecting the EXE itself. This can be very valuable in helping you
determine how malware got onto a system. Also, the AV product may be
configured to warn only, and take no action..so, correlate the event
records (UTC) to the entries in the McAfee logs (local system time)
Microsoft-Windows-Windows Defender/3004 – Windows Defender malware detection
Service Control Manager/7045 – A service was installed on the system
Service Control Manager/7030 – A service is configured to interact with the desktop
Microsoft-Windows-TaskScheduler/106 - New Scheduled Task registration
Beyond individual event records (source/ID pairs), one of the aspects of
the newer versions of Windows (in particular, Windows 7) is that there
are a lot of events that are being recorded by default, across multiple
Event Log files. What I mean is that when some events occur, multiple
event records are recorded, often across different Event Log files. For
example, when a user logs into a system at the console, there will be
an event recorded in the Security Event Log, a couple in the Microsoft-Windows-TerminalServices-LocalSessionManager/Operational.evtx log, and a couple of events will also be recorded in the Microsoft-Windows-TaskScheduler/Operational.evtx
log. Alone, each of these individual events may get little attention
from an analyst, but when placed together in a timeline, they leave an
indelible mark indicating that a user logged into the system.
Now, what's really great about this is that some of the Event Logs "roll
over" faster than others. As such, some of the source/ID pairs that
are part of an indicator cluster may have been expired from their
respective Event Logs. However, the remaining source/ID pairs in the
cluster will still provide a very good indicator that that event in
question took place. This is particular useful for infrequent events,
and I've used this information more than once to demonstrate repeated
activity going back weeks and even months prior to what was thought to
be the date of interest.
Anti-Forensics
Event auditing is one of those things that just happens in the
background on Windows systems. This is great, because sometimes Event
Log records can help us determine if anti-forensics techniques have been
employed. For example, using Event Log records, you can determine if
someone has changed the system time.
During an exam, I found that a system had been infected with malware
that installed as a Windows service, and during the installation
process, the .exe file had been time-stomped. Fortunately, when the
malicious service was installed, an event source/ID pair of "Service Control Manager/7045"
was created, indicating that a new service had been installed on the
system. I was able to correlate that information with other sources
(MFT, etc.) to better determine the correct time of when the malicious
.exe was created on the system, and nail down the infection vector.
Carving
If you need to carve Windows Event Log records, for any reason...from
unallocated space, memory, the pagefile, whatever...the tool to use is
Willi Ballentin's EVTXtract.
The "tool" is really a set of Python scripts that you run consecutively
against the data in order to recover Windows Event Log records. I've
used these scripts a couple of times, and even had a fellow team member
use them on an engagement and quite literally recover the "smoking gun".
When carving for deleted records on a Windows XP or 2003 system, I use a
custom Perl script that I wrote that's based on some of the code I've
released with my books.
Timelines
When all this is said and done, a blog post on just individual Windows Event Log records isn't really
all that valuable. Yes, I've created timelines from just a handful of
*.evtx files, for use in triage, etc. This has proved to be extremely
valuable to me.
Resources
WindowsIR: Timeline Analysis
SANS Reading Room: Detecting Security Events Using Windows Workstation Event Logs
NSA: Spotting the Adversary with Windows Event Log Monitoring
Fuente: http://windowsir.blogspot.com/2014/10/windows-event-logs.html
Mostrando entradas con la etiqueta windows. Mostrar todas las entradas
Mostrando entradas con la etiqueta windows. Mostrar todas las entradas
Search history on Windows 8 and 8.1
Etiquetas:
Forense,
windows
0
comentarios
Windows 8 introduced a new feature of saving previously searched
terms/keywords. I am refering to the Windows Search functionality which
moved from the Start-menu in Windows 7 to the Charms bar in Windows 8.
Search terms are saved on a per user basis. In Windows 8, this is stored as an MRU (Most Recently Used) list in the NTUSER.dat file under the key:
Software\Microsoft\Windows\CurrentVersion\Explorer\SearchHistory\Microsoft.Windows.FileSearchApp
\Users\\AppData\Local\Microsoft\Windows\ConnectedSearch\History
They are stored as individual link (LNK) files. Each link file holds a single previously searched for keyword (or phrase).
The format of this link file is similar to the one we are familiar with from earlier versions of windows, however, no dates or other details typically seen in link files are included. All it contains is a link header and a shell item id list. The shell item id list contains the keyword/phrase searched for. Current link file parser scripts/tools will not be able to parse this correctly as they are either not parsing the Shell item id list or not (yet) looking for this specific information. (A shell item id list is seen in many places in the registry, one of the more popular artifacts that uses it is the 'shell bags').
As seen in figure 3 above, this link file has the same header as well as
basic format. The link guid at offset 0x4 is also the same. Link flags
(0x80) indicate only a Shell Item Id List will be present and all other
fields are blank (zero). The shell item id list contains a single
property identified by guid '{F29F85E0-4FF9-1068-AB91-08002B27B3D9}'.
This guid identifies the Microsoft Office Summary Information
Properties. Only a single value is populated and that is the
keyword/phrase searched for.
Fuente: http://www.swiftforensics.com/2014/04/search-history-on-windows-8-and-81.html
Search terms are saved on a per user basis. In Windows 8, this is stored as an MRU (Most Recently Used) list in the NTUSER.dat file under the key:
Software\Microsoft\Windows\CurrentVersion\Explorer\SearchHistory\Microsoft.Windows.FileSearchApp
 |
| Figure 1 - Search history (MRU) in Windows 8 registry |
Windows 8.1
On Windows 8.1 this has changed! These entries are no longer stored in the registry, instead they are stored on disk at:\Users\
They are stored as individual link (LNK) files. Each link file holds a single previously searched for keyword (or phrase).
 |
| Figure 2 - Search history in Windows 8.1 stored as LNK files |
The format of this link file is similar to the one we are familiar with from earlier versions of windows, however, no dates or other details typically seen in link files are included. All it contains is a link header and a shell item id list. The shell item id list contains the keyword/phrase searched for. Current link file parser scripts/tools will not be able to parse this correctly as they are either not parsing the Shell item id list or not (yet) looking for this specific information. (A shell item id list is seen in many places in the registry, one of the more popular artifacts that uses it is the 'shell bags').
 |
| Figure 3 - Search history LNK file showing searched term 'enscript' |
Forensic Importance
From a forensic perspective, this ties a search keyword to a user and a date. This means that we now know the date and time when a particular user searched for a specific keyword on the machine. The last modified timestamp gives us the first time that keyword is searched and it does not get updated after, even if the search is repeated. On my machines, all 4 timestamps (created, accessed, modified, entry modified) hold the same value for a single file (see figure 2 above) and don't seem to get updated/altered once created.Fuente: http://www.swiftforensics.com/2014/04/search-history-on-windows-8-and-81.html

Office 2013: More MRUs
Etiquetas:
Forense,
windows
0
comentarios
Microsoft Office 2013 continues to yield very interesting artifacts related to user activity. Harlan recently posted about the "PendingChanges" subkeys in relation to PowerPoint, and I have previously posted about MS Word's "Reading Locations" subkeys as well as the last saved location
metadata in Excel 2013 spreadsheets. The registry, specifically the
NTUSER.DAT hive, has been particularly interesting in terms of the
Office 2013-related information it stores.
In Harlan's earlier post, he identified references to the PowerPoint
presentation he had opened in PowerPoint 2013 in the "File MRU" and
"Place MRU" subkeys of
"HKEY_CURRENT_USER\Software\Microsoft\Office\15.0\Excel\User
MRU\LiveId_xxx". The "File MRU" and "Place MRU" subkeys appear to track
files and directories recently accessed by the application, with the
"Item 1" value corresponding to the most recently accessed item, "Item
2" the next most recently accessed, etc..
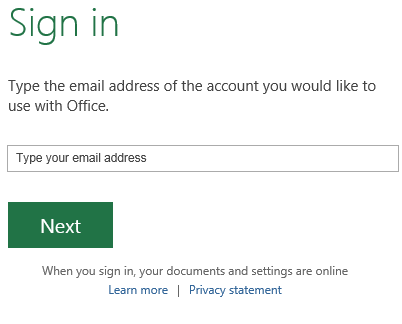 |
| Office 2013 Sign in Option |
Interestingly, it appears that a new LiveId_xxx subkey is created each time a new Live ID account is signed in to through the Office 2013 interface. Based on my limited testing thus far, the File and Place MRUs of each LiveId_xxx subkey appear to be updated independently from one another (updates depend on which Live ID account is signed in) as well as independent from the File and Place MRUs maintained when a user is not signed into a Live ID account. This means that you could see multiple sets of File and Place MRUs per application, all within a single NTUSER.DAT hive!
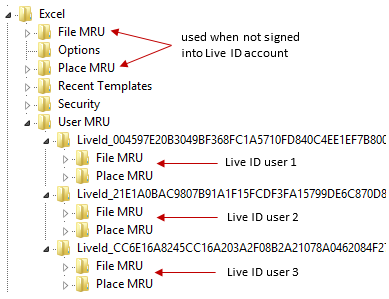 |
| HKEY_CURRENT_USER\Software\Microsoft\Office\15.0\Excel Subkey |
As Harlan mentioned in his previous post, each Item # value in the File
and Place MRU subkeys should contain data similar to
"[F00000000][T01CF2DF40FEB4220][O00000000]*Z:\Files\Presentation1.pptx",
with the value in the second set of brackets being a FILETIME structure
that corresponds to the last time the file or directory was accessed
from the application. This means that not only do we have an
independent File and Place MRU subkey for each Live ID account that
signed in to the system (as well as a File and Place MRU for when the
user is not signed into a Live ID account), but we are also provided
with the last time each item within each MRU list was accessed.
Regardless of whether a Live ID account was signed in or which Live ID
account was used to access a file, usage history still appears to be
recorded in the familiar RecentDocs subkey as well as the application's
associated jump list. These artifacts can serve to provide a file
access history (regardless of the Live ID account used to access the
file) as well as to help correlate and confirm data located in other
artifacts.
Based on initial testing, the File and Place MRU list per Live ID
account does not appear to be updated properly on Windows 7 running
Office 2013. More research will be necessary to determine the
value and reliability of this artifact under Windows 7. The majority of
my testing as it relates to the File and Place MRUs has been with
Windows 8.1, which appears to be consistent in updating the appropriate
MRU list. I've only tested the addition of Live ID-associated File and
Place MRUs with Word, Excel, and PowerPoint 2013, so the differences in
MRUs as compared to previous versions of Office likely extend beyond
these three applications.
Fuente:
http://dfstream.blogspot.com/2014/02/office-2013-more-mrus.html
Links:
http://wp.ofl.me/index.php?p=2020
http://wp.ofl.me/index.php?p=2040
http://wp.ofl.me/index.php?p=2022
http://wp.ofl.me/index.php?p=2022
Obteniendo una shell mediante Paint
Etiquetas:
paint,
shell,
windows
0
comentarios

Para tener un mejor control de estos movimientos estas son las combinaciones a realizar.
1er píxel
- Rojo: 10
- Verde: 0
- Azul: 0
2º píxel
- Rojo: 13
- Verde: 10
- Azul: 13
3er píxel
- Rojo: 100
- Verde: 109
- Azul: 99
4º píxel
- Rojo: 120
- Verde: 101
- Azul: 46
5º píxel
- Rojo: 0
- Verde: 0
- Azul: 101
6º píxel
- Rojo: 0
- Verde: 0
- Azul: 0
Consideraciones forenses en 32 y 64 bits
Etiquetas:
Forense,
windows
0
comentarios

Hola lectores,
Desde mediados de los años 90 casi todos los ordenadores que se han
vendido, han sido con equipos con arquitectura de 32 bits, y en su
mayoría han venido preinstalado con Windows. Después del lanzamiento de
Windows 7, las ventas de equipos con Windows de 64 bits han aumentado
considerablemente.
El precio de un ordenador con arquitectura de 64 bits ha disminuido
tanto que son casi tan baratos como equipos de 32 bits. Y la gente
preferirá equipos de 64 bits ya que puede manejar mucho más memoria
(RAM).
Un equipo de 32 bits con Windows de 32 bits (valga la redundancia) puede
usar un máximo de 3 a 4 GB (RAM) de memoria, sobre todo en torno a 3
GB, debido a que una gran parte del espacio de direcciones es usado por
las tarjetas de vídeo y otros dispositivos tales como tarjetas de red,
tarjetas de sonido, etc. Con los ordenadores de 64 bits se puede
manejar mucha más memoria RAM como por ejemplo 192 GB.
En el momento de evolución de Windows 32 a 64 muchas cosas se han ido adaptando en la arquitectura del sistema operativo, muchas de ellas evidentemente no se ven por su implantación y otras están a simple vista como las carpetas del sistema operativo.
En el momento de evolución de Windows 32 a 64 muchas cosas se han ido adaptando en la arquitectura del sistema operativo, muchas de ellas evidentemente no se ven por su implantación y otras están a simple vista como las carpetas del sistema operativo.
SYSTEM32 vs SysWOW64
Lo que voy a decir puede llevar a la confusión, pero son definiciones dadas por el propio Microsoft.
Aunque parezca lo contrario, la carpeta System32 está destinada a archivos de 64 bits y la carpeta SysWOW64 está diseñada para archivos de 32 bits. Aunque esto puede no parecer lógico, tiene que ver con la compatibilidad de los programas y programadores de aplicaciones.
Aunque parezca lo contrario, la carpeta System32 está destinada a archivos de 64 bits y la carpeta SysWOW64 está diseñada para archivos de 32 bits. Aunque esto puede no parecer lógico, tiene que ver con la compatibilidad de los programas y programadores de aplicaciones.
Cuando se ejecuta una aplicación de 32 bits en un entorno de 64 bits, se
produce un redireccionamiento de forma transparente siempre y cuando la
aplicación intente acceder al directorio SYSTEM32 o al registro de
windows. Este redireccionamiento lo implementa una capa de
compatibilidad llamada WOW64.
WOW64 es una abreviatura de "Windows on Windows 64-bit" (se puede leer
como "Windows de 32 bits en Windows de 64-bit"). Es un emulador que
permite a las aplicaciones basadas en Windows de 32 bits se ejecuten sin
problemas en Windows de 64 bits.
Para implementar esto, WOW64 intercepta todas las llamadas al sistema de
las claves de registro abiertas y reescribe la ruta para que apunte a
dos ramas del registro, como son, HKLM\Software y HKEY_CLASSES_ROOT.
Bajo cada una de estas ramas, WOW64 crea una clave llamada Wow6432Node.
En esta clave se almacena la información de configuración de 32 bits
Todas las demás partes del Registro son compartidos entre las
aplicaciones de 32 bits y de 64 bits (por ejemplo, HKLM y SYSTEM).
Es muy importante que un archivo compilado a 32 bits o 64 bits se
instale en la carpeta de sistema correcto. De lo contrario, el programa
que necesita el archivo no será capaz de cargar el archivo y
probablemente no funcione como se espera.
DOS VERSIONES, DOS CARPETAS Y UNA EJECUCIÓN TRANSPARENTE
A modo de recordatorio:
| Nombre de la carpeta | BITS | Descripción |
| System32 | 64 | Carpeta del sistema de Windows (directorio del sistema) para archivos de 64 bits |
| SysWOW64 | 32 | Carpeta del sistema de Windows (directorio del sistema) para archivos de 32 bits |
| Archivos de programa | 64 | Carpeta para los archivos de programa de 64 bits |
| Archivos de programa (x86) | 32 | Carpeta para los archivos de programa de 32 bits |
¿PERO ESTO ES UN PROBLEMA DESDE EL ÁMBITO FORENSE?
Puede que sí, puede que no. Veamos un caso concreto:
Supongamos que tenemos un malware de nombre 'malware.exe' y que tiene el siguiente hash:
d41d8cd98f00b204e9800998ecf8427e
Ahora vamos a copiar el fichero a las carpetas SYSTEM32 y SysWOW64.
Una vez copiados calculamos sus huellas y efectivamente vemos que coinciden, pero he aquí el problema:
¿Que ocurre si copiamos un fichero del mismo nombre y con diferente tamaño?. EL hash debería de ser identico.
Veamos los resultados...

Una vez copiados calculamos sus huellas y efectivamente vemos que coinciden, pero he aquí el problema:
¿Que ocurre si copiamos un fichero del mismo nombre y con diferente tamaño?. EL hash debería de ser identico.
Veamos los resultados...
Es el mismo HASH...¿como es posible?.
Efectivamente tenemos un mismo hash en diferentes directorios y con diferentes ficheros. ¿Es problema de colisiones MD5?. De ninguna manera, eso debido a que el programa md5sum de 32 bits intentó leer el archivo del directorio 'Win32\malware.exe', el sistema operativo 'se percata' y de forma transparente redirigió a 'C:\Windows\SysWOW64\malware.exe' obteniendo el mismo resultado.
Es decir, pogamos el caso de un malware diseñado para un entorno de 32 bits que se ejecuta en un sistema de 64 bits, esto implicaría que parte de los cambios que se van a producir en el registro se van a realizar en sobre la clave 'HKLM\SOFTWARE\Wow6432Node'. Esto además permitiria falsear la búsqueda en aquellas herramientas forenses de 32 bits en un entorno de 64. Lo cual a su vez falsearía las evidencias en un informe.
Por lo tanto una revisión 'normal' por medio de un análisis forense o
bien utilizando indicadores de contenido (IOCs) se saltaría este paso
dado que tengamos claro que ocurre una redirección, es decir, tenemos
que tener en cuenta que hay que revisar ambos directorios y utilizar
herramientas que soporten ambas arquitecturas y por su puesto la
siguiente clave (entre otras)
'SOFTWARE\Wow6432Node\Microsoft\Windows\CurrentVersion\Run'
Por lo tanto es indispensable la revisión de estas carpetas y sus contenidos.
¿ESTAMOS PERDIDOS?. ¿PODEMOS ANALIZAR Y AUTOMATIZAR EL PROCESO?.
¡¡Por su puesto que tiene solución!!. Una buena herramienta para este
análisis es utilizar la herramienta REGRIPPER, ya que analiza claramente
estas carpetas y verifica las ramas del registro anteriormente
mencionadas. Por otro lado otra herramienta como Registry Browser
permite ver las diferencias en las modificaciones del registro
contemplando los métodos de redirecciones.
Lo dicho, no os olvideis de revisar el sistema dependiendo de la arquitectura.
Lo dicho, no os olvideis de revisar el sistema dependiendo de la arquitectura.
Fuente: http://conexioninversa.blogspot.com/2014/07/consideraciones-forenses-en-32-y-64-bits.html
Windows 8 and 8.1: Search Charm History
Etiquetas:
Forense,
windows
0
comentarios
The upcoming release of Windows 8.1 offers new features that will add to
and/or modify the forensic artifacts available for examination. One of
these additions is the "Search Everywhere" feature that allows a user
to search his or her files, settings, apps, and even the Internet at the
same time. In contrast, Windows 8 restricts a user to searching within
a single category of data at a time (files, settings, apps). The new
search feature of 8.1 introduces artifacts not available in Windows 8
and provides examiners with another source of search charm data. This
post will discuss artifacts available in both Windows 8 and 8.1 as a
result of the user conducting searches via the Windows search charm.
In order to utilize the "Search Everywhere" feature of Windows 8.1, the
user must run a search using the Windows search charm, a feature
introduced with Windows 8. This is not the same as conducting a search
using Windows Explorer and leaves a different set of artifacts.
When a user runs a search using the search charm in Windows 8, specifically selecting "Files" as the search category, the search term is added as a value to an MRU list (maintained by an MRUListEx value) in the user's NTUSER.DAT under \Software\Microsoft\Windows\CurrentVersion\Explorer\SearchHistory\ Microsoft.Windows.FileSearchApp. If the "Settings" or "Apps" category is selected, the search term does not appear to be added as a value to the MRU list (nor is a separate subkey created in the SearchHistory key).
Windows 8.1 also utilizes the SearchHistory key to maintain an MRU list of search terms, but within the SearchHistory\EXPLORER.EXE subkey instead. Additionally, it appears that all search terms executed using the search charm are stored as a value here (as opposed to only the terms executed against the "Files" category). An MRUListEx value is used to maintain the list here as well and the search term itself is stored in Unicode as type REG_BINARY.
In addition to the SearchHistory subkey, it appears that Windows 8.1 maintains another set of artifacts in the form of LNK files in the user's AppData\Local\Microsoft\Windows\ ConnectedSearch\History directory. Interestingly, the LNK files associated with the search charm history that I've examined consist of only the LNK header and a shell item ID list containing the search term. This means that if your tool does not parse shell item ID lists, it will not extract the search term from these files. The LNK files I've examined that are associated with the search charm do not contain embedded FILETIME timestamps in the LNK header or DOSDate timestamps in the shell item ID list. Further, if the user runs the same search term at a later date, there appears to be no change to the file content or file system timestamps of the LNK file. This means that the file system timestamps associated with these files can only be used to identify the first time a particular search was conducted.
The search charm LNK files could be quite useful during an examination, despite the fact that the search terms are also stored in the user's NTUSER.DAT. For example, these files can help determine a specific time that each search term was used, provide additional artifacts to support that a particular search term was/wasn't used, and may be useful if the user has taken steps to remove his or her search charm history. When the search charm history is cleared (via search & apps settings), the entire SearchHistory subkey and the LNK files in the ConnectedSearch\History directory are deleted. The existence of these LNK files provides another possible avenue to recover previously used search terms. One thing to note with respect to these files is that they are likely to be resident, given the fact that they contain only the LNK header and a small shell item ID list.
The testing I've conducted with regard to the Windows 8 and 8.1 search charm history has been with the default settings. The Preview version of Windows 8.1 Professional was used for all testing related to 8.1. At the time of this writing, the option to search the Internet using Bing is not a default option and thus was not tested. It will be interesting to see if/how this option changes the artifacts available to an examiner. At any rate, the Windows search charm, both with and without the "Search Everywhere" feature, provides additional forensic artifacts to help examiners piece together user activity in a Windows environment.
Fuente: http://dfstream.blogspot.com/2013/09/windows-8-and-81-search-charm-history.html
 |
| Windows 8.1 Search Charm |
 |
| Windows 8 Search Charm |
When a user runs a search using the search charm in Windows 8, specifically selecting "Files" as the search category, the search term is added as a value to an MRU list (maintained by an MRUListEx value) in the user's NTUSER.DAT under \Software\Microsoft\Windows\CurrentVersion\Explorer\SearchHistory\ Microsoft.Windows.FileSearchApp. If the "Settings" or "Apps" category is selected, the search term does not appear to be added as a value to the MRU list (nor is a separate subkey created in the SearchHistory key).
Windows 8.1 also utilizes the SearchHistory key to maintain an MRU list of search terms, but within the SearchHistory\EXPLORER.EXE subkey instead. Additionally, it appears that all search terms executed using the search charm are stored as a value here (as opposed to only the terms executed against the "Files" category). An MRUListEx value is used to maintain the list here as well and the search term itself is stored in Unicode as type REG_BINARY.
In addition to the SearchHistory subkey, it appears that Windows 8.1 maintains another set of artifacts in the form of LNK files in the user's AppData\Local\Microsoft\Windows\ ConnectedSearch\History directory. Interestingly, the LNK files associated with the search charm history that I've examined consist of only the LNK header and a shell item ID list containing the search term. This means that if your tool does not parse shell item ID lists, it will not extract the search term from these files. The LNK files I've examined that are associated with the search charm do not contain embedded FILETIME timestamps in the LNK header or DOSDate timestamps in the shell item ID list. Further, if the user runs the same search term at a later date, there appears to be no change to the file content or file system timestamps of the LNK file. This means that the file system timestamps associated with these files can only be used to identify the first time a particular search was conducted.
The search charm LNK files could be quite useful during an examination, despite the fact that the search terms are also stored in the user's NTUSER.DAT. For example, these files can help determine a specific time that each search term was used, provide additional artifacts to support that a particular search term was/wasn't used, and may be useful if the user has taken steps to remove his or her search charm history. When the search charm history is cleared (via search & apps settings), the entire SearchHistory subkey and the LNK files in the ConnectedSearch\History directory are deleted. The existence of these LNK files provides another possible avenue to recover previously used search terms. One thing to note with respect to these files is that they are likely to be resident, given the fact that they contain only the LNK header and a small shell item ID list.
The testing I've conducted with regard to the Windows 8 and 8.1 search charm history has been with the default settings. The Preview version of Windows 8.1 Professional was used for all testing related to 8.1. At the time of this writing, the option to search the Internet using Bing is not a default option and thus was not tested. It will be interesting to see if/how this option changes the artifacts available to an examiner. At any rate, the Windows search charm, both with and without the "Search Everywhere" feature, provides additional forensic artifacts to help examiners piece together user activity in a Windows environment.
Fuente: http://dfstream.blogspot.com/2013/09/windows-8-and-81-search-charm-history.html
Simple Python Keylogger for Windows
Etiquetas:
keyloggers,
windows
0
comentarios
Un keylogger realizado en no mas de 15 lineas de código simple y
funcional me parecio interesante como con un par de lineas de codigo se
puede realizar un Keylogger esta más que claro que es necesario algunos
paquetes adicionales pero la idea loca esta de perilla como se dice,
lastima no tuve la oportunidad de hacer la prueba por mi cuenta ni ver
si es detectable o no por los antivirus pero para jugar esta mas que
bien, espero alguien pueda hacer la prueba el código y realize el
comentario respectivo dar las gracias a la cuenta de @PythonBolivia fue que dí al video.
Fuente: http://www.sniferl4bs.com/2014/09/simple-python-keylogger-for-windows.html
Seguridad en Windows: DEP y Setdllcharacteristics
Etiquetas:
seguridad,
windows
0
comentarios
Buenas a todos, como muchos ya sabréis, desde Windows Vista en adelante
contamos con una serie de medidas de seguridad muy interesantes para
protegernos frente al código malicioso, y que os hemos ido comentando a
lo largo de los últimos años. Una de esas medidas más interesantes es
DEP, que ayuda a impedir daños en el equipo producidos por malware y
otras amenazas, garantizando (más o menos) que utilizan la memoria del
sistema de forma segura. Si un programa intenta ejecutar código de la
memoria de forma incorrecta, DEP lo cierra.
Normalmente DEP es habilitado por los desarrolladores a través del bit
"nxcompat" durante la compilación, si desean que el software tenga dicha
protección (y si son compatibles claro). Podemos comprobarlo con
PEStudio por ejemplo. Pero puede pasar que a los programadores se les
olvide activar DEP en un software, o lo que también es muy probable, no
tengan ni la más remota idea de que son esas tres letras...
En casos como el comentado, si sabemos que el programa puede ser
compatible con DEP, pero no se encuentra activado, podemos forzar su uso
activando el citado bit. Para ello tenemos varias posibilidades, que
pasan desde modificar el binario con un editor hexadecimal, hasta
utilizar alguna herramienta automática para realizar dicha tarea. Una de
estas herramientas es setdllcharacteristics, de Didier Stevens:
Setdllcharacteristics se encuentra escrito en C, y os permitirá activar DEP (y ASLR como veremos otro día):

Podéis descargar la herramienta desde el siguiente enlace:
Su uso es muy sencillo, y basta con lanzarlo desde una consola, con los
parámetros +n (activación de DEP) o +d (activación de ASLR)
setdllcharacteristics +n +d programa.exe
Os dejo finalmente el hash de la aplicación, por si os la descargáis de un sitio diferente al del autor:
MD5: F96358BF90AA4D8C6B32968B2068BFCB
Saludos!
Fuente: http://www.flu-project.com/2014/07/seguridad-en-windows-dep-y.html
Auditando eventos de nuestros sistemas Windows. Parte 1
Etiquetas:
auditoria,
windows
0
comentarios
Buenas a todos, en el post de hoy comenzaremos una pequeña cadena de
posts para hablaros sobre la auditoría de eventos de los sistemas
operativos Windows.
La auditoría de eventos de seguridad de Windows es una funcionalidad del
sistema operativo muy eficaz que os ayudará a mantener la seguridad del
mismo, controlando aquellas situaciones anómalas que puedan suceder en
el entorno, dejando evidencia de todo ello en una serie de ficheros que
podréis salvar por si en el futuro fuese necesario recuperarlos, como
por ejemplo durante un análisis forense pericial.
Las directivas de auditoría nos permitirán especificar las categorías de
eventos de seguridad que deseamos monitorizar (o auditar en términos de
Microsoft).
Desde el visor de eventos del sistema podremos acceder a los registros de seguridad:


Si por ejemplo nos interesase monitorizar una carpeta, en la que los
usuarios de nuestro sistema almacenan información crítica, y así
controlar que ciertos usuarios no visualicen, copien, alteren o eliminen
sus contenidos, puede ser interesante habilitar la auditoría de eventos
sobre la misma.
Para activar la auditoría de eventos de seguridad sobre una carpeta
basta con acceder al menú de propiedades de la carpeta (botón derecho
del ratón), y pulsar sobre "Opciones avanzadas". A continuación haremos
clic sobre la pestaña "Auditoría":

Por razones de seguridad nos solicitará permisos de administración para realizar la activación:


Ahora agregaremos una nueva auditoría y seleccionaremos el tipo, carpetas y archivos a los que afectará y los permisos:


Si todo ha ido bien, desde el visor de eventos del sistema podremos controlar todos los eventos que afecten a nuestra carpeta:

Entre otras cosas, esta funcionalidad de Windows no permitirá auditar los siguientes eventos:
- Auditar eventos de inicio de sesión de cuenta
- Auditar la administración de cuentas
- Auditar el acceso del servicio de directorio
- Auditar eventos de inicio de sesión
- Auditar el acceso a objetos
- Auditar el cambio de directivas
- Auditar el uso de privilegios
- Auditar el seguimiento de procesos
- Auditar eventos del sistema
Si nuestros equipos son muy activos es probable que tengamos miles de
eventos diarios, por lo que será interesante acertar con la política de
almacenamiento de los logs, no sea que perdamos evidencias que en el
futuro podrían llegar a ser indispensables:

Los logs, se consolidan en la carpeta System32\winevt\Logs (captura realizada sobre Windows 8.1):

En el próximo post os enseñaremos algunos trucos para salvar estos logs y liberar espacio de nuestras máquinas.
Saludos!
Fuente: http://www.flu-project.com/2014/06/auditando-eventos-de-nuestros-sistemas.html
Kautilya 0.5.0 - Passwords in Plain, Exfiltrate SAM, Code Exec and more
Etiquetas:
cracking,
passwords,
windows
0
comentarios

Kautilya is a toolkit which provides various payloads for a Human
Interface Device which may help in breaking in a computer during
penetration tests.

List of Payloads
Windows
Gather
- Gather Information
- Hashdump and Exfiltrate
- Keylog and Exfiltrate
- Sniffer
- WLAN keys dump
- Get Target Credentials
- Dump LSA Secrets
- Dump passwords in plain
- Copy SAM (VSS)
- Dump Process Memory
- Dump Windows Vault Credentials
Execute
- Download and Execute
- Connect to Hotspot and Execute code
- Code Execution using Powershell
- Code Execution using DNS TXT queries
- Download and Execute PowerShell Script
- Execute ShellCode
Backdoor
- Sethc and Utilman backdoor
- Time based payload execution
- HTTP backdoor
- DNS TXT Backdoor
- Wireless Rogue AP
- Tracking Target Connectivity
Escalate
- Remove Update
- Forceful Browsing
Manage
- Add an admin user
- Change the default DNS server
- Edit the hosts file
- Add a user and Enable RDP
- Add a user and Enable Telnet
- Add a user and Enable Powershell Remoting
Misc
- Browse and Accept Java Signed Applet
- Speak on Target
Linux
- Download and Execute
- Reverse Shells using built in tools
- Code Execution
- DNS TXT Code Execution
- Perl reverse shell (MSF)
OSX
- Download and Execute
- DNS TXT Code Execution
- Perl Reverse Shell (MSF)
- Ruby Reverse Shell (MSF)
Payloads Compatibility
- The Windows payloads and modules are written mostly in powershell (in combination with native commands) and are tested on Windows 7 and Windows 8.
- The Linux payloads are mostly shell scripts (those installed by default) in combination with commands. These are tested on Ubuntu 11.
- The OS X payloads are shell scripts (those installed by default) with usage of native commands. Tested on OS X Lion running on a VMWare
0.5.0
- Added Execute Shellcode for Windows (under Execution menu).
- Added "Dump passwords in plain" for Windows (under Gather menu).
- Added "Copy SAM (VSS)" for Windows (under Gather menu).
- Added "Dump Process Memory" for Windows (under Gather menu).
- Added "Dump Windows Vault Credentials" for Windows (under Gather menu).
- Added "Add a user and Enable Powershell Remoting" for Windows (under Manage menu).
- Added support for Gems bundler.
- Added more banners of Kautilya.
Fuente: http://hack-tools.blackploit.com/2014/07/kautilya-050-passwords-in-plain.html
Detectar Máquinas Virtuales desde el registro de Windows
Etiquetas:
Forense,
virtuales,
windows
0
comentarios
En el transcurso de una revisión de
seguridad resulta muy útil descubrir si se está analizando un equipo
físico o una máquina virtual ya sea de VmWare, VirtualBox, QEMU o de
Windows Virtual PC ya que las pruebas a realizar varían sensiblemente si
se trata de una máquina virtual y es necesario tener presente que hay
que revisar el sistema que hace de anfitrión para comprobar su nivel de
seguridad o si es posible comprometer otras equipos con hardware virtual
presentes en dicho servidor host. También, sobre todo para los
desarrolladores de malware y virus, es diferente el comportamiento de
los bichos si se detecta que se está ante un equipo con hardware físico o
en una Sandbox, lo que puede indicar que se trata de un entorno aislado
de laboratorio donde se está analizando y destripando el comportamiento
de dicho código malicioso.
Aunque existen técnicas para ofuscar y ocultar los indicios más evidentes de una máquina virtual, el registro de Windows resulta de gran ayuda para reconocer fácilmente si se trata de un sistema físico o una máquina con el hardware virtualizado. El registro de Windows es una base de datos jerárquica que almacena los ajustes de configuración y opciones en los sistemas operativos Microsoft Windows. Contiene la configuración de todos los componentes de bajo nivel del sistema operativo, así como de las aplicaciones que se han instalado en la plataforma y la configuración del hardware que está disponible en el equipo como el disco duro, memoria RAM, tarjeta gráfica, etc.
Cualquier máquina virtual, al igual que un equipo real, dispone de disco duro, BIOS, tarjeta de red, tarjeta gráfica, etc que, permiten su identificación.
En un sistema Microsoft Windows es posible ejecutar el comando "reg query" y consultar el valor de determinadas claves del registro para comprobar e identificar equipos virtuales. Las claves de registro más significativas que permiten reconocer VMs son:
HKEY_LOCAL_MACHINE\System\CurrenControlSet\Services\Disk\Enum\0: esta clave de registro del tipo "valor de cadena" que guarda las características de todas las unidades de disco presentes en el equipo.
HKLM\Hardware\Description\System\BIOS: esta clave almacena los detalles de la BIOS del sistema, fabricante, versión, fecha de actualización, etc.
HKEY_LOCAL_MACHINE\SYSTEM\CurrentControlSet\Enum\PCI: aquí se localizan todos los dispositivos PCI de que dispone el sistema, es decir, la tarjeta gráfica, la tarjeta de red, etc.
HKEY_LOCAL_MACHINE\SYSTEM\CurrentControlSet\Enum\PCI\VEN_10DE&DEV_0DF4&SUBSYS_15F21043&REV_A1: es la clave de registro que contiene los datos e información referente a la tarjeta gráfica con el chipset nvidia, como, por ejemplo, una GeForce, etc.
HKEY_LOCAL_MACHINE\SYSTEM\CurrentControlSet\Enum\PCI\VEN_5333&DEV_8811&SUBSYS_00000000&REV_00: para tarjetas gráficas del tipo S3 Trio.
Por ejemplo, consultando el valor de la clave para identificar el disco duro "\Enum\0" se obtienen los respectivos resultados para un equipo con Windows 7 bajo VirtualBox, otro con hardware real y Windows 7 y un sistema bajo VmWare con Windows XP:
Aunque existen técnicas para ofuscar y ocultar los indicios más evidentes de una máquina virtual, el registro de Windows resulta de gran ayuda para reconocer fácilmente si se trata de un sistema físico o una máquina con el hardware virtualizado. El registro de Windows es una base de datos jerárquica que almacena los ajustes de configuración y opciones en los sistemas operativos Microsoft Windows. Contiene la configuración de todos los componentes de bajo nivel del sistema operativo, así como de las aplicaciones que se han instalado en la plataforma y la configuración del hardware que está disponible en el equipo como el disco duro, memoria RAM, tarjeta gráfica, etc.
Cualquier máquina virtual, al igual que un equipo real, dispone de disco duro, BIOS, tarjeta de red, tarjeta gráfica, etc que, permiten su identificación.
En un sistema Microsoft Windows es posible ejecutar el comando "reg query" y consultar el valor de determinadas claves del registro para comprobar e identificar equipos virtuales. Las claves de registro más significativas que permiten reconocer VMs son:
HKEY_LOCAL_MACHINE\System\CurrenControlSet\Services\Disk\Enum\0: esta clave de registro del tipo "valor de cadena" que guarda las características de todas las unidades de disco presentes en el equipo.
HKLM\Hardware\Description\System\BIOS: esta clave almacena los detalles de la BIOS del sistema, fabricante, versión, fecha de actualización, etc.
HKEY_LOCAL_MACHINE\SYSTEM\CurrentControlSet\Enum\PCI: aquí se localizan todos los dispositivos PCI de que dispone el sistema, es decir, la tarjeta gráfica, la tarjeta de red, etc.
HKEY_LOCAL_MACHINE\SYSTEM\CurrentControlSet\Enum\PCI\VEN_10DE&DEV_0DF4&SUBSYS_15F21043&REV_A1: es la clave de registro que contiene los datos e información referente a la tarjeta gráfica con el chipset nvidia, como, por ejemplo, una GeForce, etc.
HKEY_LOCAL_MACHINE\SYSTEM\CurrentControlSet\Enum\PCI\VEN_5333&DEV_8811&SUBSYS_00000000&REV_00: para tarjetas gráficas del tipo S3 Trio.
Por ejemplo, consultando el valor de la clave para identificar el disco duro "\Enum\0" se obtienen los respectivos resultados para un equipo con Windows 7 bajo VirtualBox, otro con hardware real y Windows 7 y un sistema bajo VmWare con Windows XP:
 c:\Hacktimes>reg query HKLM\System\CurrentControlSet\Services\Disk\Enum /v 0

 0    REG_SZ    IDE\DiskVBOX_HARDDISK_____________1.0_____\5&33d1638a&0&0.0.0
 0    REG_SZ    IDE\DiskHitachi_HTS547550A9E384_________JE3OA60A\5&875ff02&0&0.0.0
 0    REG_SZ    SCSI\Disk&Ven_VMware_&Prod_VMware_Virtual_S&Rev_1.0\4&5fcaafc&0&000
Fig 1. Captura del registro de Windows con la clave "\Enum\0" de un equipo físico
El Valor de las claves para ver la BIOS de un equipo real es:
 C:\hacktimes>reg query HKLM\Hardware\Description\System\BIOS

 HKEY_LOCAL_MACHINE\Hardware\Description\System\BIOS
 BiosMajorRelease    REG_DWORD    0x4
 BiosMinorRelease    REG_DWORD    0x6
 ECFirmwareMajorRelease    REG_DWORD    0xff
 ECFirmwareMinorRelease    REG_DWORD    0xff
 BaseBoardManufacturer    REG_SZ    ASUSTeK Computer Inc.
 BaseBoardProduct    REG_SZ    K53SV
 BaseBoardVersion    REG_SZ    1.0
 BIOSReleaseDate    REG_SZ    12/30/2011
 BIOSVendor    REG_SZ    American Megatrends Inc.
 BIOSVersion    REG_SZ    K53SV.324
 SystemFamily    REG_SZ    K
 SystemManufacturer    REG_SZ    ASUSTeK Computer Inc.
 SystemProductName    REG_SZ    K53SV
 SystemSKU    REG_SZ    To be filled by O.E.M.
 SystemVersion    REG_SZ    1.0
Otra forma de identificar una máquina virtual es
buscando drivers específicos como, por ejemplo, el driver para el ratón
de VmWare ("C:\Windows\System32\drivers\vmmouse.sys") o,
incluso, mediante la dirección MAC de la tarjeta de red. Si bien es
relativamente sencillo falsear y modificar la MAC Address de un equipo,
se puede utilizar como una comprobación adicional y complementaria al
resto de verificaciones anteriores del registro de Windows. Cada tarjeta
de red permite identificar al fabricante mediante los tres primeros
bytes de la dirección. Los fabricantes virtuales también tienen sus
propios identificadores como, por ejemplo:
 00:50:56 para Vmware
 08:00:20 para Oracle Corporation (VirtualBox)
 00:03:ff para Microsoft Corporation (Windows Virtual PC / Connectix)
 etc.
Por ejemplo, la configuración de la tarjeta de red en un equipo instalado bajo VirtualBox es:
 C:\hacktimes>ipconfig /all

 Configuración IP de Windows
 Host Name . . . . . . . . . . . . : hacktimes_w7
 Primary Dns Suffix  . . . . . . . :
 Node Type . . . . . . . . . . . . : Hybrid
 IP Routing Enabled. . . . . . . . : No
 WINS Proxy Enabled. . . . . . . . : No
 DNS Suffix Search List. . . . . . :
 Adaptador de Ethernet Conexión de área local:
 Connection-specific DNS Suffix  . :
 Description . . . . . . . . . . . : Adaptador de escritorio Intel (R) PRO/1000 MT
 Physical Address. . . . . . . . . : 08-00-20-53-21-79
 …
También se puede utilizar la aplicación PAFISH de Alberto Ortega (https://github.com/a0rtega/pafish)
que directamente consulta las diferentes claves del registro de Windows
que anteriormente se enumeraban y que permite reconocer fácilmente
equipos con VirtualBox o VmWare:
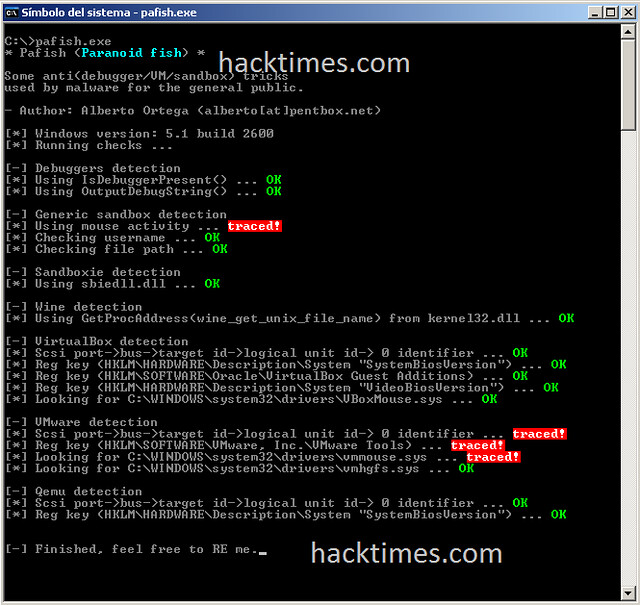
Fig 2. Captura de pantalla de la ejecución de PAFISH en un Windows 7 virtualizado con VmWare
PAFISH genera además un archivo .log con las
evidencias que ha encontrado y el resultado de las consultas a las
claves del registro que demuestran que se trata de una máquina virtual.
Para evitar la detección de un equipo virtualizado, lo primero es no instalar las "VmWare Tools" de VmWare o su equivalente en VirtualBox "Guest Addition" que, aunque mejoran el rendimiento de la VM, incluyen multitud de pistas en el Sistema Operativo huésped que hacen que se pueda detectar más fácilmente el hardware virtual. Tambien se puede editar el fichero ".vmx" que incluye la configuración de la máquina virtual e información relativa al tamaño del disco duro virtual, los dispositivos conectados, los datos de la tarjeta de red, etc. Es preciso añadir al archivo ".vmx" lo siguiente:
Para evitar la detección de un equipo virtualizado, lo primero es no instalar las "VmWare Tools" de VmWare o su equivalente en VirtualBox "Guest Addition" que, aunque mejoran el rendimiento de la VM, incluyen multitud de pistas en el Sistema Operativo huésped que hacen que se pueda detectar más fácilmente el hardware virtual. Tambien se puede editar el fichero ".vmx" que incluye la configuración de la máquina virtual e información relativa al tamaño del disco duro virtual, los dispositivos conectados, los datos de la tarjeta de red, etc. Es preciso añadir al archivo ".vmx" lo siguiente:
 isolation.tools.getPtrLocation.disable = "TRUE"
 isolation.tools.setPtrLocation.disable = "TRUE"
 isolation.tools.setVersion.disable = "TRUE"
 isolation.tools.getVersion.disable = "TRUE"
 monitor_control.disable_directexec = "TRUE"
 monitor_control.disable_chksimd = "TRUE"
 monitor_control.disable_ntreloc = "TRUE"
 monitor_control.disable_selfmod = "TRUE"
 monitor_control.disable_reloc = "TRUE"
 monitor_control.disable_btinout = "TRUE"
 monitor_control.disable_btmemspace = "TRUE"
 monitor_control.disable_btpriv = "TRUE"
 monitor_control.disable_btseg = "TRUE"
Más información en:
http://www.coffer.com/mac_find: buscador para identificar la dirección MAC de una tarjeta de red con el fabricante correspondiente.
http://www.hacktimes.com/introducci_n_al_an_lisis_forense_en_vmware: Introducción al análisis forense en VmWare.
http://www.coffer.com/mac_find: buscador para identificar la dirección MAC de una tarjeta de red con el fabricante correspondiente.
http://www.hacktimes.com/introducci_n_al_an_lisis_forense_en_vmware: Introducción al análisis forense en VmWare.
Fuente: http://www.hacktimes.com/detect_VMs/
Windows Logon Password – Get Windows Logon Password using Wdigest in Memory Dump (ingles)
Etiquetas:
cracking,
Forense,
otro idioma,
passwords,
windows
0
comentarios
1. Introduction
The former way to acquire the Windows logon password of user is to get a NTML hash value through the Windows logon session and registry then crack it. [Figure 1] shows the well-known ways to get a NTML hash value of user’s windows logon password. For more information, take a look at “Dump Windows password hashes efficiently” on http://bernardodamele.blogspot.kr/.
All of the obtained information using these methods is NTLM hash and it needs to be cracked with password crack tools. If the password is too long and even hard to crack, it is difficult to acquire the user’s Windows logon password. However, the tool called “Mimikatz” [1] has been announced in 2012 to solve the problem. It uses DLL injection on live status so that it can print out the user’s Windows logon password as a plaintext even though the password is long.
In this article, we’ll apply one of the methods used in “Mimikatz” called “extracting user’s Windows logon password using Wdigest” to memory dump, so we can help out the investigators with memory forensics.
2. Windows Authentication Package
Windows Authentication Package is one of the major components to implement the Windows security and it includes Lsass process context and DLLs executed in client’s process. The role of authentication DLL is to examine whether the user’s name is in agreement with the password. If the authentication information is consistent, it returns the user’s specific information to Lsass. Lsass create the token based on this. In typically, there are MSV1_0, TsPkg, Wdigest, LiveSSP, Kerberos, and SSP for windows authentication package and each package is carried out by various usage like Remote RDP, and Web service. It has a feature that it always carries the specific data in memory for Challenge-Response method. In this article, we will cover only Wdigest in Windows authentication package.
2.1 WDigest.dll
Wdigest.dll was first introduced in Windows XP system, and developed to authenticate the user in HTTP digest authentication and SASL (Simple Authentication Security Layer). This is used in digest authentication using Challenge-Response method as NTLM protocol. Also it transfers certificate through MD5 hash or message digest and it offers more improved security than before. However, to get a key for authentication, user’s plaintext password is necessary and it can be abused. [Figure 1] and [Table 2] explan the digest authentication architecture and the elements.

3. Extracting Windows logon password on live status
[Figure 2] shows the process of extraction of Windows logon password on live status using DLL injection in Wdigest.

The working process for each element of conducted function/dll during extraction is as follows.

LogonSessionCount pointer variable has the number of logon sessions, and LogonSessionList pointer variable has the address value of the first element among the logon session identifiers. Based on this, you can trace the Logon session list existing in system.


It calls out LsaEncryptMemory function internally, and [Figure 6] suggests the result of decrypted LsaEncryptMemory function.

With the result above, you can finally figure out that the LsaEncryptMemory function of Lsasrv.dll decrypt the encrypted password using pblV and 3DesKey handle value.
We tried to explain the whole working process so far. Anyone who wants to check out the working process through code, you can visit https://github.com/thomhastings/mimikatz-en/.
4. Extracting Windows Logon Information in memory dump
Before you extract the information, we will explain how to obtain windows logon password using WDigest in memory dump. Let’s take a look at [Table 3].
When you only refer to the contents of [Table 3], extracting password may look simple. However it has to go under complicated order to find and trace the value in memory dump. You can only access the memory dump file we have by physical address because the pointer value of dll is based on virtual address.
From now on, we will figure out how to extract the Windows Logon password in memory dump. First of all, you have to check out the parent process called PID of Lsass.exe to extract WDigest.dll and Lsasrv.dll. [Figure 7] shows the result of PID of Lsass.exe using pslist plugin of Volatility.

When Lsass.exe is being executed, it obtains the memory dump of Lsass.exe using memdump plugin to identify the value of allocated memory space. [Figure 8] shows the result of memory dump command of Lsass.exe, called PID488.

So far, we have tried to reduced the size of dump file we need to analyze to obtain the Windows Logon password by Lsass.exe memory dump, which has “whole memory dump -> every value to extract”. As we mentioned, Lsass.exe memory dump also can be accessed by physical address. So you have to create the memory map file for mapping of virtual address and physical address. [Figure 9] shows how to extract memory map of relevant memory dump with memmap plugin.

Next, you have to dump WDigest.dll, one of the dlls needed to extract Windows Logon password. [Figure 10] shows the command how to dump Wdigest.dll.

WDigest.dll has an address of encrypted password value, and you can check the very beginning address of the list out on I_LogSessList to trace it. It is made of LIST_ENTRY structure. [Figure 11] shows the stored value on I_LogSessList.

0x168D50 means the virtual address of the very first element of user’s logon session list. You have to find the space including the relevant address, and then identify the physical address of Lsass.exe memory dump file. [Figure 12] shows the searching of virtual address space including 0x168D50 in memory map file.

The space from size 0×00168000 to 0×1000 is mapped from 0x5c000 of Lsass.exe memory dump file. You can check the value by moving to 0x5C00 + (0x168D50 – 0x168D00) = 0x5CD50 from Lsass.exe physical memory dump. [Figure 13] shows the point of offset 0x5CD50 on WinHex.

On 0x5CD50, you can find the user account on 0×20. If you cannot find anything, you have to check the next 4 byte. In this memory dump, the user account is on the point 0x001C80A9. This point is 4 byte away from offset 0x5CD74. You can check it out in [Figure 14].

Now let’s move to point 0xBC000 + (0x1C80A8 – 0x1C8000) = 0xBC0A8 in Lsass.exe memory dump.You can identify the user account by unicode. This is shown in [Figure 15].

The encrypted Windows Logon password of user is on offset 0x5CD74 + 0×10, which has the user’s account information address. You can check the value of physical address 0x001A1DB8 of point 0x5CD84 in [Figure 13] like shown in [Figure 16],

If you move to point 0x95DB8 in Lsass.exe memory dump, you can find the hex value shown in [Figure 17]. That part refers to the encrypted user’s password achievable on WDigest. Because there is 0×00(NULL) in the middle, you can figure out that the actual valid value of encrypted user’s Windows logon password is by 0x95E23.

For next, you have to dump the Lsasrv.dll which is necessary to decrypt the user’s encrypted Windows logon password. [Figure 18] shows the result of dumped dll. The way of plugin command is same as WDigest.dll.

The handle value of 3DesKey is used during the process of decryption of LsaEncryptMemory function, and it is shown in [Figure 19]. However, what we actually need is the value of pbSecret instead of the handle value of 3DesKey. Because the final values to decrypt are composed of pbSecret, pbIV, and encrypted user’s Windows logon password. The value of pbSecret exists in the address of 3DesKey and the location of 0x3C.

By [Figure 20], you can see that 0×31000 is mapped to the physical address of 0xFB000.

As we mentioned, pbSecret exists right after the location of 0x3C. Therefore you need to move to 0XFB000 + 0x3C = 0xFB03C of Lsass.exe memory dump. As [Figure 21] shows, there is room of 4 byte in front of the address, and you can find the hex value right after that.

At last, you can figure out the pbIV value with just checking the first index value of array InitializationVector[4] of Lsasrv.dll. [Figure 22] shows the result of value of pbIV.

Last, you can check the actual user’s logon password through the 3Des and obtained value using Python. [Figure 23] is shows the relevant Python code.

[Figure 24] shows the result of executed code. You can decrypt the password even it is very long.

5. Volatility Plugin – logon
We created the Volatility plugin based on the method of extracting the Windows logon password from memory, which we introduced in this article before. In this chapter, we will briefly cover how the plugin works. Let’s take a look at the working order of plugin.
5.1. Memory dump of Lsass.exe, Wdigest.dll, and Lsasrv.dll
First, you need to extract some space to collect the most necessary information. In this plugin, we will dump the memory space of the process which owns the necessary space. [Figure 25] shows the function executing the dumping.

Each necessary image can be dumped by basic dump modules provided by Volatility. You can use the name of the images you need from the list so to automatically dump with filtering.
5.2. Extracting the name of user’s account
When extracting the name of user’s account from memory, you need to check the value of l_LogSessList+0×20(the address which has the name of user’s account as unicode). If the address is invalid, you have to check the address of 4 byte field to find the account. However, it is difficult to figure out which address has an account in which filed in plugin. Therefore you need to check the address value of specific space(4 byte * 3 times) first, and then move to that address to check if there is a valid character string and check if there is an account. When verifying a valid account, you have to follow the policy of Windows account name. [Figure 26] shows the routine to find the address which has account name.

Then you need to verify whether the account name corresponds to the saved value in the routine as shown in [Figure 27].

5.3. Extracting the encrypted password
There exists an encrypted password of relevant account in +0×10 away from the field which has the account name. Therefore when verifying the account name, if you find any valid account, you have to calculate the field address +0×10, where the account was found. Then you can extract and check the address value which has an encrypted password. As we mentioned in [Figure 17], the length of the character string of encrypted password is different from that of the encrypted password saved 4 byte before. So you have to do the extracting only by 0×00(NULL) in the relevant routine, and save the necessary value for the actual decryption. [Figure 28] shows the routine of extracting encrypted password.

5.4. Extracting the value of pbSecret
The pbSecret actually plays the key role during the process of decryption. You need to find pbSecret space with specific signature called “KSSM”, because the method you used in decompiling cannot be applied to find relevant value. The pbSecret has the length value of character string 16 byte after KSSM signature, and there exists a value of pbSecret right after it. [Figure 29] shows the routine of extracting the pbSecret.

5.5. Extracting the value of pbIV
You have to find the pbIV value through a specific signature as well as pbSecret. “DebugFlags” is recommended signature, and there is a value of 0×00 (NULL) between signature and pbIV value. The size information of pbIV is not saved, but you can extract the size of 16 byte or the value from relevant value to 0×00 (NULL). [Figure 30] shows the routine of extracting the pbIV.

5.6. Decrypting the password
When decrypting the password, you can use the Crypto function provided by Python. Initial vector (pbIV), key (pbSecret), and encrypted password are necessary. When the decryption using the 3DES algorithm is done, it deletes the dumps and every image files already used. [Figure 31] shows the routine of password decryption.

5.7. Plugin Result
[Figure 32] shows the result of executed relevant plugin.

You can download the plugin from the following address.
https://gitlab.kr/For-MD/volatility-plugin-logon/blob/master/logon.py
6. Conclusion
First of all, we will keep upgrading this tool and show you a new method according to the computing environment which is changing. The environment which uses 32 bit system is now turning into an environment which uses 64 bit system, and the application range of this plugin is 50:50. Therefore we will apply the method of extracting the Windows account information in 64 bit system, and also add a new function to extract the account information from various authentication packages to broaden the application range of plugin. Finally, it is a big question for us how to extract the authentication session, the Windows account information when authenticating the domain, and multiple users within the memory considering the Active Directory environment.
In this article, we covered how to extract the information of Windows account from memory image in the view of digital forensics. In terms of digital forensics, the former way using dll injection is not appropriate, because it is against the integrity of memory. However, by the method we introduced in this article, you can extract the information of Windows account only by using the memory image on offline. Therefore we presume that it can be helpfully used in the field of investigation or security incidents.
[1] Mimikatz : http://blog.gentilkiwi.com/mimikatz
[2] http://msdn.microsoft.com/en-us/library/windows/desktop/ff714510(v=vs.85).aspx
Fuente: http://articles.forensicfocus.com/2014/04/28/windows-logon-password-get-windows-logon-password-using-wdigest-in-memory-dump/
The former way to acquire the Windows logon password of user is to get a NTML hash value through the Windows logon session and registry then crack it. [Figure 1] shows the well-known ways to get a NTML hash value of user’s windows logon password. For more information, take a look at “Dump Windows password hashes efficiently” on http://bernardodamele.blogspot.kr/.
Table 1 Way of obtaining NTLM hash of user’s Windows logon password as per files
| Files | Ways of obtaining NTLM hash of password |
| SAM | Decrypt the value of SAM hive file |
| NTDS.DIT | Decrypt after extracting the database table of NTDS.DIT |
| NTDS.DIT /SAM | Use the password history of NTDS.DIT/SAM hive file |
| SECURITY | Decrypt LSA secret of SECURITY hive file |
| SECURITY | Use the cached domain logon information of SECURITY hive file |
| MSV1.0 | Use the credential information of Windows logon session |
All of the obtained information using these methods is NTLM hash and it needs to be cracked with password crack tools. If the password is too long and even hard to crack, it is difficult to acquire the user’s Windows logon password. However, the tool called “Mimikatz” [1] has been announced in 2012 to solve the problem. It uses DLL injection on live status so that it can print out the user’s Windows logon password as a plaintext even though the password is long.
In this article, we’ll apply one of the methods used in “Mimikatz” called “extracting user’s Windows logon password using Wdigest” to memory dump, so we can help out the investigators with memory forensics.
2. Windows Authentication Package
Windows Authentication Package is one of the major components to implement the Windows security and it includes Lsass process context and DLLs executed in client’s process. The role of authentication DLL is to examine whether the user’s name is in agreement with the password. If the authentication information is consistent, it returns the user’s specific information to Lsass. Lsass create the token based on this. In typically, there are MSV1_0, TsPkg, Wdigest, LiveSSP, Kerberos, and SSP for windows authentication package and each package is carried out by various usage like Remote RDP, and Web service. It has a feature that it always carries the specific data in memory for Challenge-Response method. In this article, we will cover only Wdigest in Windows authentication package.
2.1 WDigest.dll
Wdigest.dll was first introduced in Windows XP system, and developed to authenticate the user in HTTP digest authentication and SASL (Simple Authentication Security Layer). This is used in digest authentication using Challenge-Response method as NTLM protocol. Also it transfers certificate through MD5 hash or message digest and it offers more improved security than before. However, to get a key for authentication, user’s plaintext password is necessary and it can be abused. [Figure 1] and [Table 2] explan the digest authentication architecture and the elements.

Figure 1 Digest Authentication Architecture
Table 2 Digest Authentication Elements
| File | Explanation |
| Wdigest.dll | It works for SSP which is used for LDAP and Web authentication |
| Lsasrv.dll | Security service management of LSA (Security policy and behavior) |
| Secur32.dll | It works for application SSPI of user mode |
| Ksecdd.sys | It is used when kernel security device driver communicates with Lsass in user mode. |
3. Extracting Windows logon password on live status
[Figure 2] shows the process of extraction of Windows logon password on live status using DLL injection in Wdigest.

Figure 2 The process of extraction of Windows logon password on live status using Wdigest
The working process for each element of conducted function/dll during extraction is as follows.
- First, you have to collect the number of sessions and logon session identifiers (LUIDs) which exist in system through the LsaEnumerateLogonSessions function of Lsass. [Figure 3] is the LsaEnumerateLogonSessions function.

Figure 3 LsaEnumerateLogonSessions Function
LogonSessionCount pointer variable has the number of logon sessions, and LogonSessionList pointer variable has the address value of the first element among the logon session identifiers. Based on this, you can trace the Logon session list existing in system.
- I_LogSessList of Wdigest.dll is made of LIST_ENTRY structure, and it has use name, domain, encrypted password, domain DNS and so on written in Unicode character as well as Flink, Blink, and LUID.
- Afterward, you can decrypt the encrypted password obtained from I_LogSessList through LsaUnprotectedMemory function of Lsasrv.dll. [Figure 4] shows the LsaUnprotectedMemory function[2].

Figure 4 LsaUnprotectedMemory Function
- When the LsaUnProtectedMemory function is decompiled, it looks like [Figure 5].

Figure 5 Decompile the LsaUnprotectMemory Function
It calls out LsaEncryptMemory function internally, and [Figure 6] suggests the result of decrypted LsaEncryptMemory function.

Figure 6 Decompile the LsaEncryptMemory function
With the result above, you can finally figure out that the LsaEncryptMemory function of Lsasrv.dll decrypt the encrypted password using pblV and 3DesKey handle value.
We tried to explain the whole working process so far. Anyone who wants to check out the working process through code, you can visit https://github.com/thomhastings/mimikatz-en/.
4. Extracting Windows Logon Information in memory dump
Before you extract the information, we will explain how to obtain windows logon password using WDigest in memory dump. Let’s take a look at [Table 3].
Table 3 What you need to know
| Category | Explanation |
| dll needed | WDigest.dll : It has the address of encrypted password value.Lsasrv.dll : It is needed to decrypt the encrypted password. |
| value to find | WDigest.dll : The address of encrypted password value of l_LogSessListLsasrv.dll : The handle value of 3DesKey and pbIV value |
When you only refer to the contents of [Table 3], extracting password may look simple. However it has to go under complicated order to find and trace the value in memory dump. You can only access the memory dump file we have by physical address because the pointer value of dll is based on virtual address.
From now on, we will figure out how to extract the Windows Logon password in memory dump. First of all, you have to check out the parent process called PID of Lsass.exe to extract WDigest.dll and Lsasrv.dll. [Figure 7] shows the result of PID of Lsass.exe using pslist plugin of Volatility.

Figure 7 Check the PID of Lsass.exe
When Lsass.exe is being executed, it obtains the memory dump of Lsass.exe using memdump plugin to identify the value of allocated memory space. [Figure 8] shows the result of memory dump command of Lsass.exe, called PID488.

Figure 8 execution of Lsass.exe memory dump
So far, we have tried to reduced the size of dump file we need to analyze to obtain the Windows Logon password by Lsass.exe memory dump, which has “whole memory dump -> every value to extract”. As we mentioned, Lsass.exe memory dump also can be accessed by physical address. So you have to create the memory map file for mapping of virtual address and physical address. [Figure 9] shows how to extract memory map of relevant memory dump with memmap plugin.

Figure 9 Collecting Memory Map
Next, you have to dump WDigest.dll, one of the dlls needed to extract Windows Logon password. [Figure 10] shows the command how to dump Wdigest.dll.

Figure 10 WDigest.dll Dump
WDigest.dll has an address of encrypted password value, and you can check the very beginning address of the list out on I_LogSessList to trace it. It is made of LIST_ENTRY structure. [Figure 11] shows the stored value on I_LogSessList.

Figure 11 Identifying l_LogSessList
0x168D50 means the virtual address of the very first element of user’s logon session list. You have to find the space including the relevant address, and then identify the physical address of Lsass.exe memory dump file. [Figure 12] shows the searching of virtual address space including 0x168D50 in memory map file.

Figure 12 Searching the address including 0x168D50
The space from size 0×00168000 to 0×1000 is mapped from 0x5c000 of Lsass.exe memory dump file. You can check the value by moving to 0x5C00 + (0x168D50 – 0x168D00) = 0x5CD50 from Lsass.exe physical memory dump. [Figure 13] shows the point of offset 0x5CD50 on WinHex.

Figure 13 The Point of 0x5CD50 in Lsass.exe physical memory dump
On 0x5CD50, you can find the user account on 0×20. If you cannot find anything, you have to check the next 4 byte. In this memory dump, the user account is on the point 0x001C80A9. This point is 4 byte away from offset 0x5CD74. You can check it out in [Figure 14].

Figure 14 Searching the address including 0x001C80A8
Now let’s move to point 0xBC000 + (0x1C80A8 – 0x1C8000) = 0xBC0A8 in Lsass.exe memory dump.You can identify the user account by unicode. This is shown in [Figure 15].

Figure 15 Identifying User Account
The encrypted Windows Logon password of user is on offset 0x5CD74 + 0×10, which has the user’s account information address. You can check the value of physical address 0x001A1DB8 of point 0x5CD84 in [Figure 13] like shown in [Figure 16],

Figure 16 Searching The Address including 0x001A1DB8
If you move to point 0x95DB8 in Lsass.exe memory dump, you can find the hex value shown in [Figure 17]. That part refers to the encrypted user’s password achievable on WDigest. Because there is 0×00(NULL) in the middle, you can figure out that the actual valid value of encrypted user’s Windows logon password is by 0x95E23.

Figure 17 Encrypted User’s Windows Logon Password
For next, you have to dump the Lsasrv.dll which is necessary to decrypt the user’s encrypted Windows logon password. [Figure 18] shows the result of dumped dll. The way of plugin command is same as WDigest.dll.

Figure 18 Dump of Lsasrv.dll
The handle value of 3DesKey is used during the process of decryption of LsaEncryptMemory function, and it is shown in [Figure 19]. However, what we actually need is the value of pbSecret instead of the handle value of 3DesKey. Because the final values to decrypt are composed of pbSecret, pbIV, and encrypted user’s Windows logon password. The value of pbSecret exists in the address of 3DesKey and the location of 0x3C.

Figure 19 Address of 3DesKey
By [Figure 20], you can see that 0×31000 is mapped to the physical address of 0xFB000.

Figure 20 Searching the address including 0×310000
As we mentioned, pbSecret exists right after the location of 0x3C. Therefore you need to move to 0XFB000 + 0x3C = 0xFB03C of Lsass.exe memory dump. As [Figure 21] shows, there is room of 4 byte in front of the address, and you can find the hex value right after that.

Figure 21 The value of pbSecret
At last, you can figure out the pbIV value with just checking the first index value of array InitializationVector[4] of Lsasrv.dll. [Figure 22] shows the result of value of pbIV.

Figure 22 The value of pbIV
Last, you can check the actual user’s logon password through the 3Des and obtained value using Python. [Figure 23] is shows the relevant Python code.

Figure 23 Python code to decrypt the user’s password
[Figure 24] shows the result of executed code. You can decrypt the password even it is very long.

Figure 24 The result of executed code
5. Volatility Plugin – logon
We created the Volatility plugin based on the method of extracting the Windows logon password from memory, which we introduced in this article before. In this chapter, we will briefly cover how the plugin works. Let’s take a look at the working order of plugin.
5.1. Memory dump of Lsass.exe, Wdigest.dll, and Lsasrv.dll
First, you need to extract some space to collect the most necessary information. In this plugin, we will dump the memory space of the process which owns the necessary space. [Figure 25] shows the function executing the dumping.

Figure 25 dump() function
Each necessary image can be dumped by basic dump modules provided by Volatility. You can use the name of the images you need from the list so to automatically dump with filtering.
5.2. Extracting the name of user’s account
When extracting the name of user’s account from memory, you need to check the value of l_LogSessList+0×20(the address which has the name of user’s account as unicode). If the address is invalid, you have to check the address of 4 byte field to find the account. However, it is difficult to figure out which address has an account in which filed in plugin. Therefore you need to check the address value of specific space(4 byte * 3 times) first, and then move to that address to check if there is a valid character string and check if there is an account. When verifying a valid account, you have to follow the policy of Windows account name. [Figure 26] shows the routine to find the address which has account name.

Figure 26 Routine to find the address which has the account name
Then you need to verify whether the account name corresponds to the saved value in the routine as shown in [Figure 27].

Figure 27 Routine to verify the account name
5.3. Extracting the encrypted password
There exists an encrypted password of relevant account in +0×10 away from the field which has the account name. Therefore when verifying the account name, if you find any valid account, you have to calculate the field address +0×10, where the account was found. Then you can extract and check the address value which has an encrypted password. As we mentioned in [Figure 17], the length of the character string of encrypted password is different from that of the encrypted password saved 4 byte before. So you have to do the extracting only by 0×00(NULL) in the relevant routine, and save the necessary value for the actual decryption. [Figure 28] shows the routine of extracting encrypted password.

Figure 28 Routine to extract the encrypted password
5.4. Extracting the value of pbSecret
The pbSecret actually plays the key role during the process of decryption. You need to find pbSecret space with specific signature called “KSSM”, because the method you used in decompiling cannot be applied to find relevant value. The pbSecret has the length value of character string 16 byte after KSSM signature, and there exists a value of pbSecret right after it. [Figure 29] shows the routine of extracting the pbSecret.

Figure 29 Routine that extract the pbSecret
5.5. Extracting the value of pbIV
You have to find the pbIV value through a specific signature as well as pbSecret. “DebugFlags” is recommended signature, and there is a value of 0×00 (NULL) between signature and pbIV value. The size information of pbIV is not saved, but you can extract the size of 16 byte or the value from relevant value to 0×00 (NULL). [Figure 30] shows the routine of extracting the pbIV.

Figure 30 Routine that extract the pbIV
.5.6. Decrypting the password
When decrypting the password, you can use the Crypto function provided by Python. Initial vector (pbIV), key (pbSecret), and encrypted password are necessary. When the decryption using the 3DES algorithm is done, it deletes the dumps and every image files already used. [Figure 31] shows the routine of password decryption.

Figure 31 Decryption Routine
5.7. Plugin Result
[Figure 32] shows the result of executed relevant plugin.

Figure 32 The result of executed plugin
You can download the plugin from the following address.
https://gitlab.kr/For-MD/volatility-plugin-logon/blob/master/logon.py
6. Conclusion
First of all, we will keep upgrading this tool and show you a new method according to the computing environment which is changing. The environment which uses 32 bit system is now turning into an environment which uses 64 bit system, and the application range of this plugin is 50:50. Therefore we will apply the method of extracting the Windows account information in 64 bit system, and also add a new function to extract the account information from various authentication packages to broaden the application range of plugin. Finally, it is a big question for us how to extract the authentication session, the Windows account information when authenticating the domain, and multiple users within the memory considering the Active Directory environment.
In this article, we covered how to extract the information of Windows account from memory image in the view of digital forensics. In terms of digital forensics, the former way using dll injection is not appropriate, because it is against the integrity of memory. However, by the method we introduced in this article, you can extract the information of Windows account only by using the memory image on offline. Therefore we presume that it can be helpfully used in the field of investigation or security incidents.
[1] Mimikatz : http://blog.gentilkiwi.com/mimikatz
[2] http://msdn.microsoft.com/en-us/library/windows/desktop/ff714510(v=vs.85).aspx
Fuente: http://articles.forensicfocus.com/2014/04/28/windows-logon-password-get-windows-logon-password-using-wdigest-in-memory-dump/
Suscribirse a:
Entradas (Atom)

 Entradas


